Introducción
Por suerte, sustituir la batería del iPhone 4 requiere un desmontaje mínimo. Si tu batería está hinchada, [toma las precauciones adecuadas.
Para un rendimiento óptimo, después de completar esta guía, calibra tu batería recién instalada: Cárgala al 100% y sigue cargándola durante al menos dos horas más. A continuación, utiliza tu iPhone hasta que se apague por falta de batería. Por último, cárgalo ininterrumpidamente al 100%.
Qué necesitas
-
-
Apaga el iPhone antes de empezar el desmontaje.
-
La tapa trasera de tu teléfono puede tener dos tornillos Phillips del nº 1000 o tornillos "Pentalobe" de 5 puntas de Apple. Comprueba qué tornillos tienes y asegúrate de que también tienes el destornillador correcto para poder extraerlos.
-
Retira los dos tornillos Pentalobe o Phillips #000 de 3,6 mm situados junto al conector del dock.
-
-
-
Empuja el panel trasero hacia el borde superior del iPhone.
-
-
-
-
Retira el único tornillo Phillips de 1,5 mm que sujeta el conector de la batería a la placa lógica (si existe).
you do not need to take the battery out as chuck said so you dont run the risk of braking the battery connector socket from the logic board
Won't you need the battery removed to access the large-headed screws on the side which hold the front display?
Unfortunately the battery screw was already stripped probably from original assembly. We used a pair of nail clippers as pliers to grab a hold of the screw by the edges to turn it. If it hadn't have been for the stripped screw it would have taken us about 10 minutes, as it was it took us 30-40 minutes if you count searching for solutions for removing the stripped screw.
-
-
-
Utiliza el borde de una herramienta de apertura de plástico para hacer palanca suavemente y sacar el conector de batería de su zócalo en la placa lógica.
-
Retira el clip metálico que cubre el conector de la antena.
-
-
-
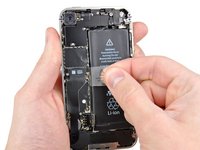
Tira hacia arriba de la pestaña de plástico transparente expuesta para despegar la batería del adhesivo que la sujeta al iPhone.
-
Si queda algo de solución alcohólica en el teléfono, límpiala con cuidado o deja que se seque al aire antes de instalar la nueva batería.
-
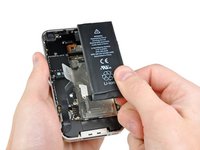
Extrae la batería.
-
Antes de reensamblarla, limpia los puntos de contacto entre metales con un desengrasante como el Windex. La grasa de tus dedos puede causar problemas de interferencias inalámbricas.
-
Realiza un reinicio completo después del reensamblaje. Esto puede evitar varios problemas y simplificar la resolución de problemas.
Note that the pull tab is not actually attached to the battery. It is attached to the iPhone chassis, and is only used to separate the battery from the adhesive. (Don't expect it to come out with the battery!)
Also, the adhesive is VERY strong. I had to use my plastic opening tool to assist in prying the battery loose. This is probably the most nerve-wracking part of the job.
It is much easier to slightly WARM the battery with a HAIRDRYER not a HEAT GUN to soften the adhesive. DO NOT GET BATTERY HOT AND DO NOT USE HEAT GUN
Joe -
I just did this today. Everything was as scripted. Mine had lots of adhesive and had to use plastic spudger to go around battery to loosen up. Do not use plastic tab until you can see under battery a little bit. Great instructions. Took less than 10 minutes.
The adhesive is very strong and I was initially worried about damaging the phone by prying so much. There are a couple of places below the volume switch where you can pry between the metal of the case and the battery. If you lift the battery just a little, wiggle the pry bar further in and then start moving down the case. Don't worry about bending the battery, its dead anyway.
Do not pry on the left side (circuit board side) and do not use the pull tab until the adhesive is broken loose.
I tried this at first with a plastic pry tool, and the adhesive was so strong that I broke the tool. I then used a large screwdriver and applied pressure very slowly along various places on the outer side of the battery. That eventually did the trick.
-


Compara la nueva pieza de repuesto con la pieza original; es posible que tengas que transferir los componentes restantes o retirar los adhesivos de la nueva pieza antes de instalarla.
Para volver a montar el dispositivo, sigue los pasos anteriores en orden inverso.
Lleve sus residuos electrónicos a un centro de reciclaje certificado.
¿La reparación no ha ido según lo previsto? Consulta nuestra Comunidad de respuestas para solucionar problemas.
Cancelar: No complete esta guía.
441 personas más completaron esta guía.
Un agradecimiento especial a estos traductores:
100%

¡ Mariana Roca nos está ayudando a reparar el mundo! ¿Quieres contribuir?
Empezar a traducir ›

12 comentarios
I actually had the plastic tab break off when I was trying to remove the battery. Any advice?
Na Aula,diz pra vc coloca álcool isopropílico 90% pra enfraquecer a cola do.
The plastic opening tools were amazing flimsy- the tips broke off both of them while trying to get the battery out.
The adhesive attaching the battery was very strong and the pull tab actually ripped, though it did not come off.
When I replace my battery for a new one it says accesory not permited or something like that, and I tried with every single battery I found (iphone 4 GSM, Iphone 4s..) is there something I could do? is the battery of iphone 4 CDMA Verizon different from others?
I have a Verizon iPhone 4. Got it the first day Verizon started selling them over 2 years ago. Followed the guide. Completed the task in 10 mins. The battery adhesive must have weakened some. Did not need to use pull tab at all. Just the pry tool along the outer side of battery as mentioned by other users. Thanks ifixit!! Saved me a contract slot. With a family of 4, that is a big savings.
Has anyone had trouble with the battery draining really really <i.e. 10% in 15 min> fast after removing the battery?
Directions posted above worked perfectly for me. The battery was glued in pretty tight (phone is a couple years old) but was able to pry it out with the tool, working my way around the edges. Total time about 10 minutes.
Thanks so much!
This was very easy. The plastic tab did breeak off, but it seemed brittle to begin with. I had to use the pry took to separate the bttery from the case, but it came out easily. Reassembly was a bit tricky getting the battery connection lined back into the logic board. Once it was properly aligned it went fast after that. I had ordered the "Liberation Kit" along with the battery and there was no extra cost for the "Kit". This was a great deal. THANK YOU iFixit for helping us peons to fix it ourselves!
The CDMA iPhone 4 battery replacement is quite easy especially if you get the ifixit tool kit with the battery. The tab did break quite easily a hair dryer (not a heat gun) on low helped soften the glue (warm up the battery to soften ) DO NOT BAKE! Took all of 10 Minutes.
Simple and straight forward replacement of battery. Right tools and step by step instructions took less than 10 minutes. IPhone 4 is up and running. $25 total with shipping versus $600 for a new phone and another BS contract with a wireless company where they screw you out of services and make you pay for things when you weren't paying for them before. Thank you Ifixit!
Read comments above before starting. Had no issues at all. Did not strip screw heads and battery was removed easily. Tools worked well and didn't break. Did not have to do a hard restart as well. Now, just need to drain the new battery to 10% so I can fully charge. Learn from others issues and avoid problems by reading the above.
today is 10/01/2020 and just had to replace a battery in this for a customer . Along with a screen and then a comport flex. I guess some folks still hold on to things they love .
Pra descarregar a bateria, antes de fazer o serviço, isso serve pra qualquer celular?
Gilmar Dutra - Contestar