Esta traducción podría no reflejar los cambios más recientes añadidos a la guía de referencia. Ayúdanos a actualizar la traducción o revisa la guía original.
Introducción
Usa esta guía para reemplazar la batería en tu teléfono inteligente Nexus 6P. Al volver a ensamblar, aplica adhesivo nuevo donde sea necesario.
Si tu batería está hinchada, toma precauciones apropiadas.
Qué necesitas
-
-
Usa una herramienta de expulsión de tarjeta SIM y remueve la bandeja de la tarjeta SIM.
-
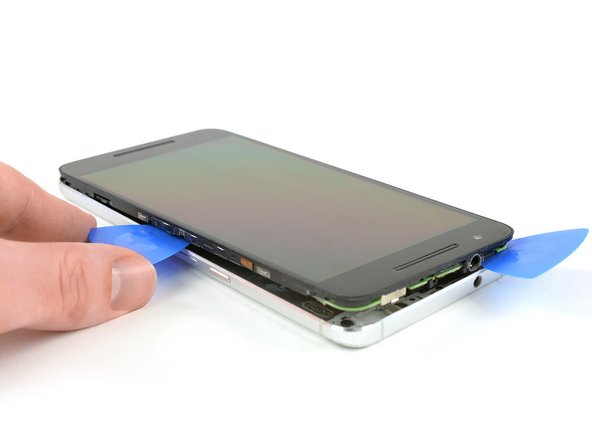
Usa un iOpener para aflojar el adhesivo por debajo de la tapa de plástico trasera en la parte inferior del teléfono.
-
-
-
Usa un iOpener para aflojar el adhesivo por debajo de la tapa de vidrio en la parte superior del teléfono.
-
Inserta un cuchillo entre el teléfono y la tapa de vidrio. Levanta la tapa de vidrio hasta que puedas insertar una púa de apertura.
-
-
-
-
Inserta una cuchilla entre la tapa trasera de metal y el vidrio frontal para crear un espacio. Insertar una púa de apertura en el espacio y deslízala hacia la esquina superior derecha.
-
Inserta una segunda púa de apertura y deslízala hacia la esquina superior izquierda.
-
Desliza las púas de aperturas a lo largo de los bordes para separar los clips de plástico que sujetan la tapa trasera y el marco medio.
-
Remueve la tapa trasera.
-
-
-
Desatornilla el tornillo Phillips #00.
-
Usa pinzas para remover la placa de metal.
-


Para volver a ensamblar tu dispositivo, sigue estas instrucciones en orden inverso. Al volver a ensamblar tu teléfono, aplica adhesivo nuevo donde sea necesario.
Tras completar esta guía, calibra la batería que acabas de instalar.
Para volver a ensamblar tu dispositivo, sigue estas instrucciones en orden inverso. Al volver a ensamblar tu teléfono, aplica adhesivo nuevo donde sea necesario.
Tras completar esta guía, calibra la batería que acabas de instalar.
Cancelar: No complete esta guía.
138 personas más completaron esta guía.
Un agradecimiento especial a estos traductores:
77%


Estos traductores nos están ayudando a reparar el mundo! ¿Quieres contribuir?
Empezar a traducir ›


37 comentarios
In case anyone is wondering, I was able to get the two small back covers to reassemble without using new adhesive. I didn’t have any on hand so I just used a heat gun to warm the adhesive that was left over and firmly held them in place. So far it seems to be holding well.
Adhesive? I’m wondering what kind of adhesive to use for reassembly?
Didn’t need any additional adhesive and the iopener worked fine for both loosening adhesive for disassembly and getting it sticky again for reassembly.. Managed not to break the glass camera cover!
any tips on using the iOpener for the top glass? It dosen’t seem to be helping me at all. :(
These were great instructions, but have to admit this was quite a hair-raising process because of the amount of heat that was required to soften the adhesive and the amount of force needed to pry things apart. Luckily, I have a digital hot air source (Sparkfun 303D) used for surface mount electronics. The safe temperature ended up being about 200 F. If I did it again would be much easier because I know the glass piece at the top is not as fragile as I thought. So, heat gun, definitely. iOpener would be next to useless, especially to loosen under battery. But be careful not to concentrate the heat and melt plastic or make glass crack. Adhesive under battery definitely reusable, easy to peel off old battery. Go slow with the whole process and it will be successful!