Introducción
Usa esta guia para cambiar completamente tu disco duro en tu mini.
Qué necesitas
-
-
Posiciona tus dedos en las depresiones marcadas en la cubierta inferior.
-
Rota la cubierta inferior en sentido contrario a las agujas del reloj hasta el el punto blanco pintado en la parte inferior esté alineado con el anillo inscripto en la carcasa exterior.
-
-
-
Remueve los dos T6 de 11.3mm tornillos Torx que aseguran el ventilador a la placa lógica cercanos a la bandeja de la antena.
-
-
-
Remueve el único tornillo Torx T6 de 3.5 mm que asegura la cubierta al disipador.
-
-
-
-
Remueve los siguientes tornillos que aseguran la chapa de la antena a la Mini:
-
Dos tornillos Torx T8 de 6.6 mm
-
Dos tornillos Torx T8 de 5.0 mm o tornillos Hexagonales de 2.0 mm (cualquier destornillador funcionará)
-
Cuando los coloques de vuelta juntos:
-
-
-
Usa el extremo plano de un spudger para extraer el conector del disco duro de su zócalo en la placa lógica.
-
-
-
Inserta la herramienta de extracción de la placa lógica de Mac mini en los dos orificios resaltados en rojo. Asegúrate de que haga contacto con el lado superior de la caja exterior debajo de la placa lógica antes de continuar.
-
Tira con cuidado de la herramienta hacia la placa de E/S. La placa lógica y el conjunto de la placa de E/S deben deslizarse ligeramente hacia afuera de la caja exterior.
-
Retira la herramienta de extracción de la placa lógica de Mac mini.
-
-
-
Al mismo tiempo, empuja los dos clips de plástico en el extremo izquierdo y derecho de la placa de E/S hacia el centro de la placa de E/S y retire la placa de E/S de la caja exterior.
-
Tira del conjunto de la placa lógica fuera de la caja externa hasta que el borde de la tarjeta de E/S esté a aproximadamente .5 "del borde de la caja exterior de aluminio.
-
-
-
Remueve la tira de cinta que conecta el cable del disco duro al disco duro.
-
Remueve el cable del disco duro tirando de su conector fuera del disco duro.
-
-
-
Remueve el cable del disco duro.
-
Remueve los dos tornillos Torx T8 de 6.2 mm del costado del disco duro.
-
-
-
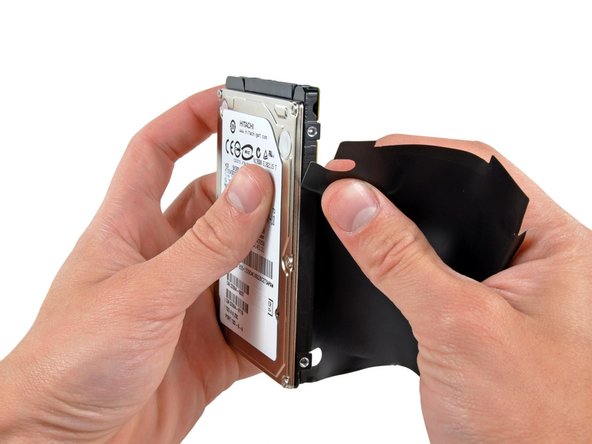
Con cuidado quita la cubierta del disco duro de la unidad.
-
Queda el disco duro.
-
Si estás instalando un disco duro nuevo, tenemos una guía de instalación de OS X para que puedas estar en funcionamiento.
-
Para re ensamblar tu dispositivo, sigue estas instrucciones en orden inverso.
Para re ensamblar tu dispositivo, sigue estas instrucciones en orden inverso.
Cancelar: No complete esta guía.
538 personas más completaron esta guía.
Un agradecimiento especial a estos traductores:
100%
¡ Sebastian Amoia nos está ayudando a reparar el mundo! ¿Quieres contribuir?
Empezar a traducir ›
78 comentarios
no need to remove the logic board! the disk comes out after step 12.
Also you do not really need to disconnect the antenna. Just be carefull no to break the wire.
i replaced 5400 rpm hdd with Samsung SSD 840 Pro
I did it Rober's way - thanks - no disconnecting antenna in step 10
Stopping after step 12 and replacing hard drive there without removing logic board
I put the sheet that was around the old hard drive over the new one - not sure if its needed?
After it is all done i did Command + R to do internet recovery and get OS X mountain lion on the blank drive
Last thing to do is go here to enable trim: http://www.groths.org/?page_id=322
royl123 -
Very helpful guide, thanks! As many have said before, I would not detach the fan or antenna, just move it out of the way.
One very trivial tip: slide a piece of paper over the logic board as soon as you've removed the fan, as a protection against accidentally touching the components with your fingers or tools.
I did not reinstall the plastic cover on the HDD. This is only to protect the logic board of the HDD, which ofcourse is very well protected in SSD's.
That depends which position the hard drive is in. If it's in the upper slot (ie at the 'top' of the enclosure when it's in use) then you will need to remove the logic board.
Dismantling the Mini was simple, but the two hardest steps when installing a new hard drive were sliding the drive back in aligned correctly, and replacing the antenna grill.
Even with the logic board pushed out, I found it difficult to line up the screws on the hard drive and get it seated properly. As for the grill, it would not line up with the screw holes. I had to use the Mac Mini tool hooked into a hole in the grill as a lever to lift it up and in towards the lip of the rim it was sitting on. There was an audible snap as it settled into place.


