Esta versión puede contener ediciones incorrectas. Cambie a la última instantánea verificada.
Introducción
Usa esta guía para reemplazar la batería en su HTC One M8.
'''Ten en cuenta que tu dispositivo puede tener una gran cantidad de blindaje de cobre y cinta que cubre la parte posterior del ensamblaje de la pantalla, como se muestra aquí. Si este es el caso, deberás eliminarlo con cuidado para llegar a la placa base ' '.
Qué necesitas
-
Este paso está sin traducir. Ayuda a traducirlo
-
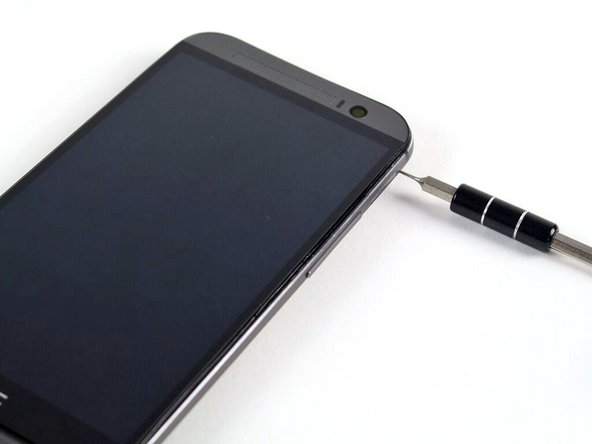
Insert a SIM card eject tool or a paperclip into the small hole in the SIM card tray, located on the upper left hand side of the phone.
-
Press to eject the tray.
-
-
Este paso está sin traducir. Ayuda a traducirlo
-
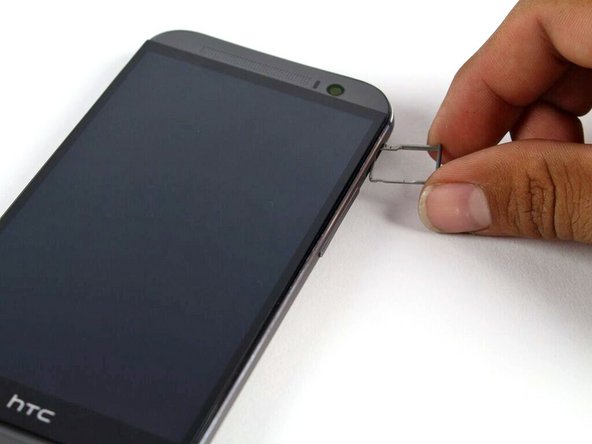
Remove the SIM card tray assembly from the HTC One M8.
-
-
Este paso está sin traducir. Ayuda a traducirlo
-
Insert a SIM card eject tool or a paperclip into the small hole in the microSD card tray, located on the upper right hand side of the phone.
-
Press to eject the tray.
-
-
Este paso está sin traducir. Ayuda a traducirlo
-
Remove the microSD card tray assembly from the HTC One M8.
-
-
Este paso está sin traducir. Ayuda a traducirlo
-
Use an iOpener or heat gun to loosen the adhesive on the upper and lower speaker grilles.
-
-
-
Este paso está sin traducir. Ayuda a traducirlo
-
Use a plastic opening tool to gently peel up the lower speaker grille.
-
-
Este paso está sin traducir. Ayuda a traducirlo
-
Use a plastic opening tool to gently peel up the upper speaker grille.
-
-
Este paso está sin traducir. Ayuda a traducirlo
-
Remove the two silver 3 mm Phillips #00 screws from the top.
-
Remove the four black 4 mm T5 Torx screws from the bottom.
-
-
Este paso está sin traducir. Ayuda a traducirlo
-
Work your way around the perimeter of the phone with a spudger and plastic opening picks to free the clips that secure the rear case to the display assembly.
-
-
Este paso está sin traducir. Ayuda a traducirlo
-
Remove the two silver 2 mm Phillips #00 screws securing the battery connector to the motherboard.
-
Use a plastic opening tool to gently pry up the battery connector.
-
-
Este paso está sin traducir. Ayuda a traducirlo
-
Use a spudger to disconnect the two (four) antenna cables.
-
Use the tip of a spudger to disconnect the seven ZIF connectors.
-
Use a pair of tweezers to gently pull the seven ribbon cables free of the connectors.
-
-
Este paso está sin traducir. Ayuda a traducirlo
-
Remove three silver 3mm screws using T5 screwdriver.
-
-
Este paso está sin traducir. Ayuda a traducirlo
-
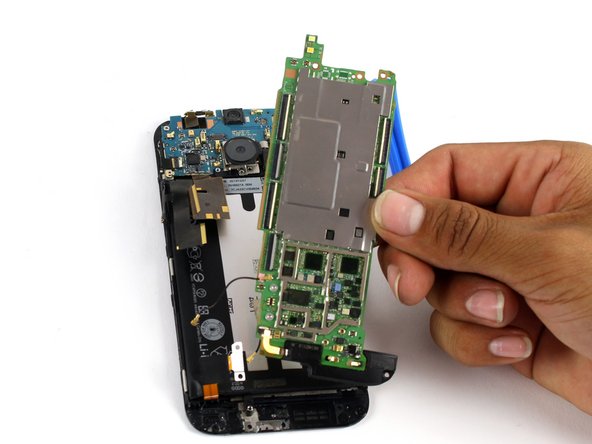
Use an iOpener or a heat gun to loosen up the adhesive securing the motherboard to the display assembly.
-
Use a plastic opening tool to gently pry the motherboard free of the display assembly.
-
-
-
Dobla con cuidado los cables planos y apártalos de la batería.
-
Usa un iOpener o pistola de calor para reblandecer el adhesivo que mantiene fija la batería al montaje de la pantalla.
-
Usa una herramienta de apertura de plástico para empujar la batería con cuidado y separarla del montaje de la pantalla
-


Para volver a ensamblar tu dispositivo, sigue estas instrucciones en orden inverso.
Para volver a ensamblar tu dispositivo, sigue estas instrucciones en orden inverso.
Cancelar: No complete esta guía.
125 personas más completaron esta guía.
Un agradecimiento especial a estos traductores:
100%


Estos traductores nos están ayudando a reparar el mundo! ¿Quieres contribuir?
Empezar a traducir ›
Equipo

Cal Poly, Team 5-9, Maness Spring 2015 Miembro de Cal Poly, Team 5-9, Maness Spring 2015
CPSU-MANESS-S15S5G9
4 Miembros
18 Guías creadas
33 comentarios
thanks for the instructions. i dropped my m8 and the power button wasnt responding at all and volume down wasnt either . i dissassembled the phone ( maybe i shouldnt have used my swiss army blade, left dents in plastic) using this guide..and pushed all the connectors into firmly and it worked again . thanks a bunch
I did not replace the adhesive: there's enough left to keep everything secure
zoccola zoccola
Hi, if there is a lot of tape is it necessary to replace it with new tape and copper shielding, and where can you get it please ?