Introducción
Estamos encantados de finalmente tener la oportunidad de desarmar un iPod Touch con una cámara y no solo una [guía|1158|ranura de cámara vacía|stepid=6204].
¡Este es uno de los tres desmontajes de iPod de esta semana! También desmontamos el nuevo
Error
Example:
[Namespace:Which Entity|Lo que quieres que la gente vea en la página]
Current text:
[[Tema:iPod Nano de 6.ª generación|iPod Nano]]
Error
Example:
[Namespace:Which Entity|Lo que quieres que la gente vea en la página]
Current text:
[[Tema:iPod Shuffle de 4.ª generación|Shuffle]]
En caso de que te lo hayas perdido, la semana pasada celebramos un hito importante. ¡Además de habilitar la reparación de Apple, ahora tenemos [enlace|/Game-Console-Parts|partes] y
Error
Example:
[Namespace:Which Entity|Lo que quieres que la gente vea en la página]
Current text:
[[Tema:Game_Console|manuales de reparación para la mayoría de las consolas de juegos]]
Error
Example:
[Namespace:Which Entity|Lo que quieres que la gente vea en la página]
Current text:
[[Tema:Retro_Game_Console|consolas retro]]
Complemento desvergonzado: ¡Financiamos desmontajes como este vendiendo iPod Touch Parts! También tenemos
Error
Example:
[Namespace:Which Entity|Lo que quieres que la gente vea en la página]
Current text:
[[Tema:iPod_Touch|manuales de reparación]]
Error
Example:
[Namespace:Which Entity|Lo que quieres que la gente vea en la página]
Current text:
[[Tema:iPod Touch 4.ª generación|este]]
Qué necesitas
-
-
¡Tenemos el nuevo iPod Touch en la mano!
-
El conjunto de funciones del nuevo Touch es sospechosamente similar al del iPhone 4:
-
Pantalla retina con resolución de 640 x 960 píxeles
-
Cámara trasera con grabación de video de 720p
-
Cámara frontal con grabación de video VGA
-
WiFi 802.11b/g/n
-
Chat de vídeo FaceTime
-
giroscopio de tres ejes
-
-
-
El nuevo Touch tiene una rejilla de altavoz visible en la parte inferior (a la izquierda del conector de base). En los iPod Touch anteriores, el audio externo simplemente salía del conector de base. Apple probablemente reforzó el altavoz para habilitar FaceTime on the Touch.
-
El nuevo Touch una vez más se ha reducido. Similar al iPhone 4, la parte posterior del Touch ahora es plana. A diferencia del iPhone 4, el iPod Touch aún cuenta con la misma parte posterior de acero inoxidable brillante que ha adornado todos los iPod Touch.
-
Pagamos $229 por nuestro Touch de 8 GB, lo que parece una buena oferta. Una Touch de 32 GB te costará $299 y una de 64 GB por $399.
-
Matemáticas falsas: en dólares por gigabyte, el Touch de 8 GB es una oferta terrible: $28.63/GB. Con el Touch de 64 GB, un gigabyte solo te costará $6.23.
-
¿Quieres que la lógica falsa vaya con nuestras matemáticas falsas? BusinessWeek tiene una columna falsa sobre cómo el iPod Touch cuesta $29 más que el iPhone 4.
-
-
-
El nuevo Touch (derecha) con su pantalla retina no se ve excepcionalmente notable en esta toma.
-
La pantalla retina presenta una resolución de 640x960. Comparado con el Touch anterior (320x480), eso es el doble de píxeles en cada dirección, o cuatro veces el total de píxeles.
-
La pantalla retina es casi completamente negra cuando está apagada. Eso es notablemente diferente de la pantalla del iPod Touch anterior (izquierda), que es gris oscuro cuando está apagado.
-
-
-
¡Cámaras!
-
Así es amigos, por fin el iPod Touch no tiene una, sino dos cámaras.
-
La cámara frontal es como la del iPhone 4, con soporte para fotos y videos de calidad VGA.
-
Desafortunadamente, la cámara trasera tiene una resolución de solo 960x720. Eso es sólo alrededor de 0,7 megapíxeles, en comparación con los 5 megapíxeles del iPhone 4. Es probable que Apple haya tenido que sacrificar la resolución de las fotos fijas para encajar la cámara en el delgado paquete del Touch.
-
Hay un orificio para el micrófono al lado de la cámara trasera. Apple actualizó la capacidad de entrada y salida de audio del nuevo Touch para permitirle jugar bien con FaceTime.
-
-
-
Basta de exterior, entremos...
-
No hay tornillos visibles. Tendremos que averiguar qué combinación de pegamento, pestañas y magia usó Apple para mantener unido el Touch.
-
Primero usamos una pistola de aire caliente para ablandar el adhesivo que sujeta el ensamblaje de la pantalla en su lugar.
-
Luego, pasamos una herramienta de apertura de iPod Touch alrededor del borde para separar el adhesivo.
-
-
-
Ese fue el iPod Touch más fácil que jamás hayamos descifrado. Con suerte, el interior seguirá siendo fácil de reparar.
-
El ensamblaje de la pantalla todavía está conectado al iPod, y desconectarlo no parece que vaya a ser fácil.
Hi guys. Thank you for taking the time for this tear down.
I am wondering if it is possible to remove the surrounding black rubber bezel between the screen and metallic frame at the moment of step 6?, step 8 after the screws?, or is it needed to be done until the end when you have it in bare bones.
Thank you guys in advance and greeting from Texas =)
-
-
-
Al igual que el iPhone 4, parece que el cristal frontal y el panel LCD están fusionados de forma permanente. La buena noticia es que esto evitará que el polvo entre debajo del vidrio, pero desafortunadamente hará que la reparación sea más costosa.
-
-
-
Hay un escudo EMI entre nosotros y el iPod. Afortunadamente, solo se mantiene en su lugar con unos pocos tornillos Phillips #00.
-
El escudo EMI es sorprendentemente pesado, con un peso de 11 gramos. Todo el iPod Touch pesa solo 101 gramos, lo que significa que Apple ha dedicado más del 10% del peso del iPod a este escudo de metal EMI.
-
-
-
-
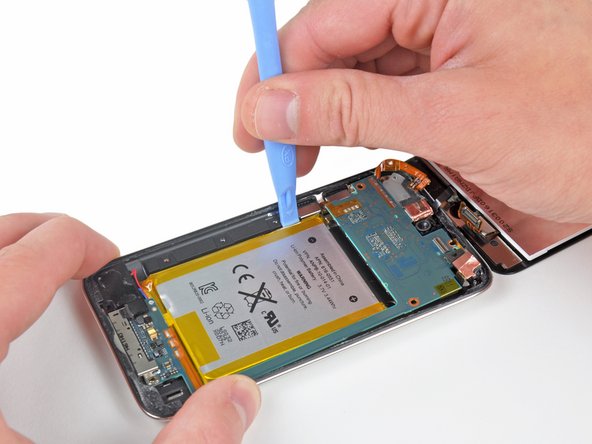
Después de quitar el escudo EMI, la batería ocupa un lugar destacado.
-
Apple afirma que obtendrás (hasta) 40 horas de reproducción de audio. ¡Eso es mucho tiempo!
-
Apple nos está obligando a investigar un poco para encontrar los chips. Este lado de la placa lógica es bastante estéril.
-
Contrariamente a las afirmaciones iniciales de Apple en su página de marketing de FaceTime, el iPod Touch no tiene vibrador. El sitio web de Apple se ha actualizado para eliminar este mensaje.
-
-
-
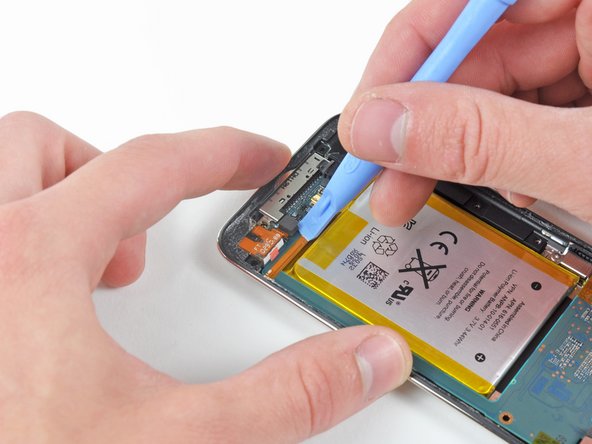
La batería indica una capacidad de 3,44 watios-hora.
-
Como todas las demás revisiones del iPod Touch (1ª gen - 2ª gen - 3ª gen), la batería está soldada a la placa lógica. Esto no es una sorpresa dado el factor de forma delgado del iPod, pero desearíamos que Apple facilitara el repuesto de la batería.
-
Afortunadamente, en comparación con el Touch de 3ª generación, Apple agregó más espacio entre los tres puntos de soldadura de la batería (en la cinta naranja justo a la izquierda de la batería). Esto debería facilitar un poco el trabajo de soldadura al reemplazar la batería, ya que hay menos posibilidades de puentear los contactos accidentalmente.
-
-
-
Aquí está el conector para auriculares solo. Observa el indicador de daño por líquido en la parte inferior de la pieza.
-
El conector para auriculares está estampado con Foxconn. Foxconn ha sido durante mucho tiempo uno de los principales fabricantes por contrato de Apple y esta parte tiene uno de los pocos indicios de que Apple en realidad no fabrica el iPod.
-
-
-
Después de sacar el ensamblaje de la placa lógica/batería/pantalla del panel posterior, finalmente podemos acceder a los tornillos que sujetan la cubierta del botón de volumen y el botón de suspensión.
-
Después de un buen rato de raspado lleno de ansiedad con un spudger de metal, el cable plano finalmente está libre del panel trasero.
The control cable can be replace ($6 part). Be careful to double check the orientation when re-soldering to the board. It's easy to put it on backwards.
guys i accidentally cracked the thin part of the logic board on the side it is completely screwed up or does it still have a chance?
Hi David,
This happened to me as well. I've had to order a new part, you can get it from China for cheap. Tried to find the item in my mail history, not sure of the name anymore.
Anyway in the end all was fixed, had to solder it on though. Remove old part completely.very frickely job since the two connection points are so close together. You need a small soldering iron and thread. In my case the solder flowed together and I resorted to cutting it apart with a knif directly after.
Keep your patience, and be careful not to break the new part as well.. it will work.
Rusty -
-
-
-
El ensamblaje de la pantalla del Touch mide 2,93 mm de grosor. Es un poco más delgada que la pantalla de 3,05 mm del iPhone 4 y un 30% más gruesa que la pantalla de 2,27 mm del nuevo iPod Nano.
-
-
-
En este punto, la cámara trasera se puede desconectar de la placa lógica.
-
A diferencia del iPhone 4, la cámara trasera del Touch de cuarta generación no es compatible con el enfoque automático y tiene una resolución mucho más baja.
-
Esta cámara mide 6,5 mm cuadrados por 3,3 mm de alto. Eso es dramáticamente más pequeño que la cámara trasera del iPhone 4.
-
Justo encima de la cámara trasera, el objeto cilíndrico plateado es el micrófono, una nueva característica de la línea iPod Touch.
-
-
-
Se puede acceder fácilmente a la cámara frontal y se puede desconectar de la placa lógica en este punto.
-
Como era de esperar, se parece a la cámara frontal del iPhone 4.
-
Esta cámara tiene un cuadrado de 4,9 mm y un grosor de 2,5 mm, ligeramente (0,3 mm) más delgada que la cámara frontal del iPhone 4.
-
-
-
A continuación, desconectamos la singular antena externa del Touch.
-
Se presume que esta antena se usa para la recepción de Wi-Fi y está situada cerca del panel de vidrio frontal cuando el Touch está completamente ensamblado. Su nueva ubicación elimina la necesidad de la "ventana" de plástico que se encuentra en el Touch de tercera generación.
-
-
-
¡Finalmente! Encontramos algunos chips importantes.
-
Este iPod cuenta con el mismo procesador A4 que se encuentra en el iPad y el iPhone 4. El chip Toshiba es muy similar al que estaba presente en el iPad en el desmontaje de la FCC, que fue reemplazado por uno de Samsung.
-
La marca clave en el procesador A4 es K4X2G643GE. Es idéntico a la marca que se encuentra en el procesador del iPad, pero diferente del procesador del iPhone 4. El iPad tiene 256 MB de RAM, mientras que el iPhone 4 cuenta con 512 MB. Desafortunadamente, esto significa que, al igual que el iPad, el nuevo iPod Touch incluye solo 256 MB de RAM.
-
La memoria flash NAND ahora la proporciona Toshiba, no Samsung como la del iPad.
-
Módulo WiFi Murata KM0727121
hey u review a ipod touch 4g 8GB, in the past the 8GB vercion have slower cpu and less ram... could u review an ipod touch 4G 64GB ? the may have more ram or even better cpu thanks!!
So what;s that little silver circle in the bottom right corner? There was some speculation that that thing was a vibrate motor? Can you at iFixit find out what it is? Is it a vibrate motor, but disabled until future use? Like bluetooth for the iPod touch 2G?
It is the microphone.
-
-
-
Hay algunos chips más en el otro extremo de la placa lógica.
-
En el extremo izquierdo hay un chip 338S0859. Es similar al códec de audio Cirrus Logic del iPhone 4 (338S0589).
-
El nuevo giroscopio AGD8 2032 es muy similar al del iPhone 4.
-
El chip 2032 33DH se encuentra junto al giroscopio. Parece que este chip estaba empaquetado en el mismo molde con el giroscopio en el iPhone 4. Este es el acelerómetro.
-
Puedes ver claramente los 30 pines del conector de base, ubicado justo debajo de la fila de chips.
Alguien que no le funcione el canal 'L' de los Audifonos??? Y que haya reparado este circuito???
What is the capacitor/ resistor to the right of the metal bracket and under the speaker terminals?
-
-
-
¿Qué es esto? ¿Espacio vacío?
-
No sabemos qué hace esta pieza de plástico blanco además de ocupar espacio. Tal vez sea un dispositivo para ahorrar peso.
In step 23 the person who was dismantling the iPod said they didnt know whats the white plastic thing for. To me it looks like an antena for wi-fi. It has built in metal dots and by the pictures it seems that it has conact with the ribbon which goes to the mobo.
It's definitely not an antenna, and there's no metal contained in/on it. It's just a chunk of white plastic; what you're seeing are shadows and/or adhesive residue.
oo right i see :) my bad then sorry :)
turb0 -
Since currently the only mic is at the back of the ipod touch. Is it possible to add a 2nd microphone at the place of the weight saving device to make it more like a phone? what about adding a 2nd speaker? I head the speak on board is very weak.
Try using an ear-bud/headphone with microphone in the jack next to the dock. Chances are it's a two-way (input and output). Or use a bluetooth mic. But the microphone as it is picks up quite well. I've recorded meetings in 10mX10m rooms.
Phil -
It's a part of the antenna. It keeps the space to the metal back
Yes, for better performance
Tom Chai -
Maybe that was supposed to be the vibrating unit?
Probably space for a vibrator for future generations
-
-
-
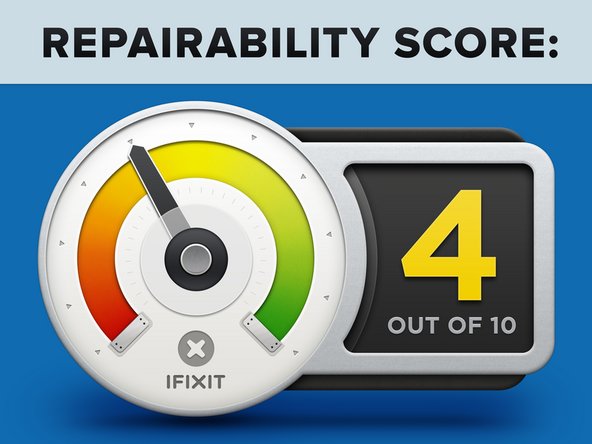
Capacidad de reparación del iPod Touch de 4.ª generación: 4 de 10 (10 es el más fácil de reparar)
-
Abrir el dispositivo es bastante sencillo, siempre y cuando tengas a mano una pistola de aire caliente y algunas herramientas de apertura del iPod Touch.
-
El conector para auriculares no está soldado a la placa lógica, por primera vez en la línea iPod Touch.
-
El vidrio frontal y la pantalla LCD están permanentemente fusionados, lo que aumenta el costo de reparar el vidrio frontal roto.
-
Quitar la pantalla por completo requiere quitar la placa lógica.
-
Apple soldó el botón de volumen y el cable del botón de suspensión a la placa lógica. El Touch anterior tenía un conector ZIF. Esto hace que quitar la placa lógica sea muy difícil.
-
La batería todavía está soldada a la placa lógica, al igual que los modelos anteriores.
Also bad: the display and RAM is not the same with iphone 4.
What is the name of that plate bolt that secures the flex cable on the power button?
My Iposestragou and went to repair this piece broke.
Where can I find it?
I covered the updated aspects of the powerhouse entertainment and communications handheld device from Apple called the iPod touch. It plays music and video like you would expect from an iPod--but also runs games and many of a myriad of apps designed for iPhone--and now takes pix and records video. It still lacks capabilities like GPS. Read more: http://bestapplecases.com/best-beautiful...
-


Un agradecimiento especial a estos traductores:
96%

¡ Francisco Javier Saiz Esteban nos está ayudando a reparar el mundo! ¿Quieres contribuir?
Empezar a traducir ›

27 comentarios
Very good Teardown! =)
But got still some open questions:
- What about the WiFi and Bluetooth Chip? Must be in the white case named "RV" on the logic board, as I see?
What about looking after the chip?
- Where's the gyroscope? On the iPhone 4 it's clearly visible as a big part, but here I can't find it.
- What about the microphone? Similar or identical to the iPhone 4?
Greetings
Marcel
Great guide! I'm a bit confused by the camera descriptions.
Which is "front"? The text seems inconsistent but it could
just be my confusion. When face-to-face with an iPod, the
camera on its *back* shows what's in front of you. Is that
the "front camera"?
.
- jam
Good question - we generally call the camera that is pointed toward you when you are looking at the LCD the front-facing camera. We generally call the back portion of most devices the rear case or rear bezel, thus the camera that is pointed toward the rear case/bezel is titled the rear-facing camera.
A couple of notes:
The copper tape on the back of the EMI shield is easily torn off. It doesn't seem to affect the unit but worth noting. When you lift the EMI shield lift it from the button end upwards, not from the side outwards to avoid tearing it.
Also, the camera shield plate which is attached to the top assembly neds to be replaced very carefuly to match the existing position otherwise when you come to reassemble the top you will not get a flush finish.
Finally, It is not neccessary to remove the whole logic board when replacing the LCD, you can remove the Camera screw, the WiFi screw and the right hand top logic board screw. Once they are removed the logic board will bend upwards about 8mm allowing you enough room to remove the old Digitizer connector and replacing the new one. It's rather fiddly but decidedly easier than removing the whole logic board.
Overall this is the hardest of the ipod touches to work on but still consdierably easier than disassembling the Nano range. Have Fun!
As the intro states, this is a teardown and should not be used as disassembly instructions. The repair guides for this device can be found here.
What is the name of that plate bolt that secures the flex cable on the power button?
My Iposestragou and went to repair this piece broke.
Where can I find it?
What is the name of that plate bolt that secures the flex cable on the power button?
My Iposestragou and went to repair this piece broke.
Where can I find it?
For anyone who is trying to take a 4. Generation iPod Touch produced 2012 late/2012, will have serious problems , as Apple did change the production towards glue and tape. They did especially tape the logic board onto the shield underside and if you are not aware of this, you definitely brake the flat cable connection between the volume buttons and the logic board. Also the volume button base plate is taped and NOT fixed with screws anymore. There are also more copper shields added to the device. The best would be, if iFixit does take apart the iPod Touch 4. Generation produced in 2012 and late/2012 as there are a lot less parts hold in place with screws. I would change the rating from difficult to extremely difficult.
Replaced the lcd/digitizer, and realized that I had torn the volume/power on flex cable in half. Then i found this website and actually found some good directions for teardown for this ipod touch. Since the flex cable was near the end portion of the teardown, i replaced the middle frame bezel because it had also cracked when my daughter broke the lcd screen. put back together and all worked like new.
About 7 dollars for the middle frame, 3 dollars for the flex cable and 35 dollars for the lcd/digitizer. The local store wanted 100$ plus parts to fix this. I found all parts on Amazon.
I would recommend putting a small piece of black electrical tape on the top side of the solder joint on the flex cable just to prevent shorting of the solder joint to the back of the lcd as a precaution. My soldering is not as good as factory. The key for this is to take your time. Took me about three hours.
Thanks for the good guide.
This is Accelerometer ic for screen rotation.
I covered the updated aspects of the powerhouse entertainment and communications handheld device from Apple called the iPod touch. It plays music and video like you would expect from an iPod--but also runs games and many of a myriad of apps designed for iPhone--and now takes pix and records video. It still lacks capabilities like GPS. Read more: http://bestapplecases.com/best-beautiful...
I started taking apart my iPod 4 and noticed that the battery is somewhat flexible. Should the battery be able to bend easily or is that a bad sign???
completely normal, try not to bend it though
um my wifi want connect all of a sudden i cheaked every thing an um i think it may be my wifi anttana can ifix that my self without changing it
i hate this hasdkfhkafhakjfd
when i was putting it back together and when i turn it on it give me the white screen of death any help plz?!!