Saltar al contenido principal

La Canon PowerShot SD700 IS se lanzó en febrero de 2006 y tiene muchas funciones, como 6,0 megapíxeles, zoom de 4,0x y pantalla LCD de 2,5 pulgadas.

Preguntas 2 Ver todo

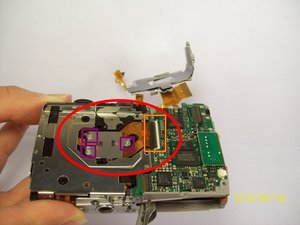
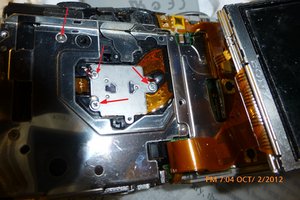
canon sd700 ccd replacement

any video that shows me how to replace sd700 CCD? I saw some of your documents for fixing sd700, but I am not sure if I can find DIRECT steps on replacing the CCD.

I am in a rush to fix the sd700, so I don't have time to buy spudger. What is the alternative? What kind of plastic opening tool can I get access to? credit card, plastic folder...?

Contestado! Ver respuesta Yo también tengo este problema

Es esta una buena pregunta?

Puntuación -1
Agregar un comentario

2 Respuestas

Solución Elegida

Ben, I just finished one of those cameras and I did not have to use a plastic opening tool. For most of it, my fingernails were good enough:) Follow this guideright up to step 17. Remove the 3 screws and the cable from the connector. That is your CCD. Hope this helps, good luck

Block Image

Fue útil esta respuesta?

Puntuación 0

8 comentarios:

Thanks for your sharing and especially the picture. It helps.

- de

Old, may I know what have caused you to change CCD? In my case, the LCD goes black on taking photos/video, but have no problem to replay. Still not sure if that is CCD issue or stuck shutter issue. Puzzled....

- de

Thank you for accepting my answer. I had black spots on my pictures and noted that the CCD was pitted. Usually, if it is your CCD the pictures show the problems even in replay as well as when they are printed out. Not sure if your problem is the CCD, because they should not turn out at all. It might just be more of a lens issue, causing your LCD to turn black.

- de

That is also what one technician is thinking. Instead of CCD issue, he thinks that it may be stuck shutter issue, or more in mechanical nature. As I speak, the camera works normally suddenly, but I know LCD screen will go black on me later in due time. It makes me wonder if I really need to do CCD surgery.

- de

Ben, if your pictures turn out okay when you download them, I would not change the CCD. You may start looking for a new lens, down the road, but for now to leave it alone is probably the best fix :-)

- de

Mostrar 3 comentarios más

Agregar un comentario

Block Image

Old, I have troubles opening up the screws at those red arrows in the attached picture. It is too small and very very tight. My screwdriver may be too big and too weak for them. I believe I must open those screws and nearby cable connectors in order to change CCD. See if you have any ideas. Thanks...

Fue útil esta respuesta?

Puntuación 0

3 comentarios:

Ben, the screw heads still look in good shape. I would suggest a new screwdriver set. This is something you will need a Phillips with good sharp edges. A good jewelers set will work. Some downward pressure and a quick left turn should loosen the screws. Yes, those are the ones to remove....

- de

Old, thanks for your suggestions. I successfully removed 2 screws out of 3 using a new set of #000 screwdrivers. The remaining one on the left top corner of the silver cover plate is very tight. That is a big trouble....

I am afraid that that screw is stripped when I was trying to remove it using other bigger screwdrivers. If that is stripped, do you have any suggestions on how to take it out?

Right next to the screws on the top of CCD silver cover plate, it appears that there are some material like glue. Do you need to remove it before changing CCD?

I also have a hard time to remove the cables from connectors. Can you give me hints on how to open that up? Hard to find anything that I can move in that connector.. :(

- de

Ben as for the wiring, the main connector has a clip that you move upward tho release the cable. Take a Look at at thisguide, step 16. To remove the stuck screw you may try a slightly bigger screwdriver, tap it onto the screw which maintains a downward pressure while turning the screwdriver. I sometimes use a relative heavy pairs of pliers to tab the back of the screwdriver into the screw head while turning it. Besides that, you could use some small set of sidecutters and see if there is enough room to get a good grip on the screw head to turn it out. If not, it;s Dremel time:-)

- de

Agregar un comentario

Añadir tu respuesta

Ben estará eternamente agradecido.
Ver Estadísticas:

Ultimas 24 horas: 0

Ultimos 7 días: 0

Ultimos 30 días: 2

Todo El Tiempo: 858