Saltar al contenido principal

Información y guías de reparación para la reparación del deshumidificador, un aparato que elimina la humedad del aire de su hogar.

Preguntas 45 Ver todo

Replacing the capacitor to the compressor in a dehumidifier

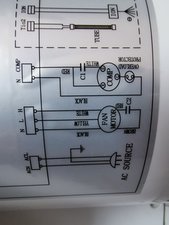
Seeking advice on replacing a capacitor to the compressor in an dehumidifier. The capacitor in question is a CBB61 3 wire 7uF 450V one, made New Tech. It is also rated at 50/60Hz

Block Image

I have searched all over the internet to try to find one which is of the same ratings, with 3 wires to allow for a straight swap, however 3 wire capacitors do not seem that common, especially at the above values. I am instead now looking to swap it for a 4 wire capacitor or 2 wire capacitor and was hoping for some advice on how to go about doing this. The capacitor has one wire from the dehumidifier's main board which connects into it. 2 wires, a red and white then lead away from the capacitor to connect to the compressor. Any advice would be greatly appreciated! thanks in advance J.

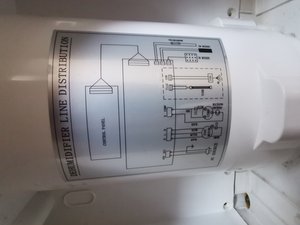
Edit: Extra photos of the ID sticker of EasyHome dehumidifier and the capcitor at a different angle

Block Image

Block Image

Block Image

Block Image

Block Image

Block Image

Block Image

Contestado! Ver respuesta Yo también tengo este problema

Es esta una buena pregunta?

Puntuación 4
9 comentarios

I think one of the wires is a ground wire

- de

@fegelein3290

Thank you Brayden for your reply, just as an aside, do you think it would be safe to bypass the ground wire if i use a 2 wire capacitor to replace this 3 wire one? Thanks in advance :)

- de

Yes, I believe it’s possible. In the picture I don’t see the third wire

- de

Hi @vishsapa ,

What is the make and model number of the dehumidifier?

- de

@jayeff Hi Jayeff, thank you for your reply,

The model is an EasyHome, A brand sold through Aldi in the UK. I will see if i can post a picture of its ID sticker

- de

Mostrar 4 comentarios más

Agregar un comentario

2 Respuestas

Solución Elegida

Hi @vishsapa,

Having the circuit really helps.

If you have an Ohmmeter, disconnect the two red wires from the 7uF capacitor and then measure across the two terminals where the reds were connected on the capacitor.

I believe they're the same point and you should read a short circuit between them The circuit shows a red wire into the capacitor and then a red wire from the same point on the capacitor into the compressor but obviously in reality the red wire runs from a different terminal connector, but is the same point.

Here's a supplier -example only of what you need. Just connect the two red wires to one end (they should be the same point in the capacitor) and the white wire to the other end leaving the terminal next to the white wire spare.

There may be other suppliers that suit you better. Just search for CBBI 61 7uF 450V capacitor to get results.

The only other CBBI 61 7uF capacitors that I found have wires coming from them and not quick connect terminal connectors which would mean that you would have to solder the two red wires to the wire at one end and the white wire to the wire at the other end. If you decide to do this then use heatshrink tubing to cover the soldered connection to provide good electrical insulation as electrician’s tape can come undone after prolonged use.

Fue útil esta respuesta?

Puntuación 3

2 comentarios:

Thank you so much Jayeff, il do just that and see what thr Ohmmeter says. Appreciate all your help and il reply back if i encounter any problems :)

- de

Part just arrived today and I have managed to fit and get the dehumidifier working again! Thank you so much to all who gave me advice, much appreciated. You've all helped to save one more appliance from disrepair and landfill!

- de

Agregar un comentario

@vishsapa there would most likely not be a ground to a plastic case and a plastic mounting base. We really need to see the whole capacitor. A third wire is unusual and we really would need to see all of your cap. I would go and use a capacitor like this to make it work.

Fue útil esta respuesta?

Puntuación 2

11 comentarios:

Hi Oldturkey03, thank you for your reply! I've put up a new image of the capcitor at a different angle to show all 3 wires. if you require any further pictures please let me know! i'm really keen to try and safe this dehumidifer and it would be a shame to scrap it for the sake of a single capacitor

- de

Hi @vishsapa ,

It is Aldi bar code number 20024882.

How long have you has the dehumidifier?

According to this link there is a 3 year guarantee on the product. So maybe check what it is for your location and if the guarantee period is still valid.

Have you proven that the capacitor is the problem or is it that it just won't start?

Also what's written under the "gunk" shown in the first image. There may be more info there that will help.

Usually motor capacitors are actually two capacitors, start and run which would make sense with the wiring you have. One capacitor in circuit to start the motor and when it runs up to speed usually there is a centrifugal switch in the motor which changes the circuit over to the run capacitor to maintain the motor running.

- de

Thank you for your reply Jayeff, unfortunately i bought the dehumidifier in 2015.

I've taken a look at the wiring, and there are two capacitors present.

The one which has had the "gunk" blow out, feeds a red and white wire directly into the compressor. The other smaller capacitor feeds a brown and separate red wire to the fan unit.

With the capcitor linked up, the fan and unit run otherwise fine, however as the compressor wont start, the unit doesnt extract any water any more and the water tank remains empty even after running for hours at a time.

Having traced the wires from the main motherboard, it appears that there are two wires which come from the main board and go into the same heat shrink tubing as the wires from failed capacitor. one of those wires, a red, goes into one of the end of the failed capacitor.

The other wire, a black, goes directly into the heat shrink wrap to the compressor.

- de

I have made a short video of the wiring and will upload this today. I just need to scale each clip to 30 seconds long and keep it under 100mb as per the forum guidelines

- de

@vishsapa The failed cap should be your motor start capacitor. It should be possible to adapt a 4 pole capacitor. Is it possible for you to post a picture straight from the bottom to see the cable shoe connectors?

- de

Mostrar 6 comentarios más

Agregar un comentario

Añadir tu respuesta

Vish Sapa estará eternamente agradecido.
Ver Estadísticas:

Ultimas 24 horas: 0

Ultimos 7 días: 1

Ultimos 30 días: 30

Todo El Tiempo: 4,076