Saltar al contenido principal

Repair guides and support for small electric personal space heaters.

Preguntas 20 Ver todo

Heater Sparks Then Shuts Off

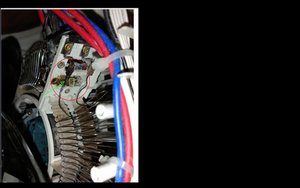
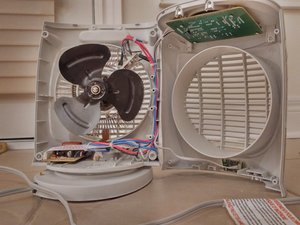
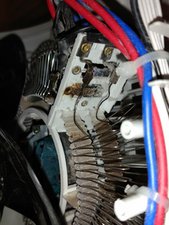
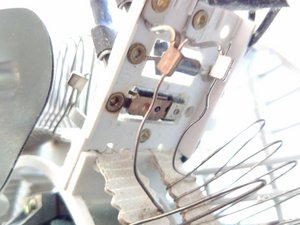
I have a Noma brand heater model: AFH302OTW. I recently disassembled the housing to vacuum all the dust inside that had accumulated over many years. After I reassembled the housing, a problem occurred. The heater would run for a short period of time, then a spark would occur next to the heating coil and the unit shuts off on its own. The fan is working and there is heat from the heating coil before it shuts down. If I unplug the unit and let it cool, it would turn on again for a short while until it shuts off again. I presume something is overloaded that is causing the safety switch to kick in, but I am puzzled which part failed. Could it be a faulty temperature sensor?

Block Image

Block Image

Block Image

Block Image

Newly added

Block Image

Block Image

Block Image

Contestado! Ver respuesta Yo también tengo este problema

Es esta una buena pregunta?

Puntuación 0
Agregar un comentario

2 Respuestas

Solución Elegida

Hi,

Here is an image taken from one of your images. ;-)

Block Image

(click on image to enlarge for better viewing)

Just so there is a better view, if you can, by using a soft brush could you please clean the area in the red circle? (power disconnected of course)

Also is the heater element wire shown by the green arrow actually touching the metal strip below? It seems very close. If it is I don't think that it should be.

The connection shown in the yellow square, is it a dry joint wire? I don't particularly like seeing 'holes' when a wire is supposed to be terminated correctly

Fue útil esta respuesta?

Puntuación 2

4 comentarios:

See image after cleaning.

The heater element wire is not touching the metal strip. Sorry the angle of the photo made them appear touching.

Sorry not sure what you mean by dry joint wire.

- de

Hi,

A dry joint wire is when a wire has been incorrectly soldered to a connection point. Usually, in the case of a wire being passed through a hole and then soldered on the other side to a connection point, not only is the wire soldered onto the connection point but the hole through which it passes is also filled with solder. This prevents the wire from moving if the contact point of the wire becomes loose thereby maintaining an electrical connection. It is called a dry joint because the solder has not been applied correctly allowing the wire to potentially disconnect and open the circuit. Very frustrating to find as it may cause intermittent connections as the wire will move due to vibrations etc. Good connection one minute bad the next.

Although now that you've cleaned up the area (thank you) it appears that it wasn't what I thought .

I believe that @oldturkey03 is right and that there is a problem with the diodes, judging by the scorch marks on the pcb.

- de

So it's a diode failure that caused the spark and the safety switch to kick in? I guess I'll have to check the diodes. Thank you all for your helpful inputs!

- de

Eddie Yeung yes, it could have been the diodes but it can always be something else. At first you want to replace those (always order more than you think you need) and then check it out again.

- de

Agregar un comentario

Eddie Yeung this sounds like your limit thermostat is turning of the unit. Post some images of it disassembled so we can see what you see. Use this guide Agregar imágenes a una pregunta existente for that

Update (03/17/2018)

Eddie Yeung looks like the diodes (Zener diodes as well) have failed. Those are most likely part of the rectifier circuit for your heater. The only way to fix that would be by carefully desoldering those and take a look at them to identify which diodes these are. Again, do feel free to add images of those if you are having trouble identifying them.

On the same image that @jayeff pointed out, can you identify that there is a resistor or similar between the contacts?

Fue útil esta respuesta?

Puntuación 2

2 comentarios:

Eddie Yeung post some images of the PCB, specifically the one in your 1st picture bottom left of your heater.

- de

PCB photo added.

- de

Agregar un comentario

Añadir tu respuesta

Eddie Yeung estará eternamente agradecido.
Ver Estadísticas:

Ultimas 24 horas: 2

Ultimos 7 días: 15

Ultimos 30 días: 65

Todo El Tiempo: 8,911