Saltar al contenido principal

Reemplazo de la rueda de Click del iPod Nano 5ª Generación

Qué necesitas

  1. Reemplazo de la rueda de Click del iPod Nano 5ª Generación, Rueda de Click: paso 1, imagen 1 de 3 Reemplazo de la rueda de Click del iPod Nano 5ª Generación, Rueda de Click: paso 1, imagen 2 de 3 Reemplazo de la rueda de Click del iPod Nano 5ª Generación, Rueda de Click: paso 1, imagen 3 de 3
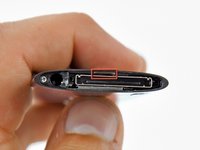
    • Usa una pistola de calor para ablandar el adhesivo debajo del marco de plástico en la parte inferior del iPod.

    • Usa un ajuste de calor bajo y no sostengas la pistola de aire caliente en su lugar por mucho tiempo para evitar derretir el bisel de plástico.

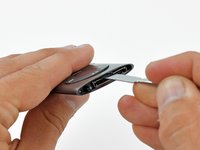
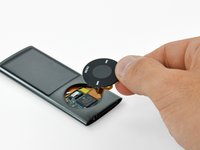
    • Usa una herramienta de abertura de plástico para hacer palanca en el bisel de la carcasa del iPod y retíralo.

  2. Reemplazo de la rueda de Click del iPod Nano 5ª Generación: paso 2, imagen 1 de 3 Reemplazo de la rueda de Click del iPod Nano 5ª Generación: paso 2, imagen 2 de 3 Reemplazo de la rueda de Click del iPod Nano 5ª Generación: paso 2, imagen 3 de 3
    • Desatornilla dos tornillos del retenedor de metal en la parte inferior del iPod:

    • Tornillo Phillips en ángulo de 4,4 mm

    • Tornillo Phillips de 5,4 mm.

    • Incluso si están flojos, es posible que los tornillos no salgan solos. Asegúrate de no perder los tornillos al quitar el retenedor.

    • Usa una herramienta de apertura de plástico para hacer palanca en el retenedor de metal de la parte inferior del iPod y retíralo.

  3. Reemplazo de la rueda de Click del iPod Nano 5ª Generación: paso 3, imagen 1 de 2 Reemplazo de la rueda de Click del iPod Nano 5ª Generación: paso 3, imagen 2 de 2
    • Inserta un spudger de metal en la ranura en la parte inferior del iPod, justo encima del conector de base.

    • Usa el spudger de metal para levantar el borde inferior de la rueda de clic.

  4. Reemplazo de la rueda de Click del iPod Nano 5ª Generación: paso 4, imagen 1 de 2 Reemplazo de la rueda de Click del iPod Nano 5ª Generación: paso 4, imagen 2 de 2
    • Coloca una púa de guitarra entre la rueda de clic y la carcasa del Nano y retira el spudger de metal.

    • Haz palanca en los bordes de la rueda de clic con la púa de guitarra hasta que la rueda de clic se suelte del estuche.

    • No intentes quitar completamente la rueda de clic todavía, ya que todavía se mantiene en su lugar mediante un cable plano.

  5. Reemplazo de la rueda de Click del iPod Nano 5ª Generación: paso 5, imagen 1 de 2 Reemplazo de la rueda de Click del iPod Nano 5ª Generación: paso 5, imagen 2 de 2
    • Levanta la rueda de clic para quitarla del camino con una mano y usa una herramienta de apertura de plástico para sacar el conector del cable plano de la rueda de clic de su zócalo en la placa lógica.

    • Retira la rueda de clic.

Conclusión

Para volver a armar tu dispositivo, sigue estas instrucciones en orden inverso.

44 personas más completaron esta guía.

Un agradecimiento especial a estos traductores:

en es

100%

Estos traductores nos están ayudando a reparar el mundo! ¿Quieres contribuir?
Empezar a traducir ›

David Hodson

Miembro Desde 04/13/10

150,358 Reputación

127 Guías creadas

14 comentarios

I just replaced the click wheel on my iPod Nano 5th Gen and I found that this guide could be better. The reason is that the bottom edge of the click wheel is held in place by the same metal bracket that surrounds the connector port at the bottom of the iPod. So, before you remove the click wheel I recommend performing the following three steps:

1. Remove the plastic cover at the bottom of the iPod

2. Unscrew the two screws on either side of the connector port. Of the three screws at the bottom of the iPod, these are the middle and right hand screws as you look at the front of the iPod.

3. Remove the metal bracket that surrounds the connector port of the iPod.

After replacing the click wheel, perform the above three steps in reverse order. Make sure that when the metal bracket is re-inserted that it secures the click wheel and prevents it from falling out as some people have experienced after replacing the click wheel.

slith - Contestar

I discovered the same solution after having destroyed one wheel by trying to pry it out without taking out that bottom bezel.That should definitely be the first step in this guide.

garyvirago -

PLEASE READ slith's comment, it's extremely important, or you will not be able to get the click wheel installed. There are notches on the click wheel that have to go in at the top and bottom, but the bottom notch is PART OF THE GREY METAL BRACKET that you take out of the bottom of the iPod. DO NOT re-install the grey bracket at the bottom until you have installed the replacement click wheel, otherwise the wheel will not go in.

Thanks slith, I just wanted to emphasize this because I screwed up quite a few of these click wheels before I read your comment.

no way -

Agreed. I ended up breaking 3 of my six tabs. It works but the wheel isn't quite flush now. Wish I'd looked at the tear down instructions first. That should be at the top of the list as well. This description just isn't at all complete.

mwm1962 - Contestar

I agree with the other notes please see step 3 BEFORE 1&2

Keith - Contestar

Agregar Comentario

Ver Estadísticas:

Ultimas 24 horas: 4

Ultimos 7 días: 20

Ultimos 30 días: 99

Todo El Tiempo: 68,671