Saltar al contenido principal

Esta versión puede contener ediciones incorrectas. Cambie a la última instantánea verificada.

Qué necesitas

  1. , Panel trasero: paso 1, imagen 1 de 1
    • Antes de desarmar tu iPhone, asegurate que este apagado.

    • Remueve los dos tornillos Pentalobe P2 de 3.6 mm localizados en las esquinas del conector dock.

    • El Destornillador de 5-Puntas solo debe ser utilizado una vez porque tiene la posibilidad de barrer el tornillo.

  2. : paso 2, imagen 1 de 2 : paso 2, imagen 2 de 2
    • Presiona el panel trasero hacia la parte superior del iPhone.

    • El panel debe moverse cerca de 2 mm.

  3. : paso 3, imagen 1 de 1
    • Separe el panel posterior de la parte posterior del iPhone, teniendo cuidado de no dañar los clips de plástico unidos al panel posterior.

    • Retire el panel posterior del iPhone.

  4. , Bateria: paso 4, imagen 1 de 2 , Bateria: paso 4, imagen 2 de 2
    • Remueve los siguientes tornillos asegurando el conector de la batería a la tarjeta lógica

    • Un tornillo Phillips de 1.7 mm

    • Un tornillo Phillips de 1.5 mm

  5. : paso 5, imagen 1 de 3 : paso 5, imagen 2 de 3 : paso 5, imagen 3 de 3
    • Cuidadosamente empuja el contacto de presión lejos del conector de la batería hasta que se desliza libremente de su posición.

    • Remueve el contacto de presión.

  6. : paso 6, imagen 1 de 3 : paso 6, imagen 2 de 3 : paso 6, imagen 3 de 3
    • Usa una herramienta de apertura de plástico para levantar el conector de la batería del zócalo en la placa lógica.

    • Pon la punta de la herramienta entre la carcasa del altavoz y la cubierta de metal del conector, y levanta el borde inferior del conector primero.

    • El conector de la batería se desconecta verticalmente de la placa lógica. No apliques fuerza del costado.

    • Se cuidadoso de no hacer palanca en el zocalo del conector de la batería, o puede que se despegue de la placa lógica. Hay unos cuatro puntos de soldadura muy pequeños esperando este error!

  7. , Consejo de re-ensamble: paso 7, imagen 1 de 2 , Consejo de re-ensamble: paso 7, imagen 2 de 2
    • Durante el re-ensamble, asegura de posicionar cuidadosamente el contacto de presión en su lugar. Debería estar encima del poste el tornillo Phillips mostrado, y el contacto dorado debería apuntar hacia el conector de la batería.

    • Asegúrate de limpiar el contacto de presión con un desengrasante como windex o alcohol isopropílico. El aceite en tus dedos tiene el potencial de crear interferencia inalámbrica.

  8. : paso 8, imagen 1 de 2 : paso 8, imagen 2 de 2
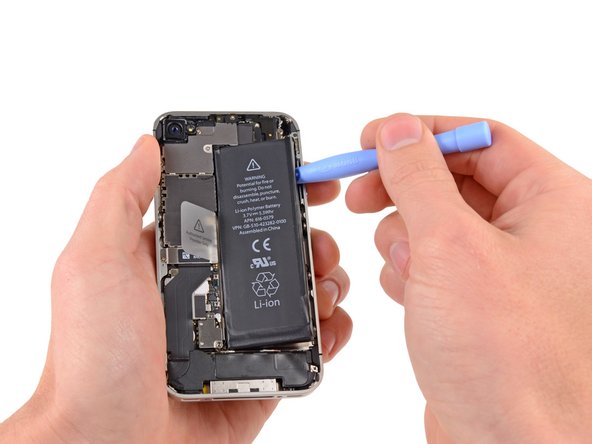
    • Inserta el borde de una herramienta de apertura de plástico entre la batería y la carcasa exterior cerca del borde inferior del iPhone.

    • Corre la herramienta de apertura de plástico junto el borde derecho de la batería y has palanca en varios puntos para separar completamente del adhesivo asegurándola a la carcasa exterior.

    • Si el adhesivo es muy fuerte, aplica unas gotas de alcohol isopropílico de alta concentración (mayor al 90%) debajo el borde de la batería.

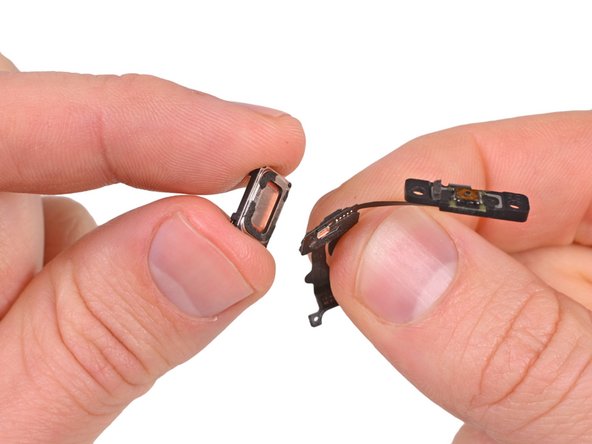
    • Espera por alrededor de un minuto para que el alcohol debilite el adhesivo.

    • Usa el lado plano de una herramienta de apertura de plástico para levantar gentilmente la batería.

    • No trates de levantar forzosamente la batería. Si es necesario, aplica unas gotas mas de alcohol para debilitar aun mas el adhesivo. Nunca deformes o perfores la batería con tu herramienta de palanca.

    • Si hay algún resto de alcohol en el teléfono, límpialo cuidadosamente o deja que seque antes de instalar tu batería nueva.

  9. : paso 9, imagen 1 de 2 : paso 9, imagen 2 de 2
    • Usa la lengüeta de plástico trasparente para despegar la batería del adhesivo asegurandola al iPhone.

    • Se cuidadoso de no jalar la lengüeta de plástico muy fuerte debido a que puede arrancar muy fácilmente.

    • Remueve la bateria.

    • Si tu batería de remplazo vino en una funda de plástico, retirala antes de la instalación para separarla del cable plano

    • Si tu batería de remplazo vino con un cable que no esta plegado, cuidadosamente pliega el cable en una forma apropiada antes de instalar la batería en el teléfono.

    • Mientras instalas la batería de remplazo, conecta temporalmente el conector de la batería al teléfono para asegurar un alineamiento propio. Una vez la batería este pegada en su lugar, desconecta el conector de la batería.

    • Realiza un reinicio forzado después del re-ensamble. Esto puede prevenir muchos problemas y simplificar la solución de problemas básicos.

  10. , Cable del Conector Dock: paso 10, imagen 1 de 2 , Cable del Conector Dock: paso 10, imagen 2 de 2
    • Retira los siguientes tornillos sosteniendo la cubierta del cable del conector dock a la placa lógica

    • Un tornillo Phillips de 1.5 mm

    • Un tornillo Phillips de 1.2 mm

    • Retira la cubierta metálica del cable del conector dock

  11. : paso 11, imagen 1 de 1
    • Usa el borde de una herramienta de apertura plástica para desconectar el cable del conector dock de su socket en la placa lógica

  12. : paso 12, imagen 1 de 1
    • Despega el cable del conector dock del adhesivo que lo asegura a la placa lógica y al lado del ensamblaje de la bocina.

  13. : paso 13, imagen 1 de 2 : paso 13, imagen 2 de 2
    • Usa el borde de una herramienta de apertura plástica para desconectar el cable de la antena celular de su socket en la placa lógica.

    • De-ruta el cable de la antena celular fuera de debajo de los anclajes de metal unidos a la placa lógica.

  14. , Cámara trasera: paso 14, imagen 1 de 1
    • Ten cuidado con el anillo de plástico exterior ubicado en la parte superior del conjunto del flash de la cámara trasera. Puedes desplazarse fácilmente si no se retira durante el desmontaje.

    • Puedes usar pinzas, una herramienta de apertura de plástico o un "spudger" para quitar el anillo de plástico exterior.

  15. : paso 15, imagen 1 de 1
    • Retira los siguientes cuatro tornillos que sujetan la cubierta del cable a la placa base:

    • Un tornillo Phillips de 2,7 mm

    • Un tornillo Phillips de 2,6 mm

    • Un tornillo Phillips de 1,3 mm

    • Un tornillo Phillips de 1,2 mm

  16. : paso 16, imagen 1 de 2 : paso 16, imagen 2 de 2
    • Utiliza una herramienta de abertura de plástico para sacar las pestañas de la cubierta metálica del cable, de sus ranuras, de la placa base.

    • Levanta la cubierta del cable desde el borde más cercano a la parte superior, y retírala del iPhone.

  17. : paso 17, imagen 1 de 2 : paso 17, imagen 2 de 2
    • Utilice el borde de una herramienta de abertura de plástico para levantar el conector de la cámara trasera de su zócalo en la placa base.

    • Tenga cuidado de no romper ningún componente de los alrededores de la placa base mientras hace palanca hacia arriba.

    • Retire la cámara trasera del iPhone.

    • Hay una pequeña junta de goma que se encuentra debajo de la cámara trasera. Asegúrese de que esté correctamente colocada antes de volver a montarlo.

  18. Este paso está sin traducir. Ayuda a traducirlo

    : paso 18, imagen 1 de 2 : paso 18, imagen 2 de 2
    • Use a SIM eject tool or a paperclip to eject the SIM and its tray.

    • This may require a significant amount of force.

    • Remove the SIM and its tray.

  19. Este paso está sin traducir. Ayuda a traducirlo

    : paso 19, imagen 1 de 2 : paso 19, imagen 2 de 2
    • Remove the five cables near the top of the logic board in the following order:

    • Headphone jack/volume button cable

    • Front facing camera cable

    • Digitizer cable

    • Display data cable

    • Power button cable (located underneath the headphone jack/volume button cable as shown in the second picture.)

    • To disconnect the cables, use the edge of a plastic opening tool to gently lift their connectors up and out of the sockets on the logic board.

    • Be careful not to break any of the small and delicate surface mount components as you disconnect the cables.

  20. Este paso está sin traducir. Ayuda a traducirlo

    : paso 20, imagen 1 de 1
    • Remove the 1.5 mm Phillips screw securing the grounding clip to the logic board near the headphone jack.

  21. Este paso está sin traducir. Ayuda a traducirlo

    : paso 21, imagen 1 de 2 : paso 21, imagen 2 de 2
    • Use the tip of a spudger to pry the small grounding clip up off the logic board.

    • Carefully grasp the grounding clip and remove it from the iPhone.

    • Before reassembly, be sure to clean all metal-to-metal contact points on the grounding clip (not the mating halves of connectors) with a de-greaser such as windex or isopropyl alcohol. The oils on your fingers have the potential to cause grounding issues.

  22. Este paso está sin traducir. Ayuda a traducirlo

    : paso 22, imagen 1 de 1
    Herramienta utilizada en este paso:
    Standoff Screwdriver for iPhones
    $5.49
    Comprar
    • Remove the 4.8 mm standoff screw near the headphone jack.

    • Standoff screws are best removed using a standoff screwdriver or bit.

    • In a pinch, a small flathead screwdriver will do the job—but use extra caution to ensure it doesn't slip and damage surrounding components.

  23. Este paso está sin traducir. Ayuda a traducirlo

    : paso 23, imagen 1 de 1
    • Use the edge of a plastic opening tool to disconnect the Wi-Fi antenna from the logic board.

  24. Este paso está sin traducir. Ayuda a traducirlo

    : paso 24, imagen 1 de 2 : paso 24, imagen 2 de 2
    • If present, peel the piece of black tape covering the hidden screw near the power button.

    • Remove the 2.6 mm Phillips screw securing the logic board near the power button.

    • (Use caution when removing this screw and removing the power contact held by it; the contact tab will come loose with the screw)

    • Notice the small rubber bumper under the screen & digitizer cables (which are detached at top above the Q-code). This bumper can fall off of the logic board when removed or get stuck to the cables and fall off later.

  25. Este paso está sin traducir. Ayuda a traducirlo

    : paso 25, imagen 1 de 1
    • Remove the following screws securing the logic board to the case:

    • One 2.5 mm Phillips screw near the vibrator motor

    • One 2.4 mm Phillips screw

    • One 3.6 mm standoff along the side of the logic board nearest the battery opening.

    • Use a standoff driver bit and driver handle to remove the single 3.6 mm standoff screw.

    • In a pinch, a small flathead screwdriver will do the job—but use extra caution to ensure it doesn't slip and damage surrounding components.

  26. Este paso está sin traducir. Ayuda a traducirlo

    : paso 26, imagen 1 de 1
    • Carefully lift the logic board from the end closest to the speaker enclosure and slide it away from the top edge of the iPhone.

    • Remove the logic board.

    • Before reassembly, be sure to clean all metal-to-metal contact points on the logic board (not the mating halves of connectors) with a de-greaser such as windex or isopropyl alcohol. The oils on your fingers have the potential to cause grounding issues.

    • There is a small rubber bumper that sits on the top edge of the logic board where the digitizer and screen cables come through the case. It protects the cables as they bend over the top of the logic board. This can either get stuck to the cables or fall off the logic board when it comes out. Look back over step 22 for more details.

  27. Este paso está sin traducir. Ayuda a traducirlo

    : paso 27, imagen 1 de 1
    • Be sure not to lose the small grounding finger for the rear facing camera near the power button. This finger rests on top of the PCB, screwed down, and covered with the adhesive black plastic tape.

  28. Este paso está sin traducir. Ayuda a traducirlo

    : paso 28, imagen 1 de 2 : paso 28, imagen 2 de 2
    • Use the edge of a plastic opening tool to carefully pry the metal front facing camera retainer away from the case of your iPhone.

    • Remove the front facing camera retainer.

  29. Este paso está sin traducir. Ayuda a traducirlo

    : paso 29, imagen 1 de 1
    • Remove the front facing camera.

  30. Este paso está sin traducir. Ayuda a traducirlo

    : paso 30, imagen 1 de 2 : paso 30, imagen 2 de 2
    • Remove the two 1.6 mm Phillips screws securing the power button bracket to the outer case.

    • Take extra care with the display cables, which can prevent easy access to the right-hand screw. The cables are easily damaged.

    • Slightly pull the power button bracket away from the outer case.

  31. Este paso está sin traducir. Ayuda a traducirlo

    : paso 31, imagen 1 de 2 : paso 31, imagen 2 de 2
    • Use a pair of tweezers to remove the power button from the iPhone.

    • During reassembly, take note of the correct orientation of the power button. The metal loop should be facing downwards and the outward edges should be on top.

  32. Este paso está sin traducir. Ayuda a traducirlo

    : paso 32, imagen 1 de 2 : paso 32, imagen 2 de 2
    • Use the edge of a plastic opening tool to pry the earpiece speaker off the adhesive securing it to the outer case. Note that the power button cable is glued to the the case as well, and will need to be pried up.

    • Use a pair of tweezers to unfold the earpiece speaker from its recess in the outer case.

    • Be careful not to tear the cable from the earpiece speaker. They are adhered together, and the cable is very delicate.

  33. Este paso está sin traducir. Ayuda a traducirlo

    : paso 33, imagen 1 de 2 : paso 33, imagen 2 de 2
    • Use the edge of plastic opening tool to gently move the top sensor assembly away from the outer case.

    • Gently pry the top sensor assembly off the outer case.

  34. Este paso está sin traducir. Ayuda a traducirlo

    : paso 34, imagen 1 de 3 : paso 34, imagen 2 de 3 : paso 34, imagen 3 de 3
    • Lift and remove the power and sensor cable assembly from the iPhone.

    • Be sure not to lose the small retainer clip located on the top sensor assembly.

  35. Este paso está sin traducir. Ayuda a traducirlo

    : paso 35, imagen 1 de 2 : paso 35, imagen 2 de 2
    • Use the edge of a plastic opening tool to peel the earpiece speaker off the foam adhesive securing it to the iPhone.

    • If you wish to reuse the earpiece speaker, try not to tear the foam adhesive that secures it to the iPhone's case.

    • Remove the earpiece speaker.

  36. Este paso está sin traducir. Ayuda a traducirlo

    : paso 36, imagen 1 de 1
    • Earpiece speaker remains.

Linea de Meta

245 personas más completaron esta guía.

7 comentarios

Is the earpiece the same as for the iPhone 4?

info - Contestar

Followed the steps and completed this guide with no problems. Very easy to follow and so happy to be able to hear my conversations now! :) thanks iFix it staff!

ifix - Contestar

Fantastic Guide. Helped me to change speaker and Smashed lcd.

John - Contestar

Be careful not to over-tighten the red screw in step 14, the head of the screw broke of with very little torque applied:( Apart from that minor mishap I worked though the guide in a little over 2 hours, big thanks for a fantastic guide!!!

Sandy Doull - Contestar

Hi,

I have an iphone 4s belonging to a friend whos speaker appears to be faulty.

When making calls the recipient sounds extremely muffled to the point of being inaudible.

As a technician I have never encountered an issue before whereby replacing the speaker didnt work.

The main test i performed was to take out the motherboard and place it into the chassis of a perfectly working iphone 4s and yet the problem still persisted.

Reason for the above is because it negates the need to individually test the dock connector and other various minor parts.

My question is where on the motherboard where this problem maybe occuring?

Is it the 2 copper plates that connect the speaker part to the m/b.

Is there any other way I can troubleshoot this?

Any help would be appreciated.

tommy murphy - Contestar

Agregar Comentario

Ver Estadísticas:

Ultimas 24 horas: 2

Ultimos 7 días: 17

Ultimos 30 días: 51

Todo El Tiempo: 220,510