Esta versión puede contener ediciones incorrectas. Cambie a la última instantánea verificada.
Qué necesitas
-
-
Apaga el iPhone antes de empezar el desmontaje.
-
La tapa trasera de tu teléfono puede tener dos tornillos Phillips del nº 1000 o tornillos "Pentalobe" de 5 puntas de Apple. Comprueba qué tornillos tienes y asegúrate de que también tienes el destornillador correcto para poder extraerlos.
-
Retira los dos tornillos Pentalobe o Phillips #000 de 3,6 mm situados junto al conector del dock.
-
-
-
Retira el único tornillo Phillips de 1,5 mm que sujeta el conector de la batería a la placa lógica (si existe).
-
-
-
Tira hacia arriba de la pestaña de plástico transparente expuesta para despegar la batería del adhesivo que la sujeta al iPhone.
-
Si queda algo de solución alcohólica en el teléfono, límpiala con cuidado o deja que se seque al aire antes de instalar la nueva batería.
-
Extrae la batería.
-
Antes de reensamblarla, limpia los puntos de contacto entre metales con un desengrasante como el Windex. La grasa de tus dedos puede causar problemas de interferencias inalámbricas.
-
Realiza un reinicio completo después del reensamblaje. Esto puede evitar varios problemas y simplificar la resolución de problemas.
-
-
Este paso está sin traducir. Ayuda a traducirlo
-
Remove the two 1.8 mm Phillips screws securing the dock connector cable to the logic board.
-
Remove the thin metal dock connector cable cover.
-
-
Este paso está sin traducir. Ayuda a traducirlo
-
Use the edge of a plastic opening tool to pry the dock cable up from its socket on the logic board.
-
-
Este paso está sin traducir. Ayuda a traducirlo
-
Peel the dock connector cable off the adhesive securing it to the logic board and the side of the speaker enclosure.
-
-
Este paso está sin traducir. Ayuda a traducirlo
-
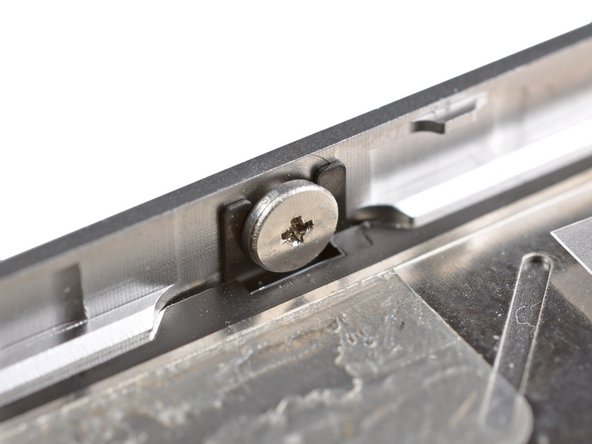
Remove the 1.6 mm Phillips screw securing the pressure contact to the logic board near the vibrator.
-
Remove the pressure contact.
-
-
Este paso está sin traducir. Ayuda a traducirlo
-
Use the edge of a plastic opening tool to pry the cellular antenna cable up from its socket on the logic board.
-
De-route the cellular antenna cable out from under the metal fingers attached to the logic board.
-
-
Este paso está sin traducir. Ayuda a traducirlo
-
Remove the following five screws:
-
Three 1.3 mm Phillips screws
-
One 1.5 mm Phillips screw
-
One 2.4 mm Phillips screw
-
-
Este paso está sin traducir. Ayuda a traducirlo
-
Lift the cable cover from its edge nearest the top of the iPhone.
-
Pull the cable cover tabs out of their slots cut into the EMI shield on the logic board and remove it from the iPhone.
-
-
-
Este paso está sin traducir. Ayuda a traducirlo
-
Use the edge of a plastic opening tool to pry the rear camera connector up from its socket on the logic board.
-
Remove the rear camera from the iPhone.
-
-
Este paso está sin traducir. Ayuda a traducirlo
-
Disconnect the five cables near the top of the logic board in the following order:
-
Headphone jack/volume button cable
-
Power button cable
-
Front facing camera cable
-
Digitizer cable
-
Display data cable
-
To disconnect the cables, use the edge of a plastic opening tool to gently lift their connectors up and out of the sockets on the logic board.
-
-
Este paso está sin traducir. Ayuda a traducirlo
-
Remove the 1.5 mm Phillips #000 screw near the headphone jack.
-
-
Este paso está sin traducir. Ayuda a traducirlo
-
Lift the small grounding clip up off the logic board and remove it from the iPhone.
-
-
Este paso está sin traducir. Ayuda a traducirlo
-
Use the edge of a plastic opening tool to disconnect the Wi-Fi antenna cable connector from the logic board.
-
-
Este paso está sin traducir. Ayuda a traducirlo
-
Remove the 2.5 mm Phillips #000 screw securing the logic board near the power button.
-
Remove the 4.8 mm standoff screw near the headphone jack.
-
-
Este paso está sin traducir. Ayuda a traducirlo
-
Remove the 3.4 mm Phillips screw near the vibrator motor.
-
Remove the two 3.6 mm standoff screws along the side of the logic board nearest the battery opening.
-
-
Este paso está sin traducir. Ayuda a traducirlo
-
Carefully lift the logic board from the end closest to the speaker enclosure and slide it away from the top edge of the iPhone.
-
Remove the logic board.
-
-
Este paso está sin traducir. Ayuda a traducirlo
-
Use the edge of a plastic opening tool to pry the vibrator off the adhesive securing it to the frame of the iPhone.
-
Remove the vibrator.
-
-
Este paso está sin traducir. Ayuda a traducirlo
-
Remove the two 2.4 mm Phillips screws from the sides of the speaker enclosure assembly.
-
-
Este paso está sin traducir. Ayuda a traducirlo
-
Remove the small plastic bracket that was installed under the screw closest to the dock connector cable.
-
-
Este paso está sin traducir. Ayuda a traducirlo
-
Remove the speaker enclosure assembly from the iPhone.
-
-
Este paso está sin traducir. Ayuda a traducirlo
-
Remove the small pieces of black tape covering the display mounting tabs.
-
-
Este paso está sin traducir. Ayuda a traducirlo
-
Remove the 1.6 mm Phillips screw securing the display assembly near the power button.
-
-
Este paso está sin traducir. Ayuda a traducirlo
-
Remove the 1.6 mm Phillips screw near the headphone jack.
-
-
Este paso está sin traducir. Ayuda a traducirlo
-
Remove the 1.6 mm Phillips screw near the lower microphone.
-
-
Este paso está sin traducir. Ayuda a traducirlo
-
Remove the 1.6 mm Phillips screw near the dock connector cable.
-
-
Este paso está sin traducir. Ayuda a traducirlo
-
Loosen the three large-headed Phillips screws along the volume button side of the iPhone about one half turn.
-
-
Este paso está sin traducir. Ayuda a traducirlo
-
Loosen the three large-headed Phillips screws along the other side of the iPhone about one half turn.
-
-
Este paso está sin traducir. Ayuda a traducirlo
-
Use the edge of a plastic opening tool to gently pry up the display assembly around its perimeter.
-
De-route the digitizer and LCD cables through the steel inner frame.
-
When the front panel has been correctly installed, both the LCD and digitizer cables should be immediately next to one another and should be the same length, as shown in the second photo.
-
During reassembly, do not touch the metallic area at the base of the LCD data cable, as this can cause problems with the LCD. If you do touch it accidentally, clean it gently with an alcohol wipe before continuing.
-
-
Este paso está sin traducir. Ayuda a traducirlo
-
Remove the display assembly from the iPhone.
-
You may have to reuse the earpiece grille and the clear plastic ring around the front facing camera from the old/damaged assembly. This will depend on where you buy the replacement part.
-
Your replacement display may come with colored plastic film on the back of the LCD. If so, use the pull tab near the home button to peel the plastic film from the LCD before installing the new display in your iPhone.
-
After reassembly, note the following:
-
Clean the touchscreen surface with an alcohol wipe prior to turning the iPhone back on. The alcohol helps dissipate any lingering static electricity, which can cause problems with the display.
-
-
Este paso está sin traducir. Ayuda a traducirlo
-
Use a clean fingernail or the edge of a plastic opening tool to flip up the retaining flap on the home button ribbon cable.
-
-
Este paso está sin traducir. Ayuda a traducirlo
-
Use a pair of tweezers to pull the home button cable out of its socket.
-
-
Este paso está sin traducir. Ayuda a traducirlo
-
Carefully de-route the home button cable through its slot in the outer case and remove it from the iPhone.
-


Cancelar: No complete esta guía.
129 personas más completaron esta guía.

3 comentarios
How can a company that prides itself on simplicity and elegance make something so needlessly unserviceable? I don't mind the small screws, even if I wonder how many of them really need to be there... but the fragile cables, little black spacers, the pentalobe screws and the glue - oh the inhumanity of the glue! The only thing that makes me happy is, now that Tim Cook's decided that they're going to service these things in-store, the thought of Apple employees sending an earful of expletives up the management chain.
Small and fragile = lite weight. And all of those spacers and glue is to keep everything in place and prevent those small and fragile parts from breaking as you use the phone. If you want a tiny, lite phone there are compromises. And Apple's mantra has never been serviceability. It's about getting you to upgrade to the new cool thing every 1-2 years, way before the phone would normally need servicing. And the Apple store really only services new batteries and screens. For pretty much everything else they just give you a new phone.
J V -
is there a way to remove the button without replacing the cable?