Esta versión puede contener ediciones incorrectas. Cambie a la última instantánea verificada.
Qué necesitas
-
-
Si el cristal de la pantalla está agrietado, evita que se siga rompiendo y evita daños corporales durante la reparación pegando el cristal con cinta adhesiva.
-
Coloca tiras superpuestas de cinta de embalar transparente sobre la pantalla del iPad hasta cubrir toda la cara. Para roturas especialmente graves, puede que tengas que poner dos capas.
-
Haz todo lo posible por seguir el resto de la guía tal como se describe. Sin embargo, una vez roto el cristal, es probable que siga agrietándose mientras trabajas, y puede que tengas que utilizar una herramienta de palanca metálica para sacar el cristal.
-
-
-
Calienta un iOpener y aplícalo en el borde izquierdo durante dos minutos.
-
-
-
Coloca una ventosa hasta la mitad del lado calentado.
-
Asegúrese de que la taza esté completamente plana en la pantalla para obtener un sello hermético.
-
Mientras sostiene el iPad hacia abajo con una mano, tire de la ventosa para separar ligeramente el conjunto del panel frontal de la carcasa trasera.
-
-
-
Deja la púa de plástico en el iPad, después de haber pasado la cámara frontal.
-
Coge una segunda púa e insértala a la izquierda de la cámara frontal, justo donde estaba antes la primera púa. Deslízala hacia la esquina para despegar el resto del adhesivo.
-
Deja la segunda púa ahí, para evitar que el adhesivo de la esquina vuelva a pegarse.
-
-
-
-
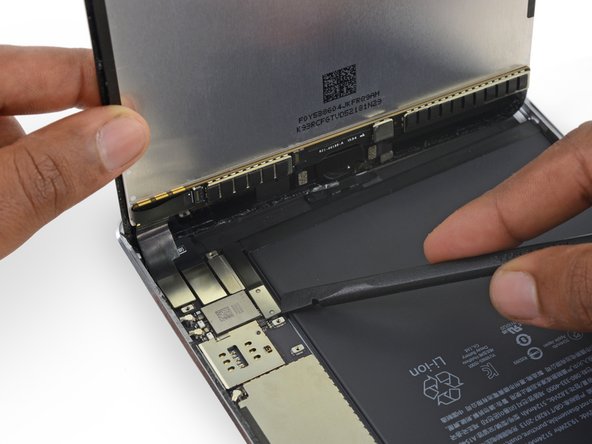
Retira los cuatro tornillos Phillips de 1.2mm que se encuentran sobre el soporte que conecta la batería y la pantalla.
-
-
-
Usa el extremo puntiagudo de un spudger para desconectar el conector de datos de la pantalla de su zócalo en la placa lógica.
-
Usa el extremo puntiagudo de un spudger para desconectar el conector del cable del digitalizador de su zócalo en la placa lógica.
-
-
Este paso está sin traducir. Ayuda a traducirlo
-
Use the pointed tip of a spudger to flip up the retaining flap on the home button ZIF socket.
-
-
Este paso está sin traducir. Ayuda a traducirlo
-
Use tweezers to unplug the home button ribbon cable from the ZIF socket.
-
Continue peeling the ribbon cable up to the EMI shield.
-
-
Este paso está sin traducir. Ayuda a traducirlo
-
Use tweezers to lift the home button control hardware module off the display assembly.
-
-
Este paso está sin traducir. Ayuda a traducirlo
-
Use an opening pick to continue separating the home button ribbon cable from the display assembly.
-
-
Este paso está sin traducir. Ayuda a traducirlo
-
Use a plastic opening tool to pry the home button bracket off the display assembly.
-
-
Este paso está sin traducir. Ayuda a traducirlo
-
Heat an iOpener and lay it over the lower edge of the front panel to soften the adhesive holding the home button in place.
-
-
Este paso está sin traducir. Ayuda a traducirlo
-
Slowly push the home button up and out of the display assembly to separate the gasket from the front panel.
-
-
Este paso está sin traducir. Ayuda a traducirlo
-
Examine your replacement part, and your original display carefully to be sure they match.
-
Your replacement screen may be missing the sleep/wake sensor that is necessary for Smart Cover use. If you want to maintain functionality you will need to transfer the component.
-
Desolder the six solder pads from the lower left of the display to remove the sensor assembly cable.
-


Cancelar: No complete esta guía.
42 personas más completaron esta guía.

3 comentarios
Please post a caution about the home button ribbon cable. I was removing it from an extremely damaged screen and I accidentally slightly ripped it. Now I’m not sure what to do :( If I had known about the problems associated with changing a touch ID home button I would have been 100x more cautious but I’ve only ever had to fix my Mini 2 before so this wasn’t an issue.
I have an iFixit replacement screen (C-stock) that has some existing adhesive already on it, but there are a few parts of the adhesive that are folded over on itself. I also have replacement adhesive. Two questions:
Should I replace the existing, possibly-worn adhesive with new adhesive, or is it better to stay with the already-applied adhesive?
Should I warm up the adhesive when I’m applying the screen back onto the body? Or should I keep it room-temperature?
Just want to say Thank you for for the guide and what i can only describe as the perfect pctures to go along! Nice1