Esta versión puede contener ediciones incorrectas. Cambiar a la última instantánea verificada.
Introducción
Use esta guía para reemplazar la batería de su iPad.
Qué necesitas
-
-
Si está agrietado el cristal de la pantalla, mantenga aún más la rotura contenida y prevenir daños físicos durante su reparación con cinta adhesiva el vidrio.
-
Coloque tiras de cinta adhesiva transparente sobre la pantalla del iPad se solapan hasta que toda la superficie está cubierta.
-
Haga todo lo posible para seguir el resto de la guía como se ha descrito. Sin embargo, una vez que el vidrio se rompe, es probable que continúe a agrietarse a medida que trabaja, y es posible que necesite usar una herramienta de palanca de metal para recoger el vaso.
-
-
Este paso está sin traducir. Ayuda a traducirlo
-
There are 14 metal clips holding the display assembly in place, shown at left. As you pry in the following steps, do your best to pry around these clips and not slice through them with your opening tool.
A clearer explanation of the orientation is needed here. The bar code is at the top left of the iPad when you are looking at the screen.
-
-
Este paso está sin traducir. Ayuda a traducirlo
-
Insert a metal spudger between the top edge of the display assembly and the rear panel assembly.
-
Rotate the spudger away from you to release the tabs along the top edge of the display.
-
Insert a second metal spudger between the top edge of the display assembly and the rear panel assembly to keep the tabs from snapping back into place.
-
-
Este paso está sin traducir. Ayuda a traducirlo
-
With one spudger, work your way along the right edge of the iPad.
-
The front panel is held to the aluminum back by metal clips on the top, bottom, and left sides. The right side has plastic tabs which slide into recesses in the backplate.
-
Once the clips are released, lift the left side of the front panel up and slide it to the left to clear the tabs from the aluminum backplate.
Its seems easier to undo the clips on the left and bottom by levering them with an iPad tool and pusing the clips in from the edge with another tool when i can visually see them. One the right side, bottom and most of the left side is done there isnt much need to do the top as it will slide off if moved about a centimeter
-
-
Este paso está sin traducir. Ayuda a traducirlo
-
Lift the display assembly away from the rear panel assembly by its bottom edge.
-
-
Este paso está sin traducir. Ayuda a traducirlo
-
In the following steps, you will disconnect the three cables attaching the display assembly to the logic board. The cables are for the following components:
-
Digitizer
-
Ambient Light Sensor
-
Display Data Cable
It would be easier to detach the Display Data Cable at its connector on the far right in the picture, since there doesnt seem to be much play to undo the suggested one.
-
-
Este paso está sin traducir. Ayuda a traducirlo
-
Use the edge of a plastic opening tool to flip up the retaining flaps holding the digitizer ribbon cables in their sockets on the logic board.
-
Pull the digitizer ribbon cables straight out of their sockets.
Adding this comment in its proper place:
After flipping up the metal retainer, pull it sideways.
Do not pull it up vertically.
-
-
Este paso está sin traducir. Ayuda a traducirlo
-
Use a plastic opening tool to remove the ambient light sensor connector from its socket by gently prying upward.
-
-
-
Este paso está sin traducir. Ayuda a traducirlo
-
Disconnect the display data cable from the main board by flipping up the metal retainer by its black plastic pull tab.
-
Pull the cable connector away from its socket.
IMHO, unhooking data display cable from the other end is preferable to the above location, since the cable itself is sealed or taped onto the assembly.
-
-
Este paso está sin traducir. Ayuda a traducirlo
-
Remove the display assembly from the rear panel assembly.
-
-
Este paso está sin traducir. Ayuda a traducirlo
-
Use the edge of a plastic opening tool to:
-
Pry the side button connector up off the logic board from underneath the wires.
-
Pry the speaker connector up off its socket on the logic board from beneath the speaker wires.
-
Carefully flip up the ZIF ribbon cable retaining flap on the socket near the headphone jack.
-
Pull the headphone jack ribbon cable toward the left side of the iPad to disconnect it from its socket.
Just skip removing the “side button connector” as you may instead sever the small solder connections to the socket. It’s not a necessary step and is more dangerous than anything.
I wish I had understood your post a little better, the socket popped off of the logic board for me. Is there any way to reconnect it or did I just waste my money trying to fix my own device? Thanks for any suggestions, listen to Max, good advice, there’s no reason to remove that connection and it just puts you in danger of doing what i did. Good luck to all.
-
-
Este paso está sin traducir. Ayuda a traducirlo
-
Remove the following screws securing the logic board to the rear panel assembly.
-
Two 4.56 mm T5 Torx screws.
-
Two 3.76 mm T5 Torx screws.
确定是T5吗,为什么在这个拆解里是写T4,我都糊涂了
-
-
Este paso está sin traducir. Ayuda a traducirlo
-
Use the edge of a plastic opening tool to carefully pry the dock cable connector straight up off the logic board.
-
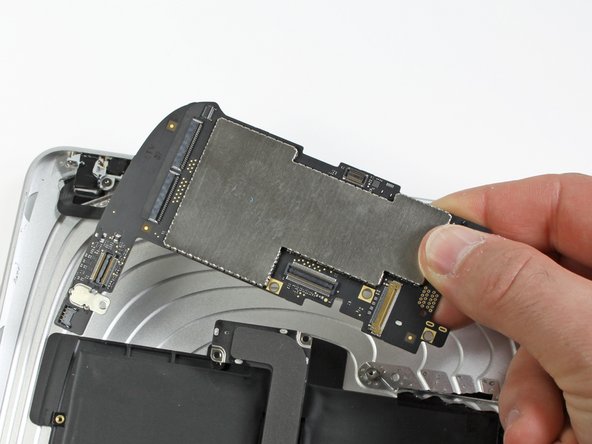
Lift the logic board out of the rear panel assembly.
-
-
-
Retire los dos tornillos Torx T5 de 2,84 mm que sujetan el conjunto de altavoces al conjunto del panel posterior.
-
Retire el tornillo T5 Torx único que asegura el medio del cable de acoplamiento al conjunto del panel posterior.
-
-
-
Use el extremo plano de un spudger para levantar suavemente la batería de la carcasa inferior.
-
Continúe agrandando suavemente el hueco moviendo el spudger y haciéndolo funcionar a lo largo del lado derecho de la batería.
No joke with the “excessive amount of adhesive” you may cut yourself or bend your metal sponger like I did. This part alone took me about 25 min, just the removal from the back panel.
-
-
-
Cuando haya suficiente espacio libre, use sus manos para despegar la batería de cualquier adhesivo que aún esté sujeto al panel trasero.
-
Retire la batería del panel trasero.
-


Para volver a armar su dispositivo, siga estas instrucciones en orden inverso.
Para volver a armar su dispositivo, siga estas instrucciones en orden inverso.
Cancelar: No complete esta guía.
114 personas más completaron esta guía.
Un agradecimiento especial a estos traductores:
100%

Estos traductores nos están ayudando a reparar el mundo! ¿Quieres contribuir?
Empezar a traducir ›

14 comentarios
Tried this with 2 ebay "OEM" cheapo batteries. Both failed- wouldn't charge, reboot every few minutes.
Solution: Dissected both new and original batteries. Snipped out old LI-ION cells from original Apple battery pack frame. Soldered new LI-ON cells into original battery frame.
Success!
The battery pack includes both LI-ION cells and an small circuit board. The cheapo replacement battery packs don't work (with newer IOS versions? are they actively blocking 3rd party battery replacements?)
Using the circuit board from the original battery pack with new LI-ION cells seems to fix everything.
Be ready to peel off a lot of adhesive label stickers and maybe use a bit of electrical tape to produce a renovated battery pack that works- original Apple battery frame + new LI-ION cells..
Thanks for letting us know that battery PCB takes LiIon cells replacement. I have the same problem with reboot using cheap ebay replacement battery. Going to test new LiIon cells for capacity and if OK - will resolder them.
Paul G -
PS: just replaced two cells, it works. Just in case, to prevent the charging PCB to loose the power (some LiIon controllers can lock because of power loss) I did it one by one. First I removed one cell, soldered replacement, then second one. I estimated capacity of new cells using Imax B6 charger - both of them were around 3100mah, not bad for noname $12 battery from ebay.
Paul G -
I am new to this. Does the iPad need to be kept powered up by an external battery while changing out the battery pack to prevent loss of apps and data? I don't mind so much losing data, it is backed to cloud. But apps are a problem as many of mine are no longer available.
No, iProduct storage doesn't depend on the battery.
jasonq -
I've performed the steps and it worked with Kastar replacement part, just to note that to open it first I've used the side were the volume button is located and slided through the botton were the front button is located.
Also is almost impossible to open it without broke some clips, I've bought some spares (10 pieces) that come handy because 6 were broken during the procedure.
What kind of replacement adhesive would I need to secure the new battery? Or is it okay without any new adhesive?
The iPad gen 1 battery I replaced did not need any extra adhesive. It stuck to the old large mess without issue.
Post battery replacement. Looks like it worked but the screen would not light up. I assumed the back light was damaged from the water damage (was dropped in a full bath tub) so I replaced the screen and now it will not charge. Should I assume it’s a cable or the logic board?
this is purely entertainment and not for work.
tres bien moi jaurais preferer un film sur youtub
1) Are you recommending to cover the display with clear packing tape even if it is intact (not cracked)?
2) If so,will the tape take the display’s oleophobic coating with it when removed?
Mitch Stary - Contestar
Hola necesito comprar
Alsone Michel - Contestar
Hola, ¿no estoy seguro si te refieres a las gafas de protección o a la pantalla? Te dejo los dos enlaces aquí:
iPad LCD Panel
Safety Glasses
Sandra Hiller -