Saltar al contenido principal

Esta versión puede contener ediciones incorrectas. Cambie a la última instantánea verificada.

Qué necesitas

  1. , Calentamiento del iOpener: paso 1, imagen 1 de 2 , Calentamiento del iOpener: paso 1, imagen 2 de 2
    • Te recomendamos que limpies tu microondas antes de continuar, ya que cualquier suciedad desagradable en la parte inferior puede terminar pegado al iOpener.

    • Coloca el iOpener en el centro del microondas.

    • Para microondas giratorios: Asegúrate de que la placa gira libremente. Si el iOpener se queda atascado, puede sobrecalentarse y quemarse.

  2. : paso 2, imagen 1 de 1
    • Calienta el iOpener durante treinta segundos.

    • Dependiendo de la potencia de tu microondas, puede necesitar más o menos tiempo. El iOpener está suficientemente caliente cuando apenas está demasiado caliente al tacto.

    • A lo largo del procedimiento de reparación, en cuanto el iOpener se enfríe, vuelve a calentarlo en el microondas treinta segundos más cada vez.

    • Ten cuidado de no sobrecalentar el iOpener durante la reparación. El sobrecalentamiento puede provocar que el iOpener se rompa. No intentes calentar a más de 100 ˚C (212 ˚F).

    • Nunca toques el iOpener si parece estar hinchado.

    • Si el iOpener esta todavía demasiado caliente al tacto, sigue utilizándolo mientras esperas a que se enfríe un poco más antes de recalentar. Un iOpener adecuadamente climatizado debe mantenerse caliente durante un máximo de 10 minutos.

  3. : paso 3, imagen 1 de 1
    • Saca el iOpener del microondas, tomándolo por una de las esquinas planas para evitar el centro caliente.

    • El iOpener estará muy caliente, ten cuidado cuando lo manipules. Utiliza guantes de horno si es necesario.

  4. , Método de calentamiento alternativo iOpener: paso 4, imagen 1 de 2 , Método de calentamiento alternativo iOpener: paso 4, imagen 2 de 2
    • Si no tienes un microondas, sigue este paso para calentar su iOpener en agua hirviendo.

    • Llena una olla o cacerola con suficiente agua para sumergir completamente el iOpener.

    • Calienta el agua hasta que hierva. Apaga el fuego.

    • Coloca un iOpener en el agua caliente durante 2-3 minutos. Asegúrate de que el iOpener esté completamente sumergido en el agua.

    • Utiliza unas pinzas para extraer el iOpener calentado del agua caliente.

    • Seca bien el iOpener con una toalla.

    • El iOpener estará muy caliente, así que ten cuidado de sujetarlo sólo por las lengüetas de los extremos.

    • Tu iOpener está listo para ser utilizado. Si necesita recalentar el iOpener, calienta el agua hasta que hierva, apaga el fuego y coloca el iOpener en el agua durante 2-3 minutos.

  5. Este paso está sin traducir. Ayuda a traducirlo

    : paso 5, imagen 1 de 3 : paso 5, imagen 2 de 3 : paso 5, imagen 3 de 3
    • If your display glass is cracked, keep further breakage contained and prevent bodily harm during your repair by taping the glass.

    • Lay overlapping strips of clear packing tape over the iPad's display until the whole face is covered.

    • This will keep glass shards contained and provide structural integrity when prying and lifting the display.

    • Do your best to follow the rest of the guide as described. However, once the glass is broken, it will likely continue to crack as you work, and you may need to use a metal prying tool to scoop the glass out.

    • Wear safety glasses to protect your eyes, and be careful not to damage the LCD screen.

  6. Este paso está sin traducir. Ayuda a traducirlo

    : paso 6, imagen 1 de 1
    • Handling it by the tab, place the heated iOpener on the side of the iPad to the left of the home button assembly.

    • Let the iOpener sit for about five minutes to soften the adhesive beneath the glass.

  7. Este paso está sin traducir. Ayuda a traducirlo

    : paso 7, imagen 1 de 3 : paso 7, imagen 2 de 3 : paso 7, imagen 3 de 3
    • Carefully place a suction cup halfway up the heated side.

    • Be sure the cup is completely flat on the screen to get a tight seal.

    • While holding the iPad down with one hand, pull up on the suction cup to slightly separate the front panel glass from from the rear case.

    • Be careful to only lift the glass enough to insert an opening pick—any more and you risk cracking the glass.

  8. Este paso está sin traducir. Ayuda a traducirlo

    : paso 8, imagen 1 de 3 : paso 8, imagen 2 de 3 : paso 8, imagen 3 de 3
    • While holding the glass up with the suction cup, slide the point of an opening pick into the gap between the glass and body of the iPad.

    • Don't insert the opening pick any deeper than the black bezel on the side of the display. Inserting the pick too far may damage the LCD.

    • Pull the suction cup's plastic nub to release the vacuum seal and remove the suction cup from the display assembly.

  9. Este paso está sin traducir. Ayuda a traducirlo

    : paso 9, imagen 1 de 1
    • Reheat and reapply the iOpener.

    • Be careful not to overheat the iOpener during the repair procedure. Always wait at least ten minutes before reheating the iOpener.

    • Let it rest for a few minutes to reheat the left edge of the iPad.

  10. Este paso está sin traducir. Ayuda a traducirlo

    : paso 10, imagen 1 de 3 : paso 10, imagen 2 de 3 : paso 10, imagen 3 de 3
    • Place a second opening pick alongside the first and slide the pick down along the edge of the iPad, releasing the adhesive as you go.

    • Throughout the rest of the procedure, if you encounter significant resistance to sliding picks beneath the glass, stop and reheat the section you're working on. Forcing the picks risks cracking the glass.

  11. Este paso está sin traducir. Ayuda a traducirlo

    : paso 11, imagen 1 de 3 : paso 11, imagen 2 de 3 : paso 11, imagen 3 de 3
    • Continue moving the opening pick down the side of the display to release the adhesive.

    • If the opening pick gets stuck in the adhesive, "roll" the pick along the side of the iPad, continuing to release the adhesive.

  12. Este paso está sin traducir. Ayuda a traducirlo

    : paso 12, imagen 1 de 3 : paso 12, imagen 2 de 3 : paso 12, imagen 3 de 3
    • Take the first pick you inserted and slide it up toward the top corner of the iPad.

    • If you can see the tip of the opening pick through the front glass, don't panic—just pull the pick out a little bit. Most likely, everything will be fine, but try to avoid this as it may deposit adhesive on the front of the LCD that is difficult to clean off.

  13. Este paso está sin traducir. Ayuda a traducirlo

    : paso 13, imagen 1 de 1
    • Reheat the iOpener and place it on the top edge of the iPad, over the front-facing camera.

    • Be careful not to overheat the iOpener during the repair procedure. Wait at least ten minutes before reheating the iOpener.

    • If you have a flexible iOpener, you can bend it to heat both the upper left corner and the upper edge at the same time.

  14. Este paso está sin traducir. Ayuda a traducirlo

    : paso 14, imagen 1 de 3 : paso 14, imagen 2 de 3 : paso 14, imagen 3 de 3
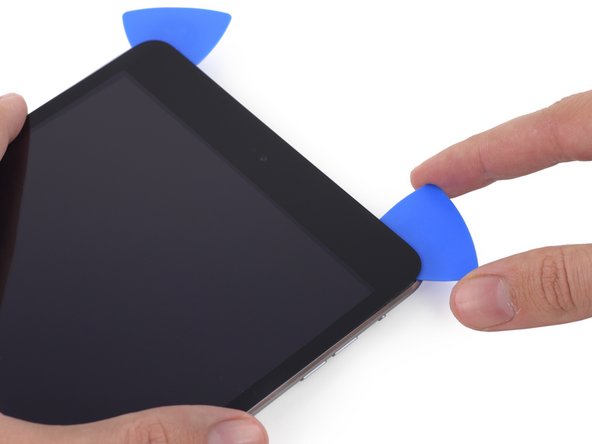
    • Slide the opening pick around the top left corner of the iPad to separate the adhesive.

  15. Este paso está sin traducir. Ayuda a traducirlo

    : paso 15, imagen 1 de 3 : paso 15, imagen 2 de 3 : paso 15, imagen 3 de 3
    • Slide the opening pick along the top edge of the iPad, stopping just before you reach the camera.

    • The third image shows where the front-facing camera and housing are in the iPad.

    • Avoid sliding the opening pick over the front-facing camera, as you may smear adhesive onto the lens or damage the camera. The following steps will detail how to best avoid disturbing the front-facing camera.

  16. Este paso está sin traducir. Ayuda a traducirlo

    : paso 16, imagen 1 de 3 : paso 16, imagen 2 de 3 : paso 16, imagen 3 de 3
    • Pull the pick out slightly, and slide the very tip gently along the top of the front-facing camera section of the top edge.

  17. Este paso está sin traducir. Ayuda a traducirlo

    : paso 17, imagen 1 de 3 : paso 17, imagen 2 de 3 : paso 17, imagen 3 de 3
    • Leave the opening pick in the iPad slightly past the front-facing camera.

    • Take a second pick and insert it to the left of the camera, where the first pick just was. Slide it back to the corner to completely cut any remaining adhesive.

    • Leave the second pick in place to prevent the corner adhesive from re-sealing as it cools.

  18. Este paso está sin traducir. Ayuda a traducirlo

    : paso 18, imagen 1 de 3 : paso 18, imagen 2 de 3 : paso 18, imagen 3 de 3
    • Insert the previous pick deeper into the iPad and slide it away from the camera toward the corner.

    • Be very careful of the small antenna cable near the upper-right corner. Only slide the pick away from the camera—while sliding it in the opposite direction you may accidentally tear the antenna cable.

  19. Este paso está sin traducir. Ayuda a traducirlo

    : paso 19, imagen 1 de 1
    • Leave the three picks in the corners of the iPad to prevent re-adhering of the front panel adhesive.

    • Reheat the iOpener and place it on the remaining long side of the iPad—along the volume and lock buttons.

  20. Este paso está sin traducir. Ayuda a traducirlo

    : paso 20, imagen 1 de 2 : paso 20, imagen 2 de 2
    • Slide the top right opening pick around the corner to fully release the top edge of the glass.

    • Leave this pick in place to keep the adhesive from re-sealing itself, and grab a new pick for the next step.

  21. Este paso está sin traducir. Ayuda a traducirlo

    : paso 21, imagen 1 de 3 : paso 21, imagen 2 de 3 : paso 21, imagen 3 de 3
    • Insert a new opening pick and slide it to the middle of the right edge of the iPad, releasing the adhesive as you go.

  22. Este paso está sin traducir. Ayuda a traducirlo

    : paso 22, imagen 1 de 3 : paso 22, imagen 2 de 3 : paso 22, imagen 3 de 3
    • Continue to slide the pick down the right edge of the iPad, releasing the adhesive.

  23. Este paso está sin traducir. Ayuda a traducirlo

    : paso 23, imagen 1 de 1
    • Leave the opening picks in place and reheat the iOpener.

    • Remember not to overheat the iOpener—no more than once every ten minutes.

    • Set the reheated iOpener on the home button end of the iPad and let it rest for a few minutes to soften the adhesive beneath the glass.

  24. Este paso está sin traducir. Ayuda a traducirlo

    : paso 24, imagen 1 de 3 : paso 24, imagen 2 de 3 : paso 24, imagen 3 de 3
    • Slide the lower left pick to the lower left corner to cut the adhesive on that corner.

    • Leave the pick at the corner. Do not pry any farther, and do not remove the pick from the iPad.

    • There are quite a few things to avoid beneath the lower bezel, so study the third image closely:

    • Antennas

    • Home button cavity

    • Digitizer cable

    • The following steps will direct you where to pry to avoid damage to these components. Only apply heat and pry where directed.

  25. Este paso está sin traducir. Ayuda a traducirlo

    : paso 25, imagen 1 de 3 : paso 25, imagen 2 de 3 : paso 25, imagen 3 de 3
    • Leave the pick from the last step in place to prevent the adhesive from re-sealing.

    • With a new pick, slice gently over the left-hand antenna, stopping before the home button.

    • Only slide the pick from the outer edge toward the center of the iPad. Do not move the pick back toward the outer edge, as moving in this direction may damage the antenna.

    • If you need to slide the pick over the lower section more than once, remove it and re-insert at the outer edge, and slide inwards.

    • Leave the pick in place before moving on.

  26. Este paso está sin traducir. Ayuda a traducirlo

    : paso 26, imagen 1 de 3 : paso 26, imagen 2 de 3 : paso 26, imagen 3 de 3
    • Insert the tip of one last pick next to the previous step's pick, and slide it beneath the home button.

    • Stop about an inch from the right-hand side to avoid cutting the digitizer cable.

    • Insert the pick slightly deeper and work it back toward the home button.

    • Again, be sure to only slide the pick toward the center of the iPad when it is fully inserted; otherwise you may damage the antenna beneath the glass.

  27. Este paso está sin traducir. Ayuda a traducirlo

    : paso 27, imagen 1 de 1
    • Reheat and reapply the iOpener to the top bezel of the iPad.

  28. Este paso está sin traducir. Ayuda a traducirlo

    : paso 28, imagen 1 de 2 : paso 28, imagen 2 de 2
    • Be very careful with this step. Take your time and ensure the adhesive is hot and soft, and that you've been through all of the adhesive with an opening pick. Don't be afraid to stop and reheat.

    • At the top of the iPad opposite the home button, you should have a pick lodged into each corner. Twist the picks to lift the glass slightly, separating the last of the adhesive along all four edges.

    • If you encounter a significant amount of resistance, stop twisting. Leave the picks in place, reheat, and reapply the iOpener to the problem areas, and run a pick through the sticking point one more time.

  29. Este paso está sin traducir. Ayuda a traducirlo

    : paso 29, imagen 1 de 2 : paso 29, imagen 2 de 2
    • Lift slowly and gently to further detach the adhesive along the lower edge.

  30. Este paso está sin traducir. Ayuda a traducirlo

    : paso 30, imagen 1 de 2 : paso 30, imagen 2 de 2
    • Once all of the adhesive has been separated, open the front glass like a page in a book and rest it on your workspace.

    • If you plan to reuse the front panel assembly, you will need to replace the display adhesive. Use our display adhesive application guide to reapply your display adhesive and reseal your device.

  31. Este paso está sin traducir. Ayuda a traducirlo

    : paso 31, imagen 1 de 3 : paso 31, imagen 2 de 3 : paso 31, imagen 3 de 3
    • The front-facing camera housing may stick to the front panel; peel up the housing and place it back over the camera to protect it.

    • Rock the camera housing up on one edge to free it from the adhesive and remove it from the front panel.

    • Return the front-facing camera housing to its recess in the rear case.

  32. Este paso está sin traducir. Ayuda a traducirlo

    : paso 32, imagen 1 de 2 : paso 32, imagen 2 de 2
    Herramienta utilizada en este paso:
    Tweezers
    $4.99
    Comprar
    • Remove the following Phillips #00 screws securing the LCD:

    • Three 3.3 mm screws

    • One 4.5 mm screw

    • If there is tape covering any LCD screws, peel it up with tweezers.

  33. Este paso está sin traducir. Ayuda a traducirlo

    : paso 33, imagen 1 de 2 : paso 33, imagen 2 de 2
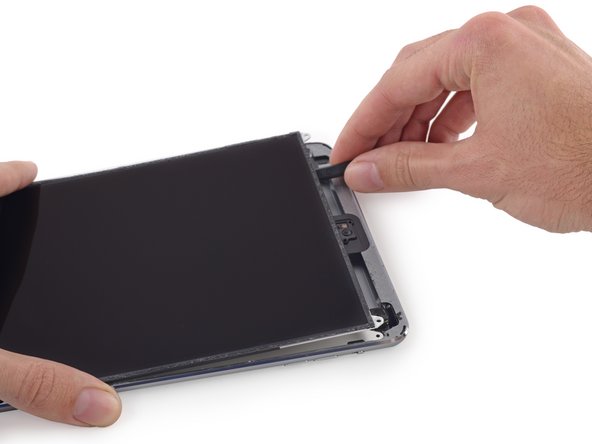
    • Do not attempt to fully remove the LCD. It is still connected to the iPad by several cables at the home button end. Lift only from the front-facing camera end.

    • Insert the flat end of a spudger under the LCD between it and the LCD shield plate and lift gently.

    • Be very careful not to get the spudger under the shield plate. It must be between the LCD and the shield.

    • Even bending the LCD slightly can permanently damage it, so be extremely careful as you lift.

  34. Este paso está sin traducir. Ayuda a traducirlo

    : paso 34, imagen 1 de 3 : paso 34, imagen 2 de 3 : paso 34, imagen 3 de 3
    • The LCD is secured by mild adhesive that should be loosened before you flip the LCD up from its shield plate.

    • Insert the spudger between the LCD and LCD shield plate and slide it to the far edge of the iPad.

  35. Este paso está sin traducir. Ayuda a traducirlo

    : paso 35, imagen 1 de 2 : paso 35, imagen 2 de 2
    • Two wide strips of tape connect the LCD to the speakers.

    • Hold the LCD with one hand, and the rear body of the iPad with the other.

    • Do not attempt to fully remove the LCD from the iPad.

    • Gently pull the LCD away from the speakers to separate the tape, being careful not to pull on the digitizer cable.

  36. Este paso está sin traducir. Ayuda a traducirlo

    : paso 36, imagen 1 de 2 : paso 36, imagen 2 de 2
    • Do not attempt to fully remove the LCD. It is still connected to the iPad by several cables at the home button end. Lift only from the front-facing camera end.

    • Flip the iPad LCD like a page in a book, lifting near the camera and turning it over the home button end of the rear case.

    • Be gentle and keep an eye on the LCD cables as you flip the display over.

    • Lay the LCD on the front panel glass to allow access to the display cables.

  37. Este paso está sin traducir. Ayuda a traducirlo

    : paso 37, imagen 1 de 3 : paso 37, imagen 2 de 3 : paso 37, imagen 3 de 3
    • Slide the tip of a spudger between the LCD and the adhesive tabs to free the display.

    • Push gently between each of the two adhesive tabs; be careful not to damage any of the nearby cables.

  38. Este paso está sin traducir. Ayuda a traducirlo

    : paso 38, imagen 1 de 1
    • Remove the seven 1.8 mm Phillips #00 screws from the LCD shield plate.

  39. Este paso está sin traducir. Ayuda a traducirlo

    : paso 39, imagen 1 de 3 : paso 39, imagen 2 de 3 : paso 39, imagen 3 de 3
    • Use the flat end of a spudger to pry the LCD shield plate up and out of the iPad.

    • Remove the LCD shield plate.

  40. , LCD: paso 40, imagen 1 de 1
    • Retira los siguientes tornillos Phillips #00 del soporte del cable de la pantalla:

    • Un tornillo de 2,8 mm

    • Tres tornillos de 1,4 mm

  41. : paso 41, imagen 1 de 3 : paso 41, imagen 2 de 3 : paso 41, imagen 3 de 3
    • Retira el soporte del cable de la pantalla del iPad.

  42. : paso 42, imagen 1 de 3 : paso 42, imagen 2 de 3 : paso 42, imagen 3 de 3
    • Utiliza la punta de un spudger para levantar el cable del botón de inicio de su zócalo en la placa lógica.

    • Dobla el cable plano del botón de inicio para apartarlo.

  43. : paso 43, imagen 1 de 3 : paso 43, imagen 2 de 3 : paso 43, imagen 3 de 3
    • Utiliza la punta de un spudger para levantar suavemente el conector de la batería de su zócalo en la placa lógica.

    • Ten mucho cuidado de hacer palanca sólo en el conector de la batería y no en el propio zócalo. Si haces palanca en el zócalo de la placa lógica, puede romper el conector por completo.

  44. : paso 44, imagen 1 de 2 : paso 44, imagen 2 de 2
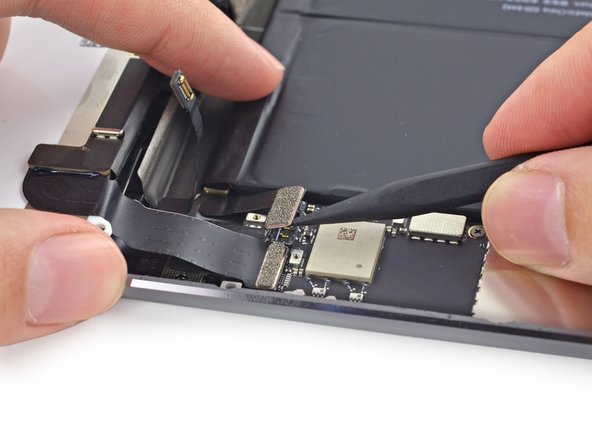
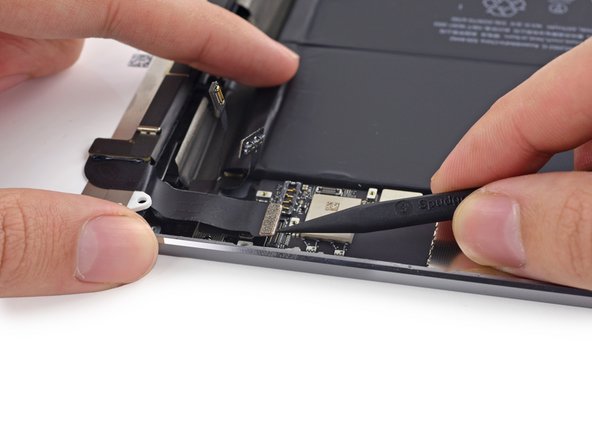
    • Utiliza la punta de un spudger para levantar el conector LCD de su zócalo en la placa lógica.

    • No hagas palanca contra el IC grande situado junto al conector, ya que podría romperse. Haz palanca suavemente desde el lado del conector como se muestra.

  45. : paso 45, imagen 1 de 1
    • Levanta y retira la pantalla LCD del iPad Mini 3.

  46. , Ensamblaje del panel frontal: paso 46, imagen 1 de 2 , Ensamblaje del panel frontal: paso 46, imagen 2 de 2
    • Reemplazo del ensamblaje de panel frontal del Pad Mini 3 Wi-Fi

  47. : paso 47, imagen 1 de 2 : paso 47, imagen 2 de 2
    • Desliza el extremo plano de un spudger bajo el lado de la batería de la tarjeta digitalizadora para empezar a separarla de la carcasa trasera.

  48. : paso 48, imagen 1 de 2 : paso 48, imagen 2 de 2
    • Levanta la tarjeta digitalizadora para liberar los últimos restos de adhesivo.

  49. : paso 49, imagen 1 de 1
    • Levanta y retira el conjunto del panel frontal del iPad.

  50. , Ensamblaje del botón de inicio: paso 50, imagen 1 de 3 , Ensamblaje del botón de inicio: paso 50, imagen 2 de 3 , Ensamblaje del botón de inicio: paso 50, imagen 3 de 3
    • Utiliza una púa de apertura para romper el adhesivo que sujeta el cable plano del botón de inicio al cable del digitalizador.

  51. : paso 51, imagen 1 de 3 : paso 51, imagen 2 de 3 : paso 51, imagen 3 de 3
    • Inserta una púa de apertura entre el cable plano del botón de inicio y el digitalizador.

    • Desliza la púa a lo largo del panel frontal, hacia el botón de inicio, para seguir separando el cable plano del botón de inicio del panel frontal.

  52. : paso 52, imagen 1 de 2 : paso 52, imagen 2 de 2
    • Utiliza una púa de apertura para levantar el hardware de control del botón de inicio de la parte posterior del panel frontal.

  53. : paso 53, imagen 1 de 2 : paso 53, imagen 2 de 2
    • Despega la última cinta que sujeta el cable plano del botón de inicio introduciendo una púa de apertura entre el cable y el digitalizador.

    • Continúa deslizando la púa por debajo del cable hasta separarlo completamente del panel frontal.

    • No intentes quitar el botón de inicio todavía.Todavía está sujeto por un soporte fuertemente adherido y una delicada junta.

  54. : paso 54, imagen 1 de 3 : paso 54, imagen 2 de 3 : paso 54, imagen 3 de 3
    • Utiliza una herramienta de apertura de plástico para despegar el soporte del botón de inicio de la parte posterior del digitalizador.

    • Retira el soporte del botón de inicio.

    • Cuando vuelvas a colocar el soporte del botón de inicio, utiliza un poco de adhesivo o cinta de doble cara de alta adherencia para garantizar una adhesión adecuada.

  55. : paso 55, imagen 1 de 3 : paso 55, imagen 2 de 3 : paso 55, imagen 3 de 3
    • Prepara un iOpener y colócalo sobre el borde inferior del digitalizador para aflojar el adhesivo que sujeta la junta del botón de inicio.

    • Espera unos dos minutos antes de continuar para asegurarse de que el adhesivo tiene tiempo suficiente para ablandarse.

    • Da la vuelta al panel digitalizador y empuja suavemente el botón de inicio hacia arriba para sacarlo de su ranura en el panel frontal.

    • Empuja lentamente y aplica la presión justa para separar lentamente la junta del cristal; si empujas demasiado fuerte, la junta se romperá.

  56. : paso 56, imagen 1 de 1
    • Retira el ensamblaje del botón de inicio.

  57. , Adherir el cable digitalizador: paso 57, imagen 1 de 3 , Adherir el cable digitalizador: paso 57, imagen 2 de 3 , Adherir el cable digitalizador: paso 57, imagen 3 de 3
    • Tu panel de reemplazo puede venir con este cable pre-adherido.

    • En el panel frontal de reemplazo, remueve la pieza pequeña de adhesivo que cubre el cable digitalizador.

    • Dobla el cable digitalizador en si mismo y presiona firmemente para asegurar el adhesivo,

  58. , Preparación del panel frontal: paso 58, imagen 1 de 2 , Preparación del panel frontal: paso 58, imagen 2 de 2
    • Es buen momento para encender tu iPad y probar todas las funciones antes de sellar y colocar el display en su lugar. Asegúrate de apagar tu iPad completamente antes de continuar.

    • Si estas instalando un nuevo conjunto de panel frontal, puede que necesites la siguiente preparación:

    • Despega la larga línea de plástico claro del interior del cristal.

    • Despega cualquier cubierta azul que cubra el adhesivo alrededor del perímetro del conjunto del panel frontal.

    • Una vez removido, las bandas de adhesivo estarán expuestas. No remuevas estas soportes hasta que estés listo para instalar el conjunto de panel frontal.

    • No remuevas ninguna cubierta de cobre de la región indicada, como la cinta amarilla Kapton o cinta de aislar negra.

    • Comprueba que el panel frontal este libre de huellas dactilares y suciedad antes de instalarlo en tu dispositivo.

  59. , Transfiere el imán de cobertura inteligente: paso 59, imagen 1 de 2 , Transfiere el imán de cobertura inteligente: paso 59, imagen 2 de 2
    • Antes de instalar tu nuevo panel frontal, necesitarás transferir el imán de cobertura inteligente de tu viejo panel frontal a tu nuevo panel frontal.

    • Coloca el borde de una herramienta de apertura en cada lado del magneto cerca del borde superior izquierdo en el conjunto del panel frontal.

    • Coloca cuidadosamente el borde de la herramienta de apertura derecha de plástico debajo del imán.

    • Firmemente sostén la herramienta de plástico de apertura derecha en este lugar.

    • Aprieta la herramienta de apertura de plástico izquierda debajo del imán y simultáneamente haz palanca y empújala hacia la herramienta de apertura de plástico derecha.

    • Esto necesitará un poco de fuerza ya que la cubierta del magneto inteligente esta sostenido en su lugar con un fuerte adhesivo.

  60. : paso 60, imagen 1 de 1
    • Si es necesario, usa un par de pinzas para parcialmente despegar la pieza de cinta que cubre el imán de cobertura inteligente cerca de la esquina izquierda del conjunto de panel frontal.

  61. : paso 61, imagen 1 de 2 : paso 61, imagen 2 de 2
    • Usa el procedimiento descrito anteriormente para remover el imán de cobertura inteligente cerca de la esquina inferior izquierda del conjunto de panel frontal.

  62. : paso 62, imagen 1 de 3 : paso 62, imagen 2 de 3 : paso 62, imagen 3 de 3
    • En este paso estarás transfiriendo el imán de cobertura inteligente a el NUEVO conjunto de panel frontal.

    • Usa un par de pinzas para colocar cuidadosamente el imán de cobertura inteligente en su lugar en la parte superior izquierda..

    • Repite el procedimiento con el imán de cobertura inteligente de la parte inferior izquierda.

    • Si es necesario, usa la punta de una herramienta de apertura de plástico para aplanar la pieza de cinta adherida a la parte de abajo izquierda del imán de cobertura inteligente.

Linea de Meta

19 personas más completaron esta guía.

Sam Goldheart

Miembro Desde 10/18/12

466,184 Reputación

538 Guías creadas

Equipo

iFixit Miembro de iFixit

Staff

136 Miembros

17,430 Guías creadas

6 comentarios

Why is the iPad Mini 3 WiFi being used instead of the iPad Mini 3 LTE?

Tobey - Contestar

This is NOT the iPad Mini 3 LTE… please fix the guide so people won't break the LCD when they follow these instructions.

Jared Smith - Contestar

Remember, fixit get money from us buying parts. so the more we try or break, the more parts we might need. so they only will give us enough info for us to be brave to try to repair. that is why before I do any repairs that I haven tried in the past, I will check here and also you tube videos from other people who tried and compare notes or tips where I have to be careful.

iphone_hack - Contestar

Over 3 years and they still haven’t fixed the guide to reflect the correct model? Very unprofessional conduct, ifixit team.

CeeJay - Contestar

Showing the wrong model iPad in the tutorial cost me a $55 mistake.

Jonathan Lowry - Contestar

Agregar Comentario

Ver Estadísticas:

Ultimas 24 horas: 1

Ultimos 7 días: 17

Ultimos 30 días: 59

Todo El Tiempo: 20,806