Esta versión puede contener ediciones incorrectas. Cambie a la última instantánea verificada.
Qué necesitas
-
-
Llena una olla o cacerola con suficiente agua para sumergir completamente el iOpener.
-
Calienta el agua hasta que hierva. Apaga el fuego.
-
Coloca un iOpener en el agua caliente durante 2-3 minutos. Asegúrate de que el iOpener esté completamente sumergido en el agua.
-
Utiliza unas pinzas para extraer el iOpener calentado del agua caliente.
-
Seca bien el iOpener con una toalla.
-
Tu iOpener está listo para ser utilizado. Si necesita recalentar el iOpener, calienta el agua hasta que hierva, apaga el fuego y coloca el iOpener en el agua durante 2-3 minutos.
-
-
-
Si tu cristal de pantalla está agrietado, mantén una mayor rotura contenida y evita daños corporales durante su reparación pegando el vidrio.
-
Coloca tiras superpuestas de cinta de embalaje transparente sobre la pantalla del iPad hasta que toda la cara está cubierta.
-
Haz lo que puedas para seguir el resto de la guía según lo descrito. Sin embargo, una vez que el vidrio se rompe, es probable que continúe agrietándose mientras trabajas, y puede que tengas que usar una herramienta metálica para sacar el vidrio.
-
-
-
Hay una pequeña brecha en el anillo adhesivo del iPad en la esquina superior derecha del iPad, aproximadamente 2,0 pulgadas (~ 5 cm) desde la parte superior del iPad. Vas a explotar esta debilidad.
-
Alinea la herramienta con el botón de silencio. Inserta la punta de una herramienta de apertura de plástico en el hueco entre el cristal frontal y el bisel de plástico. Basta con insertar la punta de la herramienta de apertura, lo suficiente como para ensanchar la grieta.
-
-
-
-
Una vez que haya pasado la antena Wi-FI (aproximadamente 75 mm desde el borde derecho, o justo al lado del botón de inicio) vuelva a insertar la selección de apertura a su profundidad máxima.
-
Desliza la palanca hacia la derecha, liberando el adhesivo que sujeta la antena Wi-Fi al cristal frontal.
-
La antena está conectada a la parte inferior del iPad a través de tornillos y un cable. Este paso separa la antena del panel frontal, asegurando que al retirar el panel, la antena no se dañará.
-
-
-
Desliza la púa de apertura a lo largo del borde superior del iPad, tirando ligeramente hacia fuera para rodear el soporte frontal de la cámara.
-
El adhesivo a lo largo de esta sección es muy grueso, y puede requerirse una cantidad justa de fuerza. Trabaja con cuidado y lentamente, asegurándose de no resbalar y dañarse a sí mismo o a tu iPad.
-
-
-
Desliza la púa de apertura a lo largo del borde izquierdo del iPad, liberando el adhesivo a medida que avanza. El adhesivo es delgado debido al digitalizador a lo largo de todo el lado izquierdo. Asegúrate de que la púa no esté más de 10 mm dentro para evitar dañar el digitalizador.
-
-
-
Sosteniendo el iPad por las esquinas superior e inferior derecha, gira el cristal delantero lejos del iPad.
-
Durante el montaje, utiliza un paño de microfibra y aire comprimido para limpiar el polvo o las huellas dactilares de la pantalla LCD antes de volver a instalar el cristal.
-
-
Este paso está sin traducir. Ayuda a traducirlo
-
Remove the four 2.0 mm Phillips screws securing the LCD to the rear case.
-
-
Este paso está sin traducir. Ayuda a traducirlo
-
Lift the LCD from its long edge closest to the volume buttons and rotate it out of the rear case.
-
Lay the LCD on the front panel as seen in the second picture.
-
-
Este paso está sin traducir. Ayuda a traducirlo
-
Use the edge of a plastic opening tool to flip up the metal retaining clip securing the display data cable to its socket on the logic board.
-
-
Este paso está sin traducir. Ayuda a traducirlo
-
Pull the display data cable out of its socket on the logic board.
-
-
Este paso está sin traducir. Ayuda a traducirlo
-
Carefully peel the rubber cover off the metal camera retainer and remove it from the iPad 2.
-
-
Este paso está sin traducir. Ayuda a traducirlo
-
Remove the following two screws:
-
One 3.3 mm Phillips screw
-
One 2.1 mm Phillips screw
-
Lift the metal retainer clip straight up from its recess in the rear panel.
-
-
Este paso está sin traducir. Ayuda a traducirlo
-
Use a plastic opening tool to pry the rear camera connector up from its socket on the control board.
-
Remove the rear facing camera.
-
-
Este paso está sin traducir. Ayuda a traducirlo
-
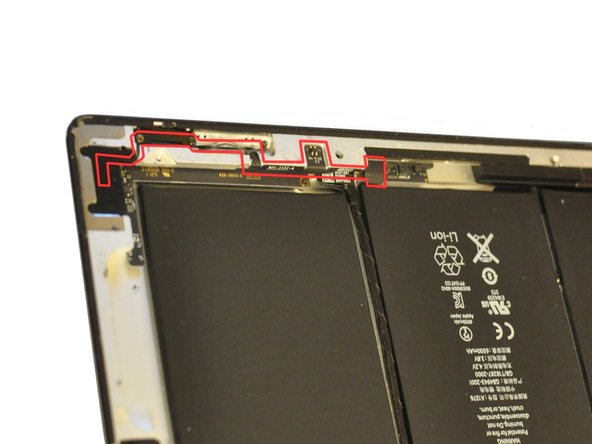
Once the LCD panel and rear camera are removed, you can begin removing the Power, Mute, Volume cable (hereafter called the PMV cable for short).
-
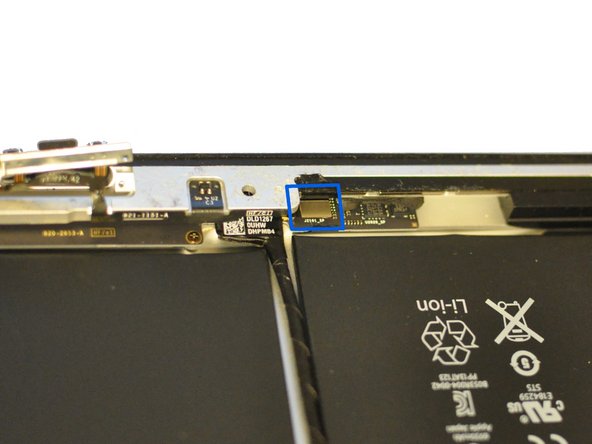
The PMV cable starts near the end of the control board cable that runs between two of the battery units, and runs in a complicated path along the side and corner of the iPad. (see photos 1 and 2)
-
The end of the PMV cable is wrapped in tape. Begin by removing this tape to expose the silver rectangular connector on the end of the cable. (see photo 3)
-
Use a plastic opening tool or small screwdriver to lift free the rectangular connector.
-
-
Este paso está sin traducir. Ayuda a traducirlo
-
Now you must disassemble the side switches.
-
Remove the 2.1 mm Phillips screw from the volume switch mechanism.
-
Remove the two 5.0 mm Phillips screws from the mute slider mechanism.
-
If you have not already removed the rear camera, do so now.
-
-
Este paso está sin traducir. Ayuda a traducirlo
-
Remove the two 2.5 mm Phillips screws from the back of the power switch mechanism.
-
You can then push in on the power switch (on the exterior of the iPad) to push the mechanism's internal metal plate loose.
-
You can then peel the PMV cable free from the iPad's case, working backwards from the power switch towards the mute switch.
-
Lift free the small metal frame piece supporting the mute and volume switches.
-
Note: The photo shows the mute and volume switch frame being removed before the rear camera and power switch; this is possible but it's probably best to start with the power switch first.
-
-
Este paso está sin traducir. Ayuda a traducirlo
-
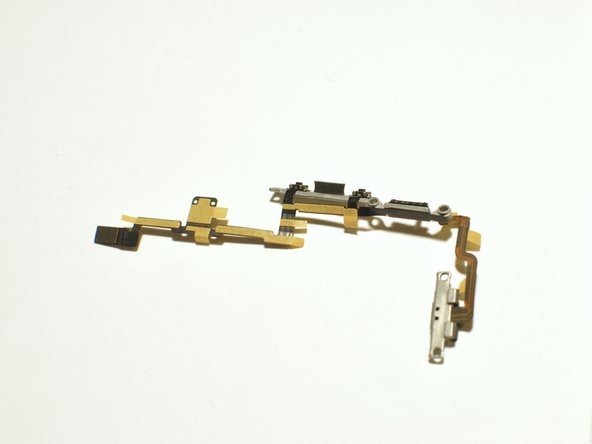
The PMV cable itself is a complicated piece with three integrated buttons and a switch slider.
-
You will need to carefully peel off the old cable free from the ipad frame and the two metal supports (one for the power switch, one for the mute and volume switches).
-
Note that each button is held in place with a tiny bit of adhesive. Use a plastic opening tool or small screwdriver to lift them free.
-
-
Este paso está sin traducir. Ayuda a traducirlo
-
Now assemble the replacement PMV cable to the two metal brackets.
-
Each button has on its underside two tiny black plastic pegs which fit into holes in the metal frames, to ensure the proper fit. Make sure to line these up properly when attaching the cable to the metal frames. The reassembled cable should look as shown in the figures.
-
Install the new cable working from the power switch back towards the mute and volume switches and then to the cable connector, snaking the PMV cable along its complicated path.
-
The replacement part should have adhesive patches to hold the cable in place.
-
Attaching the rectangular cable connector is tricky as there is little clearance from the edge of the iPad case. It may be helpful to use a plastic opening tool to push it gently until it snaps into place.
-


Cancelar: No complete esta guía.
114 personas más completaron esta guía.
6 comentarios
Hi, we have an iPad 2 in for repair and needs a new power button assembly. Thing is the ribbon is different from a standard iPad 2. There are subtle differences in the inside too. It is definitely a genuine iPad, and has same model numbers. Anyone come across this before?
Chris, I have the same problem with power ribbon cable it's not the one everyone is selling, did you manage to find a source who sold the correct part?
David -
Completed this guide thank you. Just want to point out that there are two cables for the iPad 2, making sure that you have the right one is very important. Be very careful around the camera area of the iPad too this is very tricky and there are no pictures of this part, wish I had done some now to upload for others, but I'm sure that I'll have another to do before to long and I will then. One main tip... Don't stick anything down till you've got everything secure as removing the the tape is very tricky once stuck and you don't want to be replacing this again...
Beware of fake versions of this cable 821-1151-A from many suppliers. The Hall Effect magnetic switch will then not work because the printed circuit traces on the cable are incorrect. The fake cable can be identified by an ohmmeter showing the two contacts for the Hall chip farthest from the cable edge to be shorted together.