Saltar al contenido principal

Reemplazo del Bisel Frontal del iMac Intel 24" EMC 2134 y 2211

Qué necesitas

  1. Reemplazo del Bisel Frontal del iMac Intel 24" EMC 2134 y 2211, Puerta de Acceso: paso 1, imagen 1 de 1
    • Afloja el único tornillo Phillips en el centro de la puerta de acceso.

    • Este tornillo es imperdible en la puerta de acceso.

    • Retira la puerta de acceso de tu iMac.

    PH2 head necessary to remove screw.

    airshack - Contestar

    Mine was as written, a PH1.

    tpivo - Contestar

  2. Reemplazo del Bisel Frontal del iMac Intel 24" EMC 2134 y 2211, Panel de Vidrio: paso 2, imagen 1 de 2 Reemplazo del Bisel Frontal del iMac Intel 24" EMC 2134 y 2211, Panel de Vidrio: paso 2, imagen 2 de 2
    Herramienta utilizada en este paso:
    Heavy-Duty Suction Cups (Pair)
    $14.95
    Comprar
    • El panel de vidrio se fija al bisel frontal con catorce imanes alrededor de su perímetro.

    • Pega dos ventosas en las esquinas opuestas del panel de vidrio.

    • Para colocar las ventosas que vendemos, primero coloca la ventosa con el mango móvil paralelo a la cara del panel de vidrio. Mientras sostienes suavemente la ventosa contra el vidrio, levanta la manija móvil hasta que quede paralela con la otra manija.

    • Si tus ventosas se niegan a adherirse, intenta limpiar tanto el panel de vidrio como la ventosa con un solvente suave como Windex.

    Save $15 dollars and use a plunger. Works perfectly.

    Michael Ybarra - Contestar

    Even better and more elegant: go to a household shop and buy two transparent plastic bathroom baskets with two suction cups each. I found them in Xenos in the Netherlands (maybe also in Germany).

    freed - Contestar

    Perhaps not so elegant but equally effective without any adverse effects to either... try a vacuum cleaner.

    Andrew Dobson - Contestar

    The same kind of suction cups are available from Harbor Freight Tools (Item # 62715) for $2.99 each or $5.98/pair (plus sales tax).

    Bob Atkinson - Contestar

  3. Reemplazo del Bisel Frontal del iMac Intel 24" EMC 2134 y 2211: paso 3, imagen 1 de 1
    • Tira con cuidado del panel de vidrio hacia arriba del iMac.

    • El panel de vidrio tiene varios pines de posicionamiento alrededor de su perímetro. Para evitar cortar estos pasadores del panel de vidrio, asegúrate de tirar solo hacia arriba durante la extracción.

    • Sea meticuloso al limpiar la pantalla LCD y la cara interior del panel de vidrio antes de la reinstalación, ya que las huellas dactilares o el polvo atrapado en el interior serán molestos y visibles cuando la pantalla esté encendida.

    The glass panel is somewhat thin and should come away quite easily without much force so be gentle.

    adamngordon - Contestar

    Just an FYI - my glass panel did not line up perfectly when reinstalled. Off by just 1mm. May take another attempt at it later, but does not interfere with the iSight camera. Only someone with an eagle-eye (like me) will notice it's not perfect.

    ajpfl - Contestar

    To reinstall the glass, I lined up the bottom edge first, then pivoted the top in. The magnets pulled it quickly into place.

    Magnus Dalen - Contestar

    I didn't want to use such small suction cups.. so I got suction bathroom handles from Home Depot. Very sturdy and to me, safer choice.

    Gail - Contestar

  4. Reemplazo del Bisel Frontal del iMac Intel 24" EMC 2134 y 2211, Bisel Frontal: paso 4, imagen 1 de 2 Reemplazo del Bisel Frontal del iMac Intel 24" EMC 2134 y 2211, Bisel Frontal: paso 4, imagen 2 de 2
    • Retira los siguientes 12 tornillos que sujetan el bisel frontal a la carcasa trasera:

    • Ocho tornillos Torx T8 de 13 mm

    • Cuatro tornillos Torx T8 de 25 mm

    • Es posible que tengas tornillos de diferentes longitudes según tu modelo:

    • Seis tornillos Torx T8 de 13 mm

    • Cuatro tornillos Torx T8 de 25 mm

    • Dos tornillos Torx T8 de 35 mm

    I only had two 25 mm T8 Torx on my model. (The two inner orange circles as shown in the diagram.)

    stevejansen - Contestar

    I don't know if this is different but i am in the process of disassembling a 24' imac emc: 2134. i have only: (2) 25 mm T8 screws the inner two on the bottom of the screen. I have (4) 13 mm t8 screws the outer most holes on the bottom and the 2 holes on the right side of the monitor above the drive entrance and the remaining holes are (6) 11 mm t8 screws

    ccarter314 - Contestar

    I have the same screws as ccarter on a 2211 except on the bottom row there are only 4 screws total, the longer ones go in the middle two.

    maccentric -

    The Torx set I bought from ifixIt is well worth the money. My screw heads in this step were T9 not T8. THe T8 bit was too sloppy in the screwhead and there was a risk of rounding the slots. Having the option to go a size-up was perfect.

    Troy - Contestar

    My 2211 has a different screw configuration.

    2 - 32mm long screws towards the middle of the bottom edge

    4 - 18mm long screws (2 at the corners of the bottom edge and 2 along the right edge)

    6 - 13mm screws along top and left edges

    christian - Contestar

    Mine is the same — two very long, four medium, and six short. Also my T9 worked better than my T8 which was a bit loose.

    johann beda -

    I have the same screws as Christian. The key is to make sure all screws are flush to the surface, so that the glass can be held up by the magnets.

    Kelvin Lau - Contestar

    On mine, for the red circles, I had the six 13mm Torx plus two 25mm Torx. It's not indicated in the picture here, but the 25mm Torx went on either side of the optical drive.

    JD Fox Micro - Contestar

    I marked next to each hole with a pencil "S, M or L" to indicate which length screw goes where. No guess work on reassembly.

    Magnus Dalen - Contestar

    I dropped my screwdriver on the lcd and nicked it. :(

    hewsey - Contestar

  5. Reemplazo del Bisel Frontal del iMac Intel 24" EMC 2134 y 2211: paso 5, imagen 1 de 2 Reemplazo del Bisel Frontal del iMac Intel 24" EMC 2134 y 2211: paso 5, imagen 2 de 2
    • El bisel frontal todavía está conectado al iMac por el cable del micrófono.

    • Levanta con cuidado el bisel frontal desde el borde superior de la carcasa trasera. Es útil usar los pulgares para empujar hacia abajo muy suavemente en las esquinas de la pantalla.

    • Una vez que el borde superior del bisel frontal haya salido de la carcasa trasera, gira el bisel delantero hacia el soporte y levántalo de la carcasa trasera.

    • Cuando vuelvas a instalar el marco frontal, comienza en el borde inferior y asegúrate de que esté al ras con la carcasa trasera antes de bajar el borde superior sobre el iMac.

    The microphone cable must be disconnected BEFORE rotating the bezel towards the stand.

    Also, the bezel covers the sides of the case, not just the front. This isn't obvious from the pictures.

    wallace - Contestar

    Looking at the meaning of the LEDS

    i've got 3 LEDS on but i don't get a chime or the screen.

    i am going to check the inverter voltages but can only find info for the 20" macs iMac Intel 20" EMC 2210 Power Supply Output Voltage Test

    does anyone know where i can get info for the 24"

    samraby - Contestar

    i have the same thing, 3 LEDs on but no chime and no screen.

    what is the fix? and problem?

    Bill -

    I'm in the same position. 3 LED's, No chime, no life in the screen, Optical drive starts up but no other signs of life i.e.:fans also don't start up.....

    Any guidance would be greatly appreciated!!

    Dominik - Contestar

  6. Reemplazo del Bisel Frontal del iMac Intel 24" EMC 2134 y 2211: paso 6, imagen 1 de 1
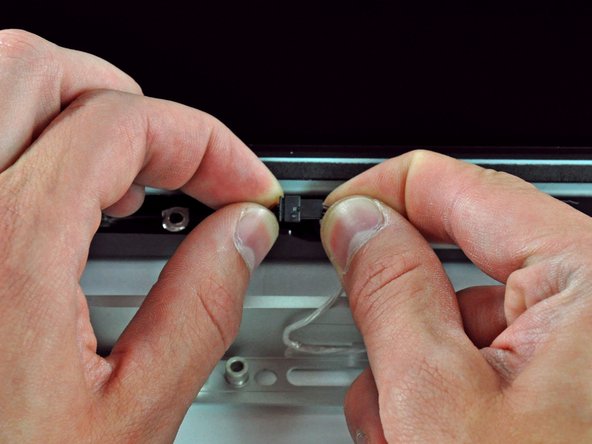
    • Desconecta el conector del cable del micrófono, quitando la cinta según sea necesario.

    • Para que el bisel frontal se asiente correctamente, asegúrate de colocar el cable del micrófono y el conector en el espacio vacío junto a la placa de la cámara.

    I didn't disconect the cable. I was working on a large table that allowed me to carefully flip the bezel upside down and rest it that way with the cable connected through the entire process.

    fulker - Contestar

    I also skipped disconnecting the microphone cable. I have a large table and I stacked some books next to the iMac. There was plenty of cable for the bezel to fold nicely over the top of the iMac.

    mikkorongas - Contestar

    I needed to move the bezel away, so disconnected the cable. On reassembly found that the pins had pulled out of the plastic housing. Need to know orientation of the 3 wires in the housing.

    prreitz - Contestar

    I used the floor instead of a table and left the cable connected.

    Frank Carrano - Contestar

Conclusión

Para volver a armar tu dispositivo, sigue estas instrucciones en orden inverso.

37 personas más completaron esta guía.

Un agradecimiento especial a estos traductores:

en es

100%

¡ Francisco Javier Saiz Esteban nos está ayudando a reparar el mundo! ¿Quieres contribuir?
Empezar a traducir ›

Brittany McCrigler

Miembro Desde 03/05/12

89,014 Reputación

131 Guías creadas

Equipo

iFixit Miembro de iFixit

Staff

135 Miembros

16,817 Guías creadas

Un comentario

Te damos las gracias por tomarte el tiempo de mostrarnos tan útiles consejos, saludos!

Raul Jeronimo - Contestar

Agregar Comentario

Ver Estadísticas:

Ultimas 24 horas: 4

Ultimos 7 días: 18

Ultimos 30 días: 60

Todo El Tiempo: 24,597