Saltar al contenido principal

Xbox Series X 2TB Galaxy Black Chassis Removal

Sólo Prerrequisito
Esta guía solo debería usarse como prerrequisito para otras guías. Por tanto, estará incompleta.

Qué necesitas

  1. Xbox Series X 2TB Galaxy Black Chassis Removal, Xbox Series X 2TB Galaxy Black Chassis Removal: paso 1, imagen 1 de 3 Xbox Series X 2TB Galaxy Black Chassis Removal, Xbox Series X 2TB Galaxy Black Chassis Removal: paso 1, imagen 2 de 3 Xbox Series X 2TB Galaxy Black Chassis Removal, Xbox Series X 2TB Galaxy Black Chassis Removal: paso 1, imagen 3 de 3
    • The ribbon cables and their connectors are extremely fragile, so always open locking tabs gently and pull cables slowly.

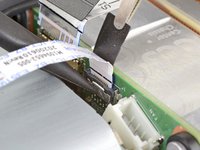
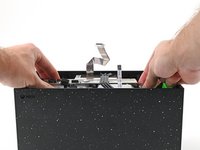
    • Use the flat end of a spudger to flip open the metal locking tab on the USB port ribbon cable.

    • During reassembly, gently snap the metal locking tab back into place once the cable has been inserted.

  2. Xbox Series X 2TB Galaxy Black Chassis Removal: paso 2, imagen 1 de 2 Xbox Series X 2TB Galaxy Black Chassis Removal: paso 2, imagen 2 de 2
    • Use a pair of tweezers to pull up on the black plastic pull tab to disconnect the USB port cable.

    • Pull only on the pull tab, not the cable itself.

    • If the USB port cable feels adhered to the metal chassis, use an apply an iOpener or hair dryer to heat the cable. Depending on your model of Xbox, you may also need to slide an opening pick under the cable to separate the adhesive.

  3. Xbox Series X 2TB Galaxy Black Chassis Removal, Disconnect the power button cable: paso 3, imagen 1 de 3 Xbox Series X 2TB Galaxy Black Chassis Removal, Disconnect the power button cable: paso 3, imagen 2 de 3 Xbox Series X 2TB Galaxy Black Chassis Removal, Disconnect the power button cable: paso 3, imagen 3 de 3
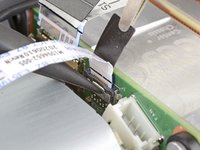
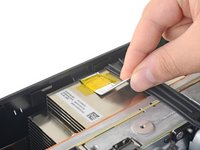
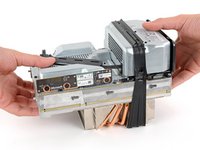
    • Use the pointed end of a spudger to depress the metal tab on the side of the power button cable's board connector.

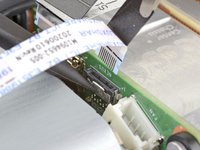
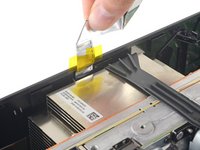
    • With the metal tab depressed, use a pair of tweezers to pull up on the pull tab to disconnect the power button cable from the center chassis.

    • Pull only on the pull tab, not the cable itself.

    • Don't pull on the cable without depressing the metal tab, otherwise you risk damaging either the cable or the connector.

    • During reassembly, the cable should lightly "snap" into place when inserted.

  4. Xbox Series X 2TB Galaxy Black Chassis Removal, Remove the chassis screws: paso 4, imagen 1 de 2 Xbox Series X 2TB Galaxy Black Chassis Removal, Remove the chassis screws: paso 4, imagen 2 de 2
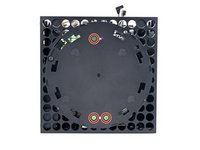
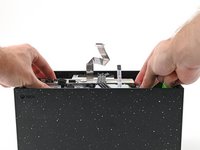
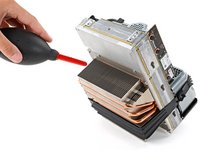
    • Use a T8 Torx driver to remove the three 7.4 mm screws securing the center chassis assembly to the shell.

  5. Xbox Series X 2TB Galaxy Black Chassis Removal: paso 5, imagen 1 de 2 Xbox Series X 2TB Galaxy Black Chassis Removal: paso 5, imagen 2 de 2
    • Gently peel the taped USB port ribbon cable off of the heatsink.

    • Depending on your model of Xbox, the adhesive may be on the underside of the cable. If so, use an iOpener or hair dryer to heat the cable.

  6. Xbox Series X 2TB Galaxy Black Chassis Removal: paso 6, imagen 1 de 3 Xbox Series X 2TB Galaxy Black Chassis Removal: paso 6, imagen 2 de 3 Xbox Series X 2TB Galaxy Black Chassis Removal: paso 6, imagen 3 de 3
    • The center chassis assembly is aligned to the bottom of the shell with guide pegs. These pegs will need to slide out of their slots to allow the chassis to be lifted out.

    • Grip the chassis and pull it towards the top of the shell, uncoupling the guide pegs from the shell.

    • Use two hands to lift out the chassis to remove it from the shell.

    • During reassembly, make sure neither of the ribbon cables get pinched as you lower the center chassis into the shell.

  7. Xbox Series X 2TB Galaxy Black Chassis Removal: paso 7, imagen 1 de 2 Xbox Series X 2TB Galaxy Black Chassis Removal: paso 7, imagen 2 de 2
    Herramienta utilizada en este paso:
    Dust Blower
    $4.99
    • Gently place the chassis heatsink-side down on a clean work surface.

    • During reassembly, this is a good point to clean the heatsink fins of any dust, dirt, or debris that may have built up over time. Use a dust blower or compressed air to clear out the fins.

Conclusión

To reassemble your device, follow these instructions in reverse order.

Alex Diaz-Kokaisl

Miembro Desde 01/16/22

162,362 Reputación

769 Guías creadas

Equipo

iFixit Miembro de iFixit

Staff

118 Miembros

19,453 Guías creadas

0 comentarios

Agregar Comentario

Ver Estadísticas:

Ultimas 24 horas: 0

Ultimos 7 días: 6

Ultimos 30 días: 9

Todo El Tiempo: 14