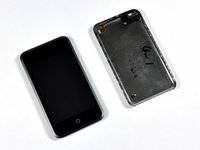
Introducción
¿La batería no dura mucho? Cámbiala (requiere soldadura).
Qué necesitas
-
-
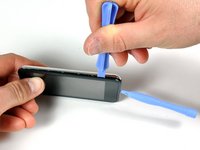
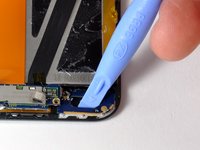
Inserta la pequeña herramienta de apertura de plástico en la costura entre el panel de plástico de la pantalla y el panel trasero de metal. El borde en ángulo debe apuntar hacia el panel trasero de metal.
-
Sostén la herramienta en su lugar una vez que esté encajada en el interior y los dos paneles estén separados.
-
-
-
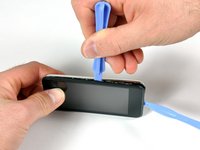
Inserta la herramienta de apertura grande en el lado derecho del iPod, con el borde de la herramienta apuntando hacia la parte posterior de metal.
-
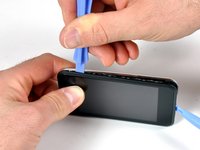
Agranda suavemente la grieta existente moviendo la herramienta de apertura grande y moviéndola hacia la derecha.
-
Continúa haciéndolo hasta que el lado derecho del iPod esté suelto.
-
-
-
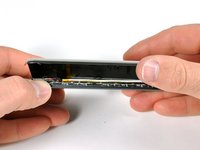
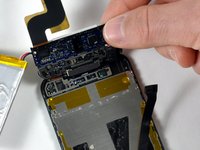
Voltea el iPod 180 grados para que coincida con la orientación de la imagen.
-
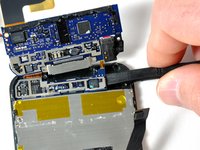
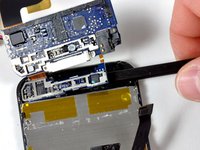
Inserta con cuidado el spudger entre la batería y la pantalla. Hay cables de enrutamiento debajo, así que asegúrate de soltar la batería lentamente.
In step five I was very careful with the spudger at getting the battery loose from the LCD screen but now after reassembly I have white bleed through all around three sides of the LCD screen. It shows up easily on light colored screen backgrounds like the Set up screen. It looks like the spudger some how damaged the back side of the LCD screen during disassembly. Is this glue heat sensitive or is there an alternative to using the spudger that a user can suggest?
Cita de DUSTmurph:
Could I possibly just cut the battery cables in this step and solder them to the wires on the new battery??
I am thinking about trying this myself - It seems a lot less labor intensive than desoldering in that very tight location. I guess the big concern is if there is room for insulation on the spliced wires when the unit gets closed up.
Cita de barlowdo:
I am thinking about trying this myself - It seems a lot less labor intensive than desoldering in that very tight location. I guess the big concern is if there is room for insulation on the spliced wires when the unit gets closed up.
I will add that there is really not a lot of wire length to do a splice on and it may be as difficult to do as soldering to the circuit board.
Yes, even without de-soldering/soldering, one can simply cut the two wires then put a jumper wire on re-installation.
I agree with DUSTmurph's, comment.
Is there any jumper little enough to fit in it?
You could cut the cables and solder the new batt's to these, but I'd make sure the total length of the splice is the same to the original. Also use the smallest-diameter heat-shrink tube to insulate so as not to make a bump that prevents the trinket to close properly.
-
-
-
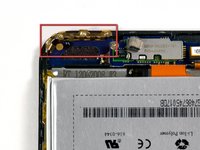
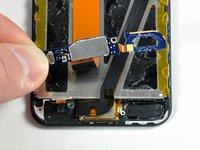
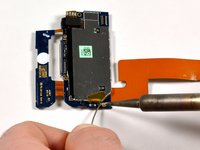
Usa un spudger (o tus uñas) para quitar la antena dorada. La antena se dobla fácilmente, así que asegúrate de no aplicar demasiada presión. Al volver a armar, coloca la antena dorada en su lugar antes de insertar las placas de circuito de la antena.
-
Usa el spudger para quitar el conector del lado izquierdo.
-
Retira dos tornillos Phillips.
There is a gold spring coil on the side of the board near the left side. BE VERY CAREFUL! It extremely brittle metal and if smashed down, won't connect with the power switch. Once smashed down, attempting to stretch it back out will break it. I found out the hard way and the only way to fix it is to replace the logic board.
Are these really Phillips 00 screws? My supposedly 00 screwdriver is way too big. Maybe they are really Phillips 000. The screws in my device were set with blue locktight (grr). I was able to unscrew three of the six with very small straight edge screwdriver but had to sand off the heads of three more with a Dremel tool. This is dangerous. During the process I barely nicked a component near where the antenna cable connects to the logic board. Now I have a new battery and no WiFi.
-
-
-
-
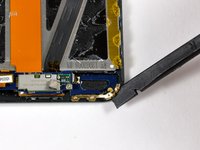
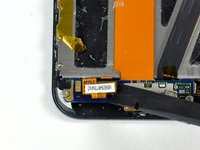
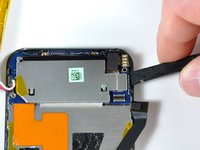
La placa de bucle de antena debe levantarse (está pegada). Con cuidado, usa una herramienta de apertura de plástico o un spudger para desalojar la placa de bucle de antena. La placa está conectada a la electrónica de la antena mediante un pequeño cable plano. Este conjunto de dos tablas es muy frágil.
-
Las dos placas de circuito de antena pequeñas ahora se pueden levantar juntas y su cable naranja se puede separar de la pantalla.
-
-
-
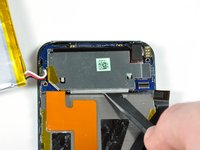
Usa el spudger para quitar la cinta adhesiva negra. Esto revelará los dos tornillos superiores en la imagen.
-
Desatornilla los cuatro tornillos Phillips.
-
Usa un spudger para desconectar el conector negro.
-
Usa un spudger para desconectar el conector negro.
Actually you can skip all this taking apart sequence - just remove older battery, clean the soldering holes and solder wires back from top. just put some thin plastic film under logic board where the soldering points are while soldering wires in. I replaced god knows how many batteries like this and they all are fine. that way you can replace battery in 5minutes!
Right, this is what I did. Although it took me more than 5 minutes just to get the case open.
-
-
-
Usa el spudger para aflojar la placa lógica de varios lados. Se mantiene en su lugar con pegamento y los cuatro tornillos que se quitaron en el paso anterior.
-
-
-
Levanta suavemente la placa lógica (y los componentes adjuntos) hacia arriba.
-
Desliza el spudger debajo de la pequeña porción de la placa lógica. La tabla debe aflojarse una vez que el spudger se haya deslizado casi por completo hacia el otro lado.
I've managed to strip a screw. Be careful of that!
When I did this, the headphone jack cable sheared completely. The headphone jack was still down and the board flipped up. There was almost no resistance to indicate something was tearing. Luckily, installing a new headphone jack is pretty easy if you have a fine tip soldering iron. But it was a big delay as I had to order the part.
Cita de jonathan:
When I did this, the headphone jack cable sheared completely. The headphone jack was still down and the board flipped up. There was almost no resistance to indicate something was tearing. Luckily, installing a new headphone jack is pretty easy if you have a fine tip soldering iron. But it was a big delay as I had to order the part.
Cita de Ryan:
Do you have any specific info or guide on how to replace the headphone jack? I agreed to help a friend with their iPod and it turns out a new headphone jack is in order. I have never done a repair on an iPod requiring soldering. I think myself and many others would be grateful for a tutorial.
Cita de Ryan Lacy:
Do you have any specific info or guide on how to replace the headphone jack? I agreed to help a friend with their iPod and it turns out a new headphone jack is in order. I have never done a repair on an iPod requiring soldering. I think myself and many others would be grateful for a tutorial.
Well what worked for me was keeping the old connector on the soldered part. The new ribbon has two holes on each solder connecting point. If the ribbon isn't already ripped, go ahead and rip/cut it. Then simply place the new ribbon on top of the existing end with the solder blobs on it. Press down with the heated tip from on top of the solder pads and the heat should be enough to melt the solder beneath. It should flow right up through the holes with the pressure and voila.
Jonathan did you post any photos or a video of your soldering the new headphone jack to the logic board? I did as you did and broke the small ribbon or cable connecting the headphone jack to the logic board. This is my first attempt at repairing an electronic device, and it ended very badly.
I do it without removing the smaller card : it is more safety !!
-
-
-
Usa la punta de un spudger para quitar el pegamento blanco turbio que cubre los contactos de la batería.
-
-
-
Coloca la mecha desoldadora encima de la bola de soldadura existente.
-
Coloca el soldador encima de la mecha sobre la bola de soldadura existente.
-
Sostén el soldador en su lugar hasta que la soldadura se derrita en la mecha.
-
Repite el mismo procedimiento en los dos conectores restantes.
-
Saca la batería vieja del iPod. Asegúrate de que se haya quitado toda la soldadura antes de sacar los cables de la placa. Los cables deben salir libres con poca o ninguna resistencia.
-
-
-
Derrite una pequeña gota de soldadura directamente sobre el conector metálico de la placa colocando el soldador sobre el conector metálico y luego presionando la soldadura contra la punta del soldador y la placa.
-
Una vez que una pequeña cantidad de soldadura se haya derretido en la placa, levanta primero la soldadura y luego el soldador.
I would remove all the solder and use a pin to clear the holes before inserting the cables and resoldering.
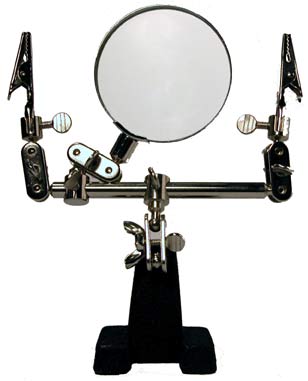
Also get a 'helping hand' - they are a few quid on eBay - similar to this: http://www.laventure.net/tourist/cables3...
I removed all the solder as Neil suggests. But to pull the solder out with the wick you may need to add some a little solder to the top of the hole first so that you get good thermal conductivity between the wick and the solder you are trying to remove from the small hole.
-
-
-
Coloca el cable de la batería nueva en el cordón de soldadura nuevo.
-
Presiona la punta del soldador sobre el cordón de soldadura hasta que se derrita.
-
Desliza el cable conductor en la soldadura líquida hasta que el cable pase por el centro del cordón, luego retira el soldador.
-
Continúa con las otras dos conexiones de la misma manera, teniendo especial cuidado de no soldar dos de los conectores entre sí.
-
-
-
Los cables deben verse muy similares a esta imagen una vez que hayas terminado de soldar.
Hey guys, I have a question, I have an Ipod touch 1st gen but it needs a battery and the replacements are too expensive so I think to just use brand new nokia 3 contact battery but I don't know what pins are on the ipod and I can't find chematic anywere, do anyone know.
-


Para volver a armar tu dispositivo, sigue estas instrucciones en orden inverso.
Para volver a armar tu dispositivo, sigue estas instrucciones en orden inverso.
Cancelar: No complete esta guía.
134 personas más completaron esta guía.
Un agradecimiento especial a estos traductores:
100%

¡ Francisco Javier Saiz Esteban nos está ayudando a reparar el mundo! ¿Quieres contribuir?
Empezar a traducir ›

8 comentarios
When i did this i found the desoldiering wick un necessary. A helper is mutch advised, she held it, i heated and pulled out the old wires, then reused the soldier already there
If you don't want to go to all the trouble and risk of breaking something. Don't take everything apart. Just cut the battery wires as close as possible to the old battery terminals and splice the wires from the new battery on them. A little solder and a bit of electrical tape and your done! It's miller time!
while this might be an easy way to get the job done, it is for lack of a better word half-assed. It opens the door for shorts and part malfunction in the future. While i can see where you are coming from, it is not the corect way. Do it right the first time.
I stopped at step 5, cut the battery wires and spliced them to those on the new battery and then scotch taped them. It worked, although to official method is doubtless better.
I recommend examining the metal case fastening carefully to see that prongs are flattened before reassembly. Several of mine were bent out and up.
I took it apart and stopped before step 6. Took it to an experienced radio repairs man. I think he did a good work soldering three point for £5 but I forgot to check the headphone jack before taking it back home and 'of course' the jack is not working any more. I've did everything I could find on internet to make the jack work again but no.
I doubt it could have broken in the repair but who knows...
Anyway I've ordered a spare jack from Amazon for £5 and I'm thinking of changing it myself.
Unfortunately though the ipod has given up totally on me now. I can't even make it wake/start up connected to iTunes. Oh, dear! my good old friend, won't you please come back to me?!
Bonjour,
le liens propose une batterie chez Amazon est 1600 mAh, est-ce que l’appareil peut supporté cette intensité ?
I found the little plastic tools to be useless. I finally got the case apart using jeweler's screwdrivers, guitar picks, and believe it or not, a wood chisel to split the sides of the case open. And believe it or not, I got back together again - not quite as good as new, but good enough.
I'd REALLY love to know how Apple technicians get this little beast apart without damaging or nicking the case.
phinegan - Contestar
Who's betting the actually replace the back with a brand-spanker - if they repair them at all!
marc draco - Contestar
They do replace it with a new back, thats why they said that if you have words on the back (engraved) by someone other then apple, your going to lose those but if there done by apple then they'll do it again (when replaceing the battery they say that)
shadowfox00101 - Contestar
I replaced my battery in my 1st gen iPod and it still doesn't hold a charge for more then 5 min. Any ideas?
ae86keidori - Contestar
mine has the same problem. My 1st gen iPod touch dropped in water. after that It still works but can't hold a charge for more than 5 mins. I changed the battery and still the same.
One of my friend give me some advices, I simply clean the whole logic board with some non water alcohol, and it works. It works perfect now. You can have a try.
Liku - Contestar
I found a method that worked for me in opening the case. I started at the top, and used a sewing needle. I'm sure a straight pin world work also. Using some padding between the back of the needle and my hand, I worked the point of the needle between the casing and the metal back. Don't push straight into the gap, push on the edge of the gap down toward the back of the iPod. Once you feel the needle slip in, use it as a guide to get your prying tool in there.
Paul Jones - Contestar
Hey, I made it, it's open! My opener tool was useless. A swiss army knife and lots of brute force is your friend. My tool broke apart not resisting such force that is necessary.
http - Contestar
lol i dropped my iPod this fixedit because it had no back
elais - Contestar
Count get past step 1 :( began seperating the back but the metal back sooner bent than the clips letting loose. I heard something chip then the ipod started getting very hot so I think I punctured the battery :( its going to live outside for a while before I throw it out.
Mike - Contestar