Saltar al contenido principal

Samsung Galaxy S10 Rear-Facing Camera Module Replacement

Qué necesitas

  1. Samsung Galaxy S10 Rear-Facing Camera Module Replacement, Remove the SIM tray: paso 1, imagen 1 de 3 Samsung Galaxy S10 Rear-Facing Camera Module Replacement, Remove the SIM tray: paso 1, imagen 2 de 3 Samsung Galaxy S10 Rear-Facing Camera Module Replacement, Remove the SIM tray: paso 1, imagen 3 de 3
    • Insert a SIM card eject tool, SIM eject bit, or a straightened paperclip into the hole on the SIM tray, located at the top edge of the phone next to the plastic antenna band.

    • If you inserted the tool into the other hole, don't worry—the microphone and the ingress seal are mounted out of harm's way.

    • Press firmly to eject the tray.

    • Remove the SIM card tray.

    • When reinserting the SIM card, ensure that it is in the proper orientation relative to the tray.

  2. Samsung Galaxy S10 Rear-Facing Camera Module Replacement, Heat the back cover: paso 2, imagen 1 de 3 Samsung Galaxy S10 Rear-Facing Camera Module Replacement, Heat the back cover: paso 2, imagen 2 de 3 Samsung Galaxy S10 Rear-Facing Camera Module Replacement, Heat the back cover: paso 2, imagen 3 de 3
    • Unplug and power off your phone before you begin.

    • Heat an iOpener and apply it to the back cover's right edge for two minutes.

    • A hair dryer, heat gun, or hot plate may also be used, but be careful not to overheat the phone—the display and internal battery are both susceptible to heat damage.

    • As you wait, take a look at the image of the removed back cover and take note of where the adhesive is located.

  3. Samsung Galaxy S10 Rear-Facing Camera Module Replacement, Create an opening gap: paso 3, imagen 1 de 3 Samsung Galaxy S10 Rear-Facing Camera Module Replacement, Create an opening gap: paso 3, imagen 2 de 3 Samsung Galaxy S10 Rear-Facing Camera Module Replacement, Create an opening gap: paso 3, imagen 3 de 3
    • Rest the heated right edge of the phone on something that is about 0.5 inches (13 mm) thick. This angles the phone for the opening tool.

    • Brace the left edge of the phone with your fingers so that the phone won't slide. Pull on the suction cup with firm pressure.

    • Press the edge of an opening tool into the seam between the back cover and the frame.

    • With the opening tool in place in the seam, slide it back and forth along the seam to loosen the back cover.

  4. Samsung Galaxy S10 Rear-Facing Camera Module Replacement, Insert an opening pick: paso 4, imagen 1 de 3 Samsung Galaxy S10 Rear-Facing Camera Module Replacement, Insert an opening pick: paso 4, imagen 2 de 3 Samsung Galaxy S10 Rear-Facing Camera Module Replacement, Insert an opening pick: paso 4, imagen 3 de 3
    • Heat an iOpener and apply it to the same edge of the phone for two minutes.

    • Apply a suction cup to the back of the phone, as close to the center of the right edge as possible (where the adhesive is narrowest).

    • Pull on the suction cup with strong, steady force to create a gap between the back cover and the frame.

    • Insert the point of an opening pick into the gap.

    • Due to tight tolerances, this may take multiple attempts.

    • If you are having trouble creating a gap, your best bet is to apply more heat to the edge and try the previous step again. The glass is heated enough when it is barely too hot to touch.

    • You can try applying a few drops of high concentration (over 90%) isopropyl alcohol into the seam to help loosen the adhesive.

    • Do not apply excessive force with the pick, or you will risk cracking the back cover glass.

  5. Samsung Galaxy S10 Rear-Facing Camera Module Replacement, Slice through the adhesive: paso 5, imagen 1 de 3 Samsung Galaxy S10 Rear-Facing Camera Module Replacement, Slice through the adhesive: paso 5, imagen 2 de 3 Samsung Galaxy S10 Rear-Facing Camera Module Replacement, Slice through the adhesive: paso 5, imagen 3 de 3
    • Slide the opening pick along the edge of the phone, slicing through the adhesive.

    • Do not attempt to slice the adhesive holding the corners down before applying heat. If you do, you may crack the back cover.

    • Leave a pick in the seam to prevent the adhesive from re-sealing.

  6. Samsung Galaxy S10 Rear-Facing Camera Module Replacement: paso 6, imagen 1 de 2 Samsung Galaxy S10 Rear-Facing Camera Module Replacement: paso 6, imagen 2 de 2
    • Apply a heated iOpener to the bottom edge of the phone for two minutes.

    • Insert an opening pick into the right edge near the bottom right corner.

    • Carefully slide the pick around the corner. Continue cutting along the bottom edge and around the bottom left corner.

    • If the cutting feels difficult, re-apply heat to the edge before continuing.

    • Leave an opening pick in the seam to prevent the adhesive from re-sealing.

  7. Samsung Galaxy S10 Rear-Facing Camera Module Replacement: paso 7, imagen 1 de 3 Samsung Galaxy S10 Rear-Facing Camera Module Replacement: paso 7, imagen 2 de 3 Samsung Galaxy S10 Rear-Facing Camera Module Replacement: paso 7, imagen 3 de 3
    • Continue heating and slicing around the remaining edges of the phone.

    • When cutting around corners, be sure that the corner is thoroughly heated.

  8. Samsung Galaxy S10 Rear-Facing Camera Module Replacement: paso 8, imagen 1 de 3 Samsung Galaxy S10 Rear-Facing Camera Module Replacement: paso 8, imagen 2 de 3 Samsung Galaxy S10 Rear-Facing Camera Module Replacement: paso 8, imagen 3 de 3
    • Once you have sliced around the phone, twist an opening pick in one of the edges to help separate the back cover from the frame.

    • Lift the back cover slowly. Use opening picks to slice any remaining adhesive.

    • Remove the back cover.

    • During reassembly, this is a good point to power on your phone and test all functions before you seal the back cover in place. Be sure to power your phone back down completely before you continue working.

    • Follow this guide to reinstall the back cover, transfer and install the camera bezel, and replace the adhesive.

    • If desired, you may reinstall the back cover without replacing the adhesive. Remove any large chunks of adhesive that might prevent the back cover from sitting down flush. After installation, heat the back cover and apply pressure to secure it.

  9. Samsung Galaxy S10 Rear-Facing Camera Module Replacement, Remove the midframe: paso 9, imagen 1 de 1
    • Remove the eight 4 mm Phillips screws securing the top midframe to the phone.

  10. Samsung Galaxy S10 Rear-Facing Camera Module Replacement: paso 10, imagen 1 de 2 Samsung Galaxy S10 Rear-Facing Camera Module Replacement: paso 10, imagen 2 de 2
    • The midframe is still held in place by a few plastic clips around the edge.

    • Insert the point of a spudger into the notch on the right edge of the midframe, near the volume up button.

    • Pry up to loosen the midframe from the phone.

  11. Samsung Galaxy S10 Rear-Facing Camera Module Replacement: paso 11, imagen 1 de 3 Samsung Galaxy S10 Rear-Facing Camera Module Replacement: paso 11, imagen 2 de 3 Samsung Galaxy S10 Rear-Facing Camera Module Replacement: paso 11, imagen 3 de 3
  12. Samsung Galaxy S10 Rear-Facing Camera Module Replacement, Disconnect the battery: paso 12, imagen 1 de 3 Samsung Galaxy S10 Rear-Facing Camera Module Replacement, Disconnect the battery: paso 12, imagen 2 de 3 Samsung Galaxy S10 Rear-Facing Camera Module Replacement, Disconnect the battery: paso 12, imagen 3 de 3
    • Insert the flat end of a spudger underneath the battery connector, which is attached to the motherboard below the rear-facing camera.

    • Pry upwards to disconnect the connector from its socket.

    • When you disconnect connectors like these, be careful not to dislodge the small surface-mounted components surrounding the socket.

    • Gently push the battery's flex cable away from the motherboard socket to prevent accidental contact.

  13. Samsung Galaxy S10 Rear-Facing Camera Module Replacement, Remove the loudspeaker: paso 13, imagen 1 de 1
    • Remove the seven 4 mm Phillips screws securing the lower midframe.

  14. Samsung Galaxy S10 Rear-Facing Camera Module Replacement: paso 14, imagen 1 de 2 Samsung Galaxy S10 Rear-Facing Camera Module Replacement: paso 14, imagen 2 de 2
    • The midframe is still held in place by a few plastic clips around the edge.

    • Insert the point of a spudger underneath the top right corner of the lower midframe.

    • Pry up to release the midframe from the phone.

  15. Samsung Galaxy S10 Rear-Facing Camera Module Replacement: paso 15, imagen 1 de 3 Samsung Galaxy S10 Rear-Facing Camera Module Replacement: paso 15, imagen 2 de 3 Samsung Galaxy S10 Rear-Facing Camera Module Replacement: paso 15, imagen 3 de 3
    • Grasp the loosened end of the midframe with your fingers and lift upwards slowly.

    • Wiggle the midframe slightly to help release the remaining edge clips.

    • Remove the lower midframe. The loudspeaker is built into the lower midframe.

  16. Samsung Galaxy S10 Rear-Facing Camera Module Replacement, Motherboard: paso 16, imagen 1 de 2 Samsung Galaxy S10 Rear-Facing Camera Module Replacement, Motherboard: paso 16, imagen 2 de 2
    • Use the flat end of a spudger to pry up and disconnect the display connector from its motherboard socket, located near the bottom right corner of the phone.

  17. Samsung Galaxy S10 Rear-Facing Camera Module Replacement: paso 17, imagen 1 de 2 Samsung Galaxy S10 Rear-Facing Camera Module Replacement: paso 17, imagen 2 de 2
    • Use the point of a spudger to pry up and disconnect the headphone jack's connector from its motherboard socket.

  18. Samsung Galaxy S10 Rear-Facing Camera Module Replacement: paso 18, imagen 1 de 1
    • Remove the three 3.7 mm Phillips screws securing the motherboard to the phone.

  19. Samsung Galaxy S10 Rear-Facing Camera Module Replacement: paso 19, imagen 1 de 2 Samsung Galaxy S10 Rear-Facing Camera Module Replacement: paso 19, imagen 2 de 2
    • Insert the point of a spudger underneath the right edge of the motherboard, near the volume down button.

    • Pry up gently to loosen the motherboard from its recess.

  20. Samsung Galaxy S10 Rear-Facing Camera Module Replacement: paso 20, imagen 1 de 2 Samsung Galaxy S10 Rear-Facing Camera Module Replacement: paso 20, imagen 2 de 2
    • Insert the point of a spudger under bottom left corner of the motherboard.

    • Pry up gently to loosen the motherboard from its recess.

  21. Samsung Galaxy S10 Rear-Facing Camera Module Replacement: paso 21, imagen 1 de 3 Samsung Galaxy S10 Rear-Facing Camera Module Replacement: paso 21, imagen 2 de 3 Samsung Galaxy S10 Rear-Facing Camera Module Replacement: paso 21, imagen 3 de 3
    • Using your fingers, grasp the motherboard by the top corners.

    • Swing the motherboard slightly out of its recess. Be careful not to snag any cables along the way.

    • Pull the motherboard towards the top edge of the phone while wiggling the board slightly. This will loosen the charging port from its socket.

    • Once the charging port is freed from its socket, remove the motherboard.

    • To reinstall the motherboard:

    • Align the motherboard's charging port with the bottom edge of the phone.

    • Gently push the motherboard against the bottom edge of the phone until the charging port is completely seated.

    • Lower the motherboard and press into place. Be careful not to trap any cables underneath the motherboard. The board should sit flush against the frame.

  22. Samsung Galaxy S10 Rear-Facing Camera Module Replacement, Rear-Facing Camera Module: paso 22, imagen 1 de 3 Samsung Galaxy S10 Rear-Facing Camera Module Replacement, Rear-Facing Camera Module: paso 22, imagen 2 de 3 Samsung Galaxy S10 Rear-Facing Camera Module Replacement, Rear-Facing Camera Module: paso 22, imagen 3 de 3
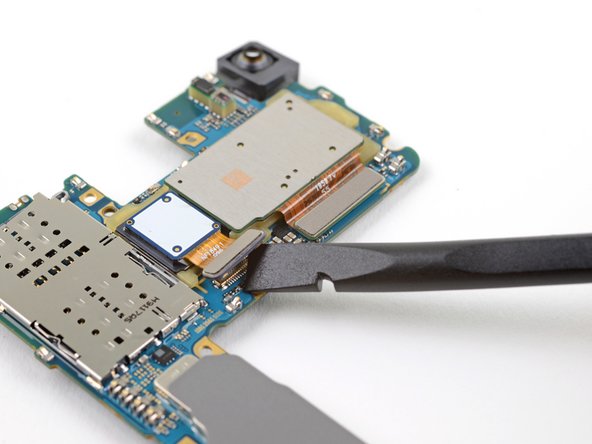
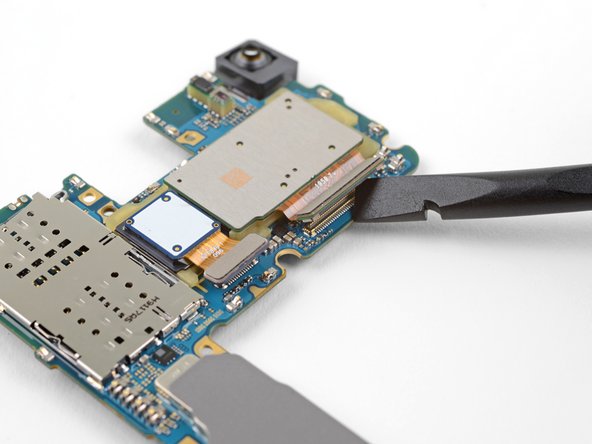
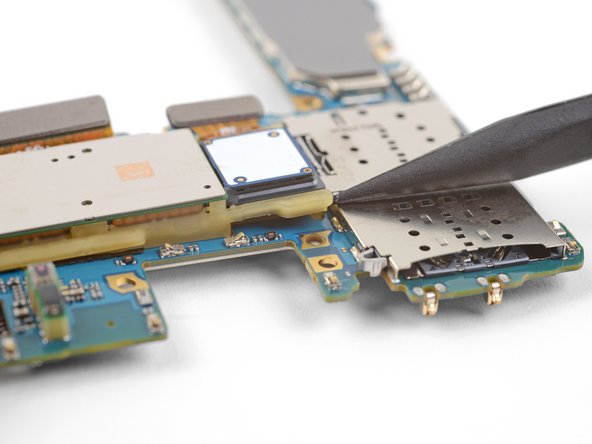
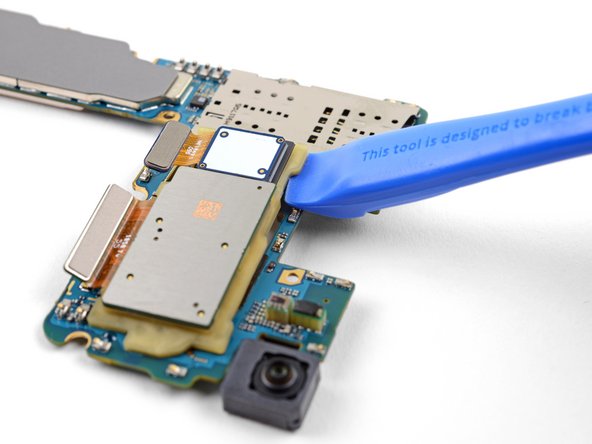
    • Flip the motherboard over.

    • Use the flat end of a spudger to pry up and disconnect the two camera connectors from their sockets on the motherboard.

  23. Samsung Galaxy S10 Rear-Facing Camera Module Replacement: paso 23, imagen 1 de 1
    • Heat an iOpener and lay it over the rear-facing camera module for one minute.

  24. Samsung Galaxy S10 Rear-Facing Camera Module Replacement: paso 24, imagen 1 de 2 Samsung Galaxy S10 Rear-Facing Camera Module Replacement: paso 24, imagen 2 de 2
    • Insert the point of a spudger under the top-left corner of the camera module, where there is a small notch.

    • Pry up to loosen the camera module from the motherboard.

  25. Samsung Galaxy S10 Rear-Facing Camera Module Replacement: paso 25, imagen 1 de 2 Samsung Galaxy S10 Rear-Facing Camera Module Replacement: paso 25, imagen 2 de 2
    • Insert the edge of an opening tool under the loosened corner of the camera module.

    • Pry up to release the camera module from the motherboard.

  26. Samsung Galaxy S10 Rear-Facing Camera Module Replacement: paso 26, imagen 1 de 1
    • Remove the rear-facing camera module.

Conclusión

To reassemble your device, follow these instructions in reverse order.

After you've completed the repair, follow this guide to test your repair.

11 personas más completaron esta guía.

Arthur Shi

Miembro Desde 01/03/18

248,439 Reputación

503 Guías creadas

Equipo

iFixit Miembro de iFixit

Staff

136 Miembros

16,573 Guías creadas

8 comentarios

I only wanted to know, what cameras are used in Galaxy S10/e, are they from Sony or Samsung used its own?

Hanif Ali Baloch - Contestar

I’m sure I could combine info and figure it out on my own, but is there anywhere I can find instructions on only replacing the camera lens glass? I’m not the best at figuring this stuff out and getting it right. Any help is appreciated.

Riley Crawley - Contestar

Hi, I had to replace the cover on my lens, and now the only one that focuses clear is .5. The rest are blurry. IF I replace this, will it fix that?

Jeanie Compton - Contestar

i having camera issue, camera failed . Even check with *#0*# camera still unable. Changing the camera module will solve this?

ngoh aywen - Contestar

hello, if you have an authorized Samsung dealer around you they can diagnose the problem at a very affordable fee

mcsmart pain -

Agregar Comentario

Ver Estadísticas:

Ultimas 24 horas: 6

Ultimos 7 días: 32

Ultimos 30 días: 217

Todo El Tiempo: 24,394