Introducción
Remplazar la batería en el iPhone 4S requiere desensamble mínimo. Si tu batería esta inflada, toma precauciones adecuadas.
Para un rendimiento optimo, después de completar esta guía,calibra tu nueva batería instalada: Cargala hasta el 100% y deja cargándola por al menos dos horas mas. Después usa tu iPhone hasta que se apague debido a batería baja. Finalmente cargadla ininterrumpidamente al 100%.
Qué necesitas
Resumen del Video
-
-
Remueve los dos tornillos Pentalobe P2 de 3.6 mm localizados en las esquinas del conector dock.
-
El Destornillador de 5-Puntas solo debe ser utilizado una vez porque tiene la posibilidad de barrer el tornillo.
-
-
-
-
Remueve los siguientes tornillos asegurando el conector de la batería a la tarjeta lógica
-
Un tornillo Phillips de 1.7 mm
-
Un tornillo Phillips de 1.5 mm
-
-
-
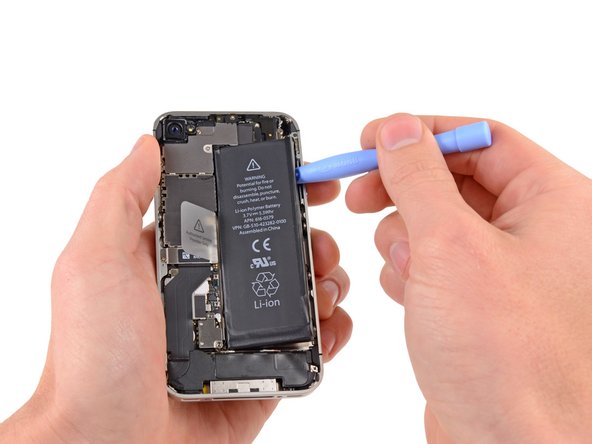
Inserta el borde de una herramienta de apertura de plástico entre la batería y la carcasa exterior cerca del borde inferior del iPhone.
-
Corre la herramienta de apertura de plástico junto el borde derecho de la batería y has palanca en varios puntos para separar completamente del adhesivo asegurándola a la carcasa exterior.
-
Espera por alrededor de un minuto para que el alcohol debilite el adhesivo.
-
Usa el lado plano de una herramienta de apertura de plástico para levantar gentilmente la batería.
-
Para rensamblar tu dispositivo, sigue estas instrucciones en orden inverso.
Si tu iPhone se reinicia constantemente después del remplazo, necesitas hacer un "Reinicio Forzado" al presionar el botón Home y el botón de Apagado por alrededor de 10 segundos (hasta que el dispositivo se reinicie).
Si tienes problemas con la conexión WiFi y/o Celular con la nueva batería, trata restaurar el dispositivo usando iTunes.
La reparación no salió como planeado? Checa nuestra Comunidad de Respuestas para ayuda con la resolución problemas básicos .
Cancelar: No complete esta guía.
4064 personas más completaron esta guía.
Un agradecimiento especial a estos traductores:
100%
Estos traductores nos están ayudando a reparar el mundo! ¿Quieres contribuir?
Empezar a traducir ›
254 comentarios
When I removed the battery the glue was holding it in. I used the screw driver to pry it out. It sparked and I'm sure shorted the logic board. VERY IMPORTANT ONLY USE PLASTIC TOOL WHEN REMOVING BATTERY! Now I have no service. I swapped a different logic board into same phone and works fine. Any suggestions on how to fix the old logic board are appreciated.
Used a screw driver once to lift up battery, shorted the board. No display. Had to give another iPhone 4 to customer.
I now on always use my nail to lift up the battery. Never had issues since doing that.
Ben -
Well, the phillips screwdriver was a bit awkward. Had to hold screwdriver top down with one hand and turn driver with other hand. All else was as stated. Never had to touch any internal parts with my bare hands just used tools. That saves the worries about static or corrosion. One part that I failed to see in write up is the small case ground. Don't loose it it will come loose once screw is out.
A couple of suggestions.
1). If you are over about 40, some sort of hands free magnifier helps a lot - I used a headband mounted jewelers magifier called an Optivisor.
2). A pair of fine tipped tweezers and a gentle touch will let you grab the pressure contact in step 5 without getting skin oil on it.
3). Work over some sort of tray to stop small parts from rolling away.
4). If you don't have a spudger or a set of plastic case opening tools (or you know you have them, but can't recall their exact location at this moment...*cough*), the corner of an an expired credit card, or a stiff guitar pick will work to pry the battery loose. It will likely bend the card though, so do use an expired one. I used an empty Starbucks gift card I found in a junk drawer...
I'm over 40, I wish I read your tips first! both a magnifier and tweezers would have helped, and possiby prevented the spark... It's charging, fingers crossed that the tiny spark wasn't enough to fry anything!


