Introducción
Usa esta guía para remover o reemplazar el altavoz en tu OnePlus 5T.
Qué necesitas
-
-
Antes de comenzar, apaga el teléfono.
-
Remueve la bandeja de la tarjeta SIM.
-
-
-
Remueve los dos tornillos Torx T2 (2.5 mm de largo)
-
El OnePlus 5T no utiliza mucho adhesivo para asegurar la tapa trasera, sin embargo las abrazaderas son muy fuertes y requieren algo de fuerza durante el procedimiento de apertura.
Could you clarify the statement “The OnePlus 5T doesn't use a lot of adhesive“? Do you mean that it uses adhesive, but only a little? Or do you mean that it doesn’t use any adhesive at all to secure the back, just the clamps?
Hi Avram,
there is a little bit of adhesive underneath the edges of the back cover, however it doesn’t require heating to soften it. In case the back cover doesn’t come of straight away it won’t help to apply an iOpener to further soften the adhesive but requires a little bit more force to open the plastic clamps.
i have tried t2 srewdrivers multiple times but they doesn’t seem work, could those be different screws?
I had the same problem. I tried a T1 screwdriver, that fit perfectly.
That said, the 'tools' section of this repair doesn't mention any torx screwdriver. That should be updated to include the T2 (or T1, for me!) screwdriver.
Akka -
I purchased the entire kit to do my battery replacement and found the opening tool was not capable of opening my One Plus 5t phone. I tried the tool for at least 30 minutes and couldn’t even get it started. Luckily I had a set of “plastic tools” for removing door panels from cars while doing stereo work. These tools have nice sharp points and are much longer and thicker, providing much better grip and leverage. With these tools, I had the back off the phone in just a few minutes. All the rest of the process was easy to follow and everything worked out great.
I have all of the necessary parts/tools for replacement. Upon removing the two screws from the bottom, one came out no problem first try. The second bolt slipped andbis now completely stripped out. Any advice?
-
-
-
Inserta una herramienta de apertura entre la pantalla y la cubierta trasera en el extremo inferior del teléfono.
-
Usa la herramienta de apertura para crear un espacio entre la tapa trasera y la pantalla.
-
Inserta una púa de apertura en el espacio que creaste con la herramienta de apertura.
Don’t make the same mistake as i did and put the opening tool between the screen and glass rather than the screen and body. Make sure its the second line from the top where you insert your tool
I too had troubles with this step. I recommend having a look at the guide for opening up the back cover of the Oneplus 5 before proceeding. It has a lot of helpful images and the instructions go into far more detail than this one does.
This step was the hardest step for me. I could only succeed with suction cup pliers and a metal pry tool, which unfortunately scratched the device’s edges a little.
I found this hard. Look carefully and use a bright light. There are two small ridges. I worked ages on the top one which isn't actually a gap. You need to work on the bottom one of the two. I used a very small metal screw driver with a thin flat blade. I pushed this in to open the gap a fraction then put a plastic tool in the now slightly opened gap and worked it round.
For opening up the device, Tapa trasera OnePlus 5 that Iceblade02 mentions is excellent. The tools in the kit also correspond to it since the new kit that I received last week had no guitar picks and instead had the suction cup.
Be sure you are getting below the screen's LOWER lip, as in the photo, as HaydenRooney mentions.
Try to minimize flexing of the screen when you are wedging, the clamps (like snaps or tabs) will demand force and you want to avoid turning that into screen flex. There are several forum posts here about device working-but-dark after a repair. Too bad user input is rather folded away on ifixit, and few will see these.
-
-
-
-
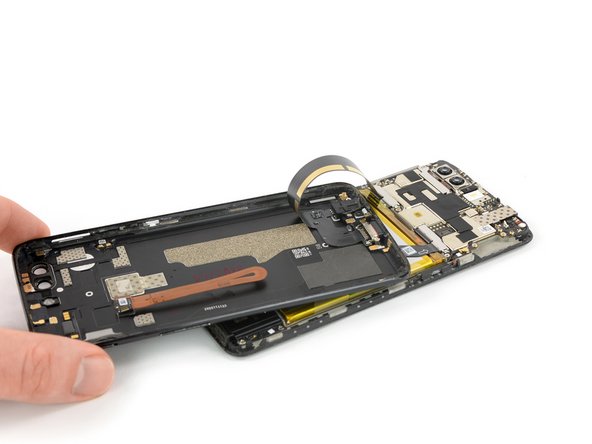
Intenta no quitar la tapa trasera del todo todavía. Los cables flexibles del puerto de carga, de los auriculares y huella digital siguen conectados a la placa madre.
-
Da la vuelta al teléfono y levanta con cuidado el extremo inferior de la tapa trasera para separarlo del conjunto del teléfono. Dóblalo hacia la izquierda y manténlo en un ángulo de 80°.
-
-
-
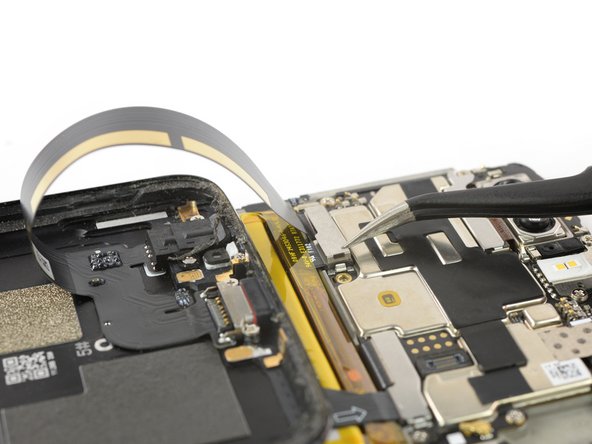
Usa un spudger para desconectar el cable flexible de la batería.
-


Para volver a montar el dispositivo, sigue estas instrucciones en orden inverso. Aplica un nuevo adhesivo donde sea necesario después de limpiar las áreas relevantes con alcohol isopropílico (>90%).
Lleva tus desechos electrónicos a un R2 or e-Stewards certified recycler.
¿La reparación no salió como planificaste? Consulta nuestra comunidad de respuestas para ayuda en la resolución de problemas.
Cancelar: No complete esta guía.
2 personas más completaron esta guía.
Un agradecimiento especial a estos traductores:
100%


Estos traductores nos están ayudando a reparar el mundo! ¿Quieres contribuir?
Empezar a traducir ›


2 comentarios
Following water damage the loudspeaker stopped working. I changed it out (twice) and the flex cable but still not working. Any ideas?
did you ever find a solution to this issue?