Introducción
Usa esta guía para reemplazar una pantalla agrietada o rota en su Samsung Galaxy S9.
Antes de desmontar tu teléfono, descarga la batería por debajo de 25%. La batería puede prenderse fuego y/o explotar si se la perfora accidentalmente, pero la posibilidad de que esto paso es mucho menor si está descargada.
Nota: Esta guía te indica que reemplaces solo la pantalla mientras dejas el marco original, la placa lógica y la batería en su lugar. Sin embargo, algunas pantallas de reemplazo para este teléfono vienen preinstaladas en un nuevo marco (también conocido como chasis), que requiere un procedimiento muy diferente: trasplantar las partes internas de tu teléfono e instalar una batería nueva. Asegúrate de tener la pieza correcta antes de comenzar esta guía.
Esta guía implica quitar la tapa de vidrio trasera, necesitarás un adhesivo de reemplazo para volver a colocar la cubierta posterior en el teléfono. Si tu pantalla de reemplazo no viene con adhesivo, usa una cinta resistente de doble cara como Tesa 61395 para sujetarla.
Si el marco está dañado o doblado, es importante reemplazarlo, de lo contrario, la nueva pantalla podría no montarse correctamente y sufrir daños por la presión desigual.
El proceso de separar la pantalla del marco generalmente destruye la pantalla, por lo tanto, no sigas esta guía a menos que tengas la intención de reemplazar la pantalla
Qué necesitas
-
-
Antes de comenzar, apaga tu teléfono.
-
Usa un iOpener a un borde largo del teléfono para ablandar el adhesivo por debajo del cristal trasero. Aplica el iOpener durante al menos dos minutos.
-
-
-
En los siguientes pasos, cortarás el adhesivo que sujeta la tapa trasera.
-
Tendrás que cortar el adhesivo en las áreas que se muestran:
-
Porciones gruesas de adhesivo
-
Áreas delgadas de adhesivo
-
Evita hacer palanca o cortar en este área para proteger el cable flexible del sensor de huella digital.
I ran into a chunk of adhesive that was in the red zone right next to where the connector was. Be careful, cut slow, I managed to make it through my working my way through things that felt like foam.
-
-
-
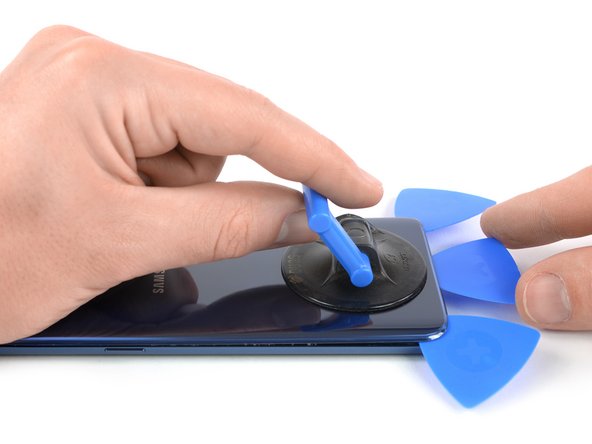
Presiona una ventosa sobre la tapa trasera.
-
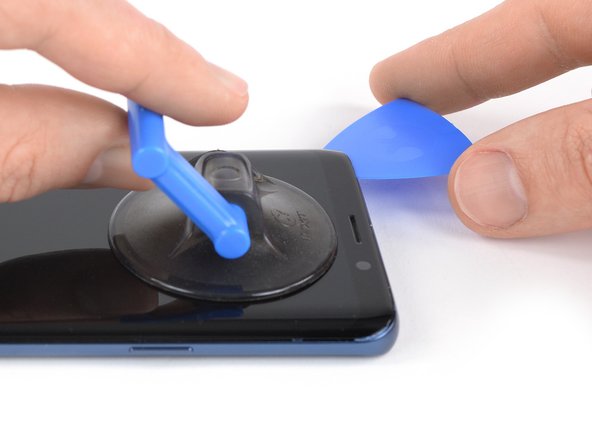
Levanta el borde inferior de la tapa trasera con la ventosa con fuerza y firmemente para crear un espacio entre la tapa trasera y el marco.
-
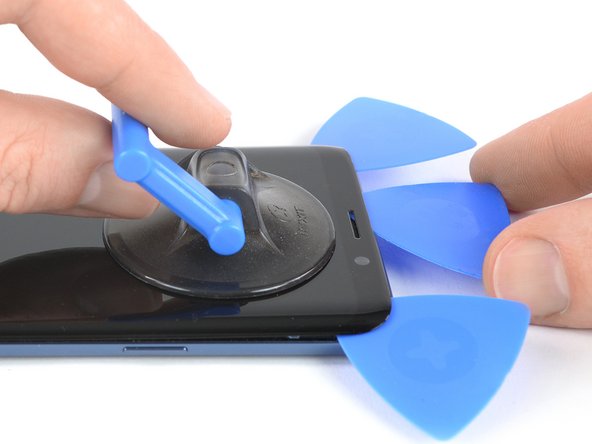
Inserta una púa de apertura en la grieta y deslízala hacia la esquina derecha inferior.
-
Inserta una segunda púa de apertura y deslízala hacia la esquina izquierda inferior.
-
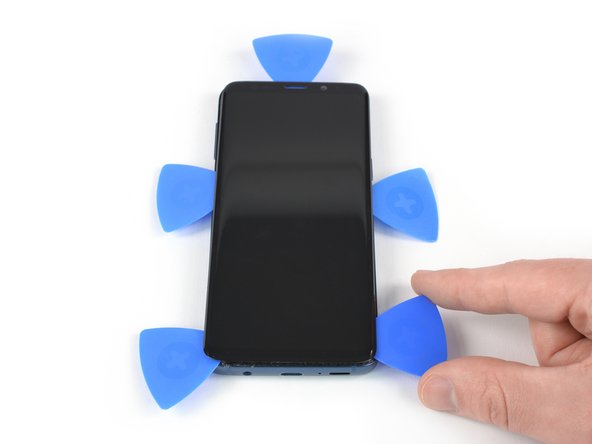
Inserta una tercer púa de apertura en el extremo inferior del teléfono para prevenir que el adhesivo se vuelva a sellar durante el resto del procedimiento de extracción.
The manufacturer obviously doesn't want owners to replace the battery, or they would have a simple method like they did in the past !!! They would rather have you throw it away and replace the phone !!!!
Well. I guess so!
I was so looking forward to doing this.
What a shame this type of manufacturing occurs!
😭
From a do it yourself person.
-
-
-
Retira el cristal trasero.
-
Al volver a ensamblar, sigue esta guía para reemplazar el adhesivo y reinstalar el cristal trasero.
-
En caso de que quieras reemplazar el cristal trasero, sigue esta guía para transferir el bisel de la cámara trasera con el sensor de huella digital.
-
-
-
-
Quita los ocho tornillos Phillips #00 de 4 mm.
I think the #000 fits better!
The second and fourth screws on the bottom row are a little shorter at 2mm ( I measure the others as 3mm). Worth some care to put the screws back in the same holes as they came from. (SM-G960U)
Hi Will,
thank you for mentioning! On our model the “SM-G960XU” all screws have the same length (4 mm). However this might differ between different models and is definitely something to keep an eye on during repairs.
-
-
-
Usa el extremo plano de un spuger para levantar y desconectar el cable flexible de la batería.
-
-
-
Remueve los dos tornillos Phillips #00 de 4 mm que sujetan la cubierta de plástico en su lugar.
-
-
-
Usa el extremo plano de un spudger para desconectar el cable flexible de la pantalla.
-
-
-
Prepara un iOpener y aplícalo a la pantalla durante al menos dos minutos para ablandar el adhesivo por debajo.
-
Coloca tiras superpuestas de cinta transparente de embalaje sobre la pantalla hasta cubrirla toda.
-
Esto mantendrá los fragmentos de vidrio contenidos y proporcionará integridad estructural al hacer palanca y levantar la pantalla.
-
-
-
Una vez que la pantalla se sienta caliente al tacto, aplica una ventosa al borde superior del teléfono.
-
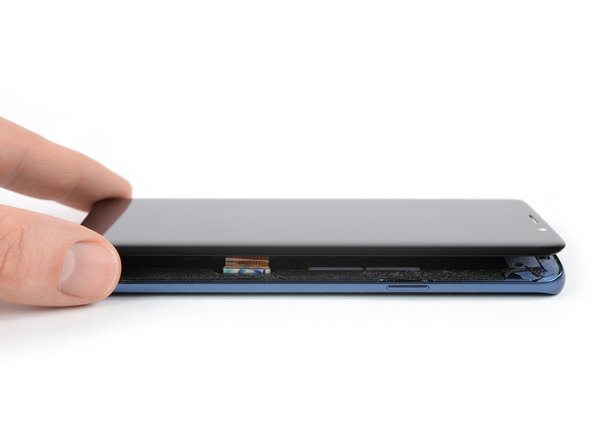
Inserta una púa de apertura en la grieta y comienza a cortar el adhesive deslizándolo hacia la esquina superior izquierda.
-
Compara tu parte nueva de reemplazo con la parte original. Necesitarás transferir los componentes restantes o remover los respaldos adhesivos de la parte nueva antes de la instalación.
La mejor manera de sujetar una pantalla nueva es con una hoja cortada de cinta de doble cara. Aplica la cinta a la parte trasera de la pantalla, luego con cuidado pasa el cable de pantalla a través del marco. Alinea la pantalla y presiónala en su lugar.
Para volver a ensamblar tu dispositivo, sigue los pasos arribas en orden inverso.
Una vez que hayas completado la reparación, sigue esta guía para probar tu reparación.
Si es posible, enciende tu teléfono y prueba tu reparación antes de instalar el adhesivo nuevo y vuelve a sellar el teléfono.
Toma tus desechos electrónicos a un centro de reciclaje certificado.
¿La reparación no salió como lo planeaste? Revisa nuestra comunidad de Respuestas para solución de problemas.
Cancelar: No complete esta guía.
75 personas más completaron esta guía.
Un agradecimiento especial a estos traductores:
100%
Estos traductores nos están ayudando a reparar el mundo! ¿Quieres contribuir?
Empezar a traducir ›
5 comentarios
A bit of guidance on where the adhesive seal goes would be nice. I believe I got it right.
digitizer is stuck to glass, and came apart
I followed the entire guide and still got a black screen of death.
Na het uitvoeren van alle stappen kwam ik een goudfolie tegen achter het scherm. Deze zie ik niet terug in jouw beschrijving. Wat kan ik doen?









Nightmare. Impossible to get the back off so far. Being trying using the iOpener with hair dryer for last 1hr. No chance.
Chris Bunney - Contestar
You’re right Chris. I’ve tried on 3 separate occasions now and haven’t been able to budge that back. All that has happened is the pick has taken a piece out of the glass back leaving a rough edge now.
grahamcatto - Contestar
it was not easy but doable.
Clinton Stark - Contestar
It’s difficult, but the trick I did to get it was to wrap the hot iOpener around a bottom corner, apply the suction cup, then I covered the opener and phone with a paper plate, better insulating the area. Then I set my blow dryer to high heat and low velocity and heated the area under the plate for about a minute. Right after turning off the blower, I took off the plate and pulled the suction cup with a cutter at hand. You’ll hear a bit of a cracking/popping noise when the adhesive is starting to give, just apply a little more force and push the cutter at the seam. This method worked great for me, so good luck and just keep at it — you’ve got this!
Nicholas Weger - Contestar
I used nearly boiling water in a storage zip bag on the phone for 10 minutes. I can’t really recommend this method, but thankfully the bag did not leak - an iOpener is probably a much better way to go. Regardless, the bag covered the entire back of the phone, and the phone was too hot to hold, but I still could not get the glass to budge with the suction cup after struggling with it for about an hour and multiple reheats. I ended up epoxying a 2”x2” square of PVC board to the bottom of the cover and built a relatively complex fixture that pulled on the PVC with the turn of a screw while it held down the frame by the edges. After heating the edges up again It did lift the glass enough to get a pick underneath it, but it cracked the glass and it was a pain to slide a pick around the edge while the glass was cracking all the way around. Once I finally got all the glass off, I spent the next 30 minutes (which is what this entire process is supposed to take… what a joke!) cleaning the adhesive off the phone.
drbenton815 - Contestar
Heavy Duty Heat Gun from popular discount tool store for the win!
Jesse Meyer - Contestar
Well, it is not obvious how to do this. I have no iOpener, but a heat cushion for remedy hurting muscles and sometimes a backpain. It is filled with grain of some kind and it is to be heated in a microwave oven for about 3 minutes. After that I enveloped this cushion round the phone and brewed myself a cup of tea. After ten miutes the phone was warm (almost hot) and I was able to press the tip of a small (very small) knife above the charging port into the connection between the phone body and the backplate. A very small opening emerged slowly (this is the critical point in this process) and I was able to start using the iFixit opening picks. It became obvious to me that the opening picks are too blunt to achive this with them. But after starting carefully with the (very small and very sharp) knife, everything went straight forward. Thou I had to give the phone a second heatpush with my heat cushion before the backplate came loose.
borutberg - Contestar
I used my 3D printer heat bed and heated it to 90 Celcius to succeed.
gahute - Contestar
It took about 3 minutes on my 90 C printbed to get the first pick in. If the suction cup gives up before the adhesive does, try using some Isopropyl alcohol to clean the back of the phone, and it should stick better. Also, don't apply heat to the screen, just in case that wasn't clear.
Evan Newman -
Used a corn bag (usually used for sore muscles) and incased the phone. It was hot to the touch, but it did the trick. Also needed a knife to have a small enough edge to start prying the back off and get the adhesive to finally pop.
Laurie Hallberg - Contestar
Don't Forget Step 0! Turn the phone Off and remove the SIM card tray. just to be safe, I'd recommend making a full backup of your phone onto a micro SD card in case the worst should happen. also, make sure anyone who needs to contact you knows you aren't currently available at your phone number.
Evan Newman - Contestar
We went for a hairdryer. Put it on hot, low blow and put the head right up to the corner. Took maybe 5 minutes per corner!
Robert Tomohamat - Contestar
Removing the back wasn't too difficult on my phone: several rounds of heating with the iOpener, applying gentle pressure with the suction cup, and eventually a corner lifted up without much force and I could easily slide a pick in. From there it was very straightforward and I had no trouble sliding the picks around and removing the back. The battery removal was much harder in comparison (especially as the iOpener burst when reheating in the microwave for the battery, despite following the time instructions).
Less eWaste - Contestar