Esta traducción podría no reflejar los cambios más recientes añadidos a la guía de referencia. Ayúdanos a actualizar la traducción o revisa la guía original.
Introducción
Utiliza esta guía para reemplazar o quitar la caja del cepillo de dientes Philips Sonicare DiamondClean.
Qué necesitas
-
-
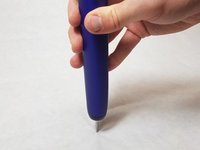
Usa una espátula de nailon para quitar la tapa cromada en la parte inferior.
Cover the toothbrush with a thin towel or some cardboard, then take a pair of pliers or channel locks and squeeze the corners to slightly deform the case. That will give you some room to get under the cap.
-
-
-
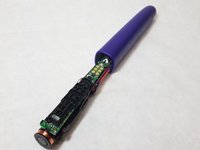
Usa una espátula de nailon para liberar las pestañas negras a ambos lados de las partes internas.
This is the most difficult part but it can be done once one understands how the tabs that need to be unlocked are designed and located. The difficulty is in seeing the tabs -- they are black - and especially the way they lock in, on the body.
There are two tabs - one each side - built on the internal frame holding the battery and electronic circuitry. They are pushing towards the outside, and each locks inside a recessed hole on the internal side of the toothbrush body.
They are most effectively unlocked by going deeper with the spudger and unlocking them by going behind them and hooking them from below, going in from the top opening. IMPORTANT NOTE The tabs need to be PUSHED from the outside TOWARDS the inside of the unit, i.e. towards the chassis that holds the battery and electronics. Trying to pushing the external toothbrush shaft from above will only damage the mechanism. The only way - on this latest Sonicare model- is to unlock these two black tabs.
This was invaluable but I still couldnt quite picture it. So I want to add: you can see the tabs MASINARI is speaking about on the picture seen at step 6. They are the little wings at the bottom end of the 'side panels' . If you shine a light into the opened toothbrush, you should be able to see them. The holes are recessed into the shell of the toothbrush. It worked for me to push the tabs from the side downwards. Once they are lose, the body of the toothbrush will slide out of the shell with only little pressure.
-


Para volver a armar tu dispositivo, sigue estas instrucciones en orden inverso.
Para volver a armar tu dispositivo, sigue estas instrucciones en orden inverso.
Cancelar: No complete esta guía.
3 personas más completaron esta guía.
Un agradecimiento especial a estos traductores:
75%

¡ Francisco Javier Saiz Esteban nos está ayudando a reparar el mundo! ¿Quieres contribuir?
Empezar a traducir ›
Equipo

IUPUI, Team S22-G1, Bayer Fall 2017 Miembro de IUPUI, Team S22-G1, Bayer Fall 2017
IUPUI-BAYER-F17S22G1
Miembros de 4
9 Guías creadas