Esta guía ha sufrido modificaciones. Revisa la última versión sin revisar.
Introducción
Si estás teniendo problemas con la batería del Moto Z2, usa esta guía para reemplazarla.
Qué necesitas
-
-
Apaga el teléfono antes de comenzar.
-
Si es posible, drena la batería antes del desmontaje. Cuando la batería esté cargada, hay un aumento en el riesgo de un evento térmico peligroso si la batería se sobrecalienta o daña durante la reparación.
-
Prepara un iOpener y calienta la parte delantera del teléfono a lo largo de su borde inferior durante unos dos minutos, o hasta que esté ligeramente demasiado caliente para tocarlo. Esto ayudará a suavizar el adhesivo que asegura el montaje de la pantalla.
-
-
-
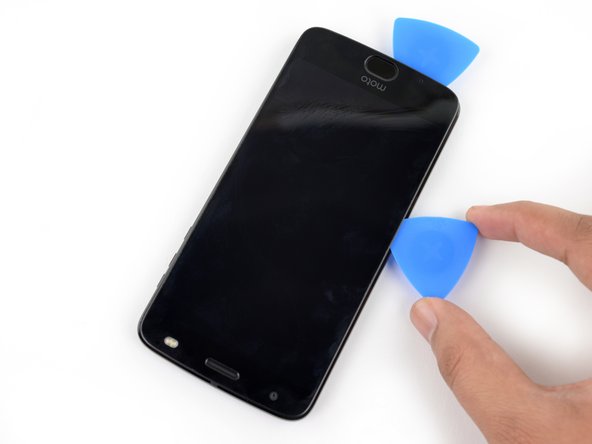
Aplica una ventosa en el borde derecho de la pantalla lo más cerca posible de la parte inferior del dispositivo sin superponer el sensor de huellas digitales.
-
Tira de la ventosa con una presión firme y constante para crear un ligero hueco a lo largo del borde inferior entre el ensamblaje de la pantalla y la caja trasera.
-
Esto puede requerir una cantidad significativa de fuerza, pero sólo necesita abrir un pequeño espacio con la ventosa para insertar su herramienta.
-
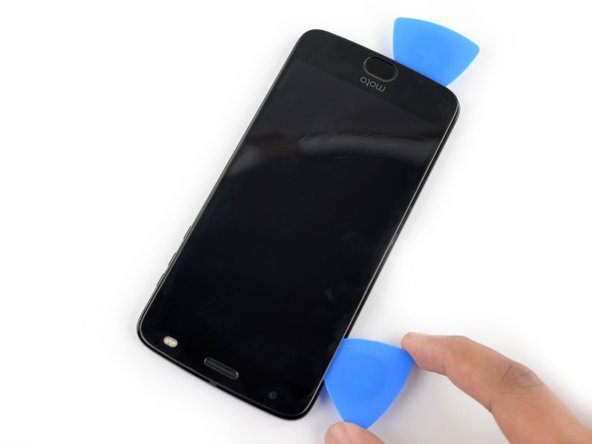
Inserta una púa de apertura en el zócalo que abrió detrás del ensamblaje de la pantalla.
No — *slaps wrist* No. Bad steps! Don’t use the suction cup at all, ever. It causes the two layers to separate immediately, long before the frame clips give way to let the screen come off.
I’m being super ultra very careful with this second attempt on a new device (that was in pretty pristine condition, if I can keep it that way!), and right when I tried pulling as instructed, the screen layers started to pull apart. Use a blade shoved into the edge of the phone and pry it apart, releasing the latches in the process!
I have to agree with Matt above. At the smallest bit of pressure on the suction cup, the screen de-laminated from the metal base. It still “works”, but….
None of the tools in the kit is terribly suited for getting in there and prying that clip apart without splitting the screen.
lease Read the Comments poste on “STEP 2”, When you apply the heat, the screen becomes unglued from the metal fram that it is attached to. I ended up damaging my screen. You need to make sure that what is coming unglued is the metal, and not just the plastic screen. I found out when I saw another video, where they do not apply heat, they just use a tool to pry the frame-display assembly… But apparently it was too late… You should be more specific about the warning…
A jimmy does not come with the kit. Buy one before beginning this procedure. It is the best way to lift the screen assembly without damaging the assembly.
This whole guide has been rewritten since my last comment, and I super appreciate it. The steps are now much more appropriate and less likely to cause damage. Jamming your Jimmy (huehue) into the edge of the screen is actually quite a good idea, not likely to hit anything as there’s nothing but body underneath it.
-
-
-
Retira la pantalla tirando de derecha a izquierda y colocando la pantalla boca abajo sobre la superficie plana al lado del cuerpo principal del dispositivo.
-
Deja tu herramienta aquí debajo del borde inferior del ensamblaje de la pantalla para evitar que se vuelva a adherir al marco. Continúa con el siguiente paso con una nueva herramienta.
-
-
-
Al separar el ensamblaje de la pantalla del resto del dispositivo, tendrás que desenganchar cinco clips metálicos que lo sujetan al marco del dispositivo.
-
Tres de estos clips están situados en el lado izquierdo del dispositivo, y dos en el lado derecho.
-
Necesitarás trabajar alrededor de estos clips con tu herramienta para poder desengancharlos completamente.
-
Puedes deslizar la herramienta cuidadosamente alrededor de estos clips, o dejar una púa en un lado del clip mientras que haces palanca en el otro lado con otra púa.
-
-
-
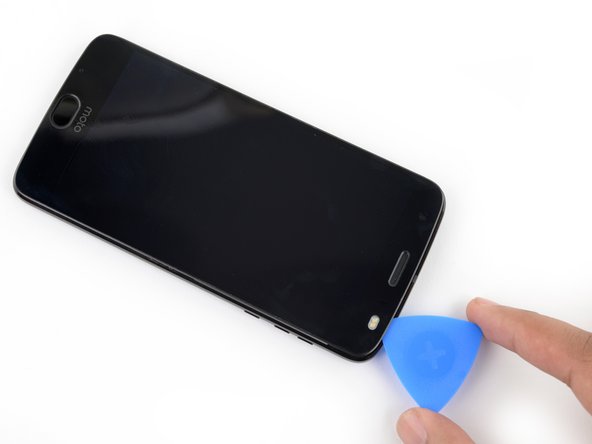
Desliza tu herramienta a lo largo del lado derecho del dispositivo para liberar los clips y el adhesivo que asegura el ensamblaje de la pantalla.
this is really for the digitizer and screen replacement. there are still more steps for just the screen.
There is an enormous amount of adhesive sticking this thing together. As the adhesive is not essential (it holds together with clips, mostly), you really need to focus on *removing* the adhesive, so that it doesn’t stretch and bunch-up, preventing clean reassembly. Leave behind the adhesive that you can prevent from bunching-up (by cleanly breaking it, in turn by holding down one edge to the phone or screen), so you have some sticky left, but just make sure it’s not bunched-up.
Revisiting this comment a year later: there’s now replacement adhesive available (or maybe there always was - wish I knew!) for this model in the iFixit store. So, it would be best to remove the adhesive whereever you see it, cleaning everything up and preparing for the new adhesive. That darn adhesive in step 9 below, though… ugh. Work slow, don’t expect it to all be apart by this point.
-
-
-
-
Hay dos grandes almohadillas de adhesivo que aseguran el ensamblaje de la pantalla cerca del borde superior pero más allá de los 4 mm que ya han sido cortados.
-
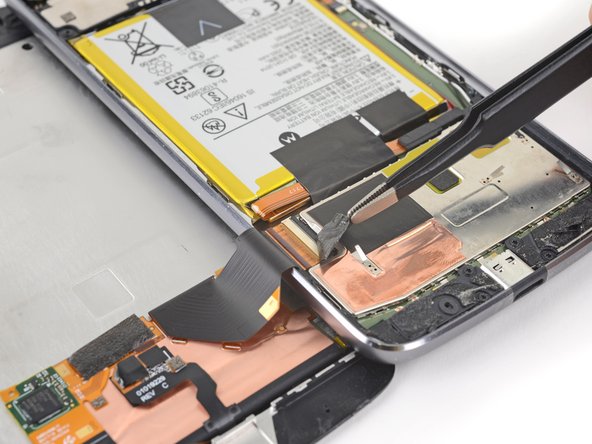
El ensamblaje de sensores frontales y el cable rodean el parche de adhesivo de la parte superior y derecha, por lo que si se fisgonea o se corta desde el borde superior o derecho se puede dañar el cable. Los siguientes pasos describirán cómo separar el adhesivo del borde izquierdo.
This is a tricky part. See the biggest red-squared section in the photo above? That part always wants to detach — the adhesive to the screen is stronger than the molding that holds the metal into the plastic. The metal will detach from the plastic pretty easily, and there’s no way to get that metal back into the plastic frame (as it seems to have been molded as a single part). So, the adhesive is a booby-trap.
To defuse the booby-trap, heat the heck out of it, insert one end of tweezers (or perhaps a spudger) from the right side, hold the metal plate down, and verrry slooowwly convince the adhesive to separate. At some point, it’ll start cascading and snap free.
The metal finger area, between the two red squared sections above, also is a problem area — it’s latched into a frame above the battery, and those latches can get pulled up on top of the frame, preventing the phone from reassembling clean and flat. Make sure to re-insert those tabs so that little edge with the metal fingers sits flat and proper.
-
-
-
Inserta un pico de apertura lo más profundo posible bajo la esquina izquierda de la pantalla para cortar a través del parche izquierdo de adhesivo.
I found that a plastic card inserted from the left side, and worked with a sawing motion, between the screen and the adhesive worked great after the adhesive was softened by the alcohol.
-
-
-
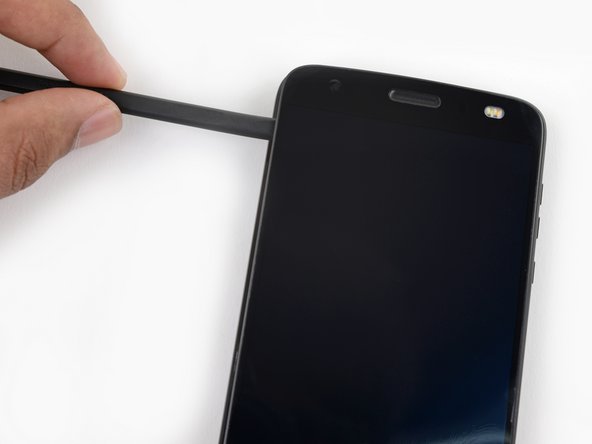
Desliza lenta y cuidadosamente el extremo plano de un spudger bajo el borde izquierdo del dispositivo. Poco a poco, introdúcelo más profundamente para levantar el borde superior del ensamblaje de la pantalla y libera el parche adhesivo derecho.
-
Recalienta el adhesivo para ablandarlo lo que sea necesario.
Again, pay careful attention to the strong block of adhesive sticking the display to a metal shield that’s molded into the plastic frame - the adhesive strength is quite likely to pull out the metal shield from the plastic frame and there’s no going back from that. Not as catastrophic as ripping a ribbon cable, but still pretty bad. See my comment a couple photos up about that.
I added some alcohol directly to the adhesive patches on this side of the phone and waited a couple of minutes before continuing with this step.
-
-
-
Si el ensamblaje de pantalla se atasca, vuelve a calentar y cortar el adhesivo repetidamente cuanto sea necesario.
-
Levanta el ensamblaje de pantalla del borde derecho y levántalo alejándolo del teléfono. Está todavía conectado al chasis del teléfono del borde izquierdo infierno, así que no lo remuevas completamente aun.
Do this only after slicing all the little ribbons of adhesive that hang around - and clean up any gummed-up, bunched-up strands of adhesive after removing it. I worked at detaching adhesive until the screen was totally free, only held by the ribbon cable, before moving on from this step.
-
-
-
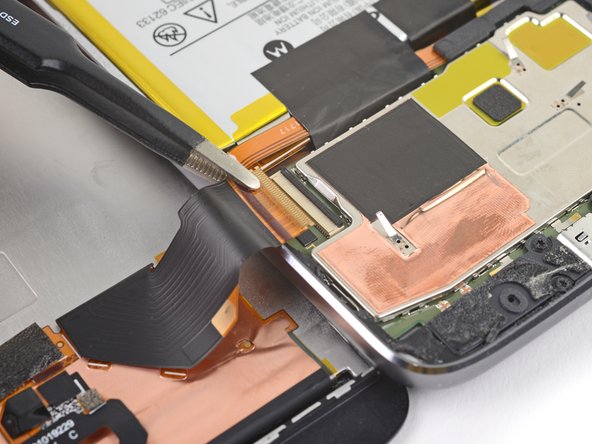
Usa un par de pinzas para remover el trozo negro de la cinta que cubre el conector de la batería.
-
-
-
Usa un spudger para levantar la pestaña de bloqueo en el conector ZIF del cable de pantalla.
-
Desliza el cable plano de su conector.
-
-
-
Remueve el ensamblaje de pantalla.
When reconnecting the display ribbon I found it much easier if you straighten out major 45/90 degree bend that is in the middle of the ribbon until the entire ribbon is all unbent and in parallel with the display face. You will then have a straight shot into the connector without having to hold the display at a 90 degree angle to the chassis and then having to look around, over or through the display to (and if luck is with you) find, lineup and insert the ribbon into the connector. You have to do a little in 3 dimensional thinking to re-bend the ribbon and line the display back up with the chassis but if you’ve made it that far then you should have no problems. Don’t bend the ribbon back and forth too many times.
-
-
-
Inserta el extremo plano del spudger de náilon en el lado de la cámara más cercano a la batería.
-
Levanta la cámara empujando hacia abajo el spudger hasta que se abra la cámara.
-
-
-
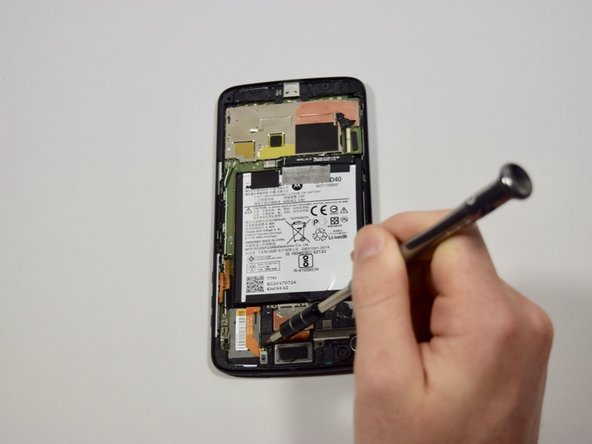
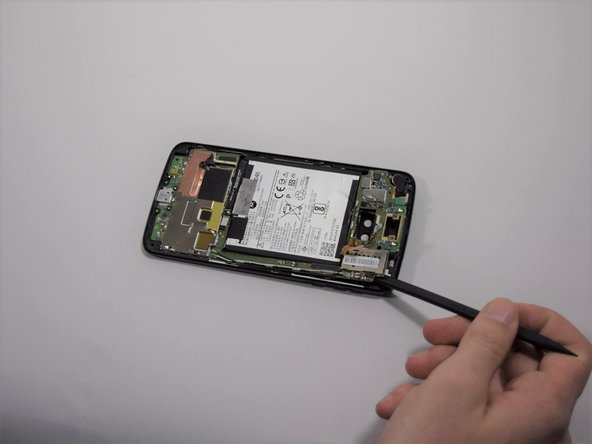
Coloca la herramienta de abertura de plástico debajo de la placa madre cerca de la batería y usa el extremo plano del spudger para crear un espacio.
-
Gradualmente haz este espacio más grande para que el área aún esté suelta cuando retires el spudger.
-
-
-
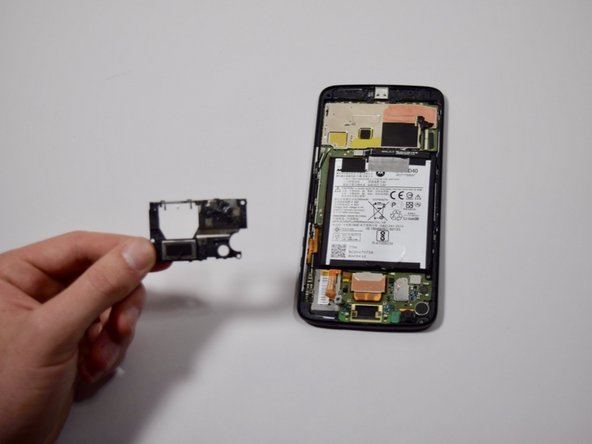
Luego de remover la placa madre, solo la batería debería quedar dentro del dispositivo.
-
Remueve la batería.
-


Para volver a ensamblar tu dispositivo, sigue estas instrucciones en orden inverso.
Para volver a ensamblar tu dispositivo, sigue estas instrucciones en orden inverso.
Cancelar: No complete esta guía.
16 personas más completaron esta guía.
Un agradecimiento especial a estos traductores:
100%

¡ Mariana Roca nos está ayudando a reparar el mundo! ¿Quieres contribuir?
Empezar a traducir ›

Equipo

Cal Poly, Team S2-G1, Livingston Winter 2018 Miembro de Cal Poly, Team S2-G1, Livingston Winter 2018
CPSU-LIVINGSTON-W18S2G1
4 Miembros
26 Guías creadas
14 comentarios
Anyone knows where to get the lcd glue/tape/adhesive?
I got everything out, got a new battery, the screen works but the touchscreen doesn’t, anyone had the same problem?
Wow! This guide is way, way improved vs last week’s version! Nice work, Tarun! I picked up a “bad IMEI” copy of my Z2 Force on eBay to replace the damaged screen, and I’ll step my way through this when transplanting the screen. Thanks!
Please Read the Comments poste on “STEP 2”, When you apply the heat, the screen becomes unglued from the metal fram that it is attached to. I ended up damaging my screen. You need to make sure that what is coming unglued is the metal, and not just the plastic screen. I found out when I saw another video, where they do not apply heat, they just use a tool to pry the frame-display assembly… But apparently it was too late… You should be more specific about the warning…
I saw that video (i think it’s the same) on youtube too and it is misleading. It looks like they already removed the screen and did a second take for the video. There is no way the screen can be removed without heat. My phone was bulging and separated on the left side which gave me room to put the pick in but the adhesive was too strong to continue removing the entire screen. Once I used the iopener the pick was able to separate the screen without issue. I just moved slowly and didn’t use too much force.
jon -
Worked great! Thanks for the instructions. One must be patient and work slowly to separate the screen from the frame and since the screen is plastic it’ll take the iopener longer for heat to conduct through to the adhesive. I initially used the 90 minute rule on the iopener instructions but that wasn’t enough. I reread the OP’s instructions and used the two minute rule which worked great.
Add to Instructions: Remove all adhesive, especially around the perimeter, using the spudger or tip prior to reassembly. It’s very thin so be diligent. If you’re not careful, you’ll end up doubling up tape and the screen won’t sit flush. The precut display adhesive pattern only applies to the perimeter so make sure to cut additional adhesive for the areas at the top and bottom. Compare the screen adhesive pattern and you can see what areas that need the additional adhesive.
I used aluminum foil tape to re-adhere the conductive tape to the new battery. This tape is used to seal ventilation ducts for furnaces and AC systems.
Worked but almost damaged my screen. I have just a small black spot on one edge, that does not affect usability. I didn't had to remove the main board to remove the battery. When the camera was disassembled, I had enough space to go under the battery carefully with the spudger step by step and removed it without bending the battery.
I agree that the plastic card is the best tool to use for lifting the battery. It worked great with 2 minutes of the iOpener and a little alcohol. I used a gentle blower to dry the alcohol before reassembly. I found the entire process took about 40 minutes from start until I had books sitting on the phone to anchor the display and the charger plugged in to bring the battery up for the calibration.
Thanks for this guide….everything appears to bee working after putting it all back together. Now to see if replacing the battery fixes the random “where’s the battery?” screens I was getting. Note: I have an iOpener but never used it. Used 99% alcohol a few times to loosen the adhesive and that did the trick. Thoroughly cleaned the old adhesive round the edges and tried to preserve the adhesive patches at the top. With the replacement adhesive in the battery kit…phone looks like it was never taken apart.
Old phone gets new battery and it is working fine. Everything went as described. Tip: be sure to read the extra comments for each step to make things even easier. The hardest part for me was breaking the adhesive grip tape that seals and secures the perimeter between the case and display. Suggest you take your time, working slowly as eventually they do separate with damaging anything.
Ive done the screen and battery. Have you guys encountered boot looping with replacing them?
And if so how did you fix the bootloop. Using oem battery. I do not want to hard wipe it