Introducción
La batería es donde se almacena la carga y permite que el motor funcione. La batería está conectada al motor a través de la placa base.
Qué necesitas
-
-
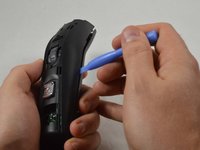
Presiona el botón negro debajo de la hoja para quitar la hoja.
-
-
-
Coloca el dispositivo de modo que la parte posterior del producto quede hacia arriba.
-
Retira los dos tornillos PH00 de 11,0 mm de la carcasa de plástico negro en la parte inferior del dispositivo.
What do you do if the screws strip? they are really cheap
Where does one get the actual battery replacement from?
You must use a very small blade Phillips screwdriver. A #0 will be too big. Significant downward pressure is also needed to break the screw loose and prevent stripping the screw. It feels like they are glued in. The battery is available in many places and is a 14500 type rated at 750mAh with a 4mm tab on the positive side and a 2.5mm tab on the negative side.
-
-
-
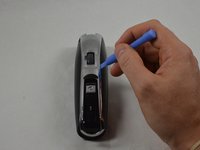
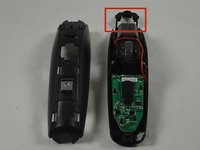
Retira la pieza de plástico cromada utilizando la herramienta de apertura de plástico para hacer palanca desde el conjunto de la carcasa.
-
Retira la pequeña pieza de plástico transparente que cubre los números de la rueda del zoom.
-
-
-
-
Retira los dos tornillos PH00 de 16,0 mm de la cubierta frontal.
-
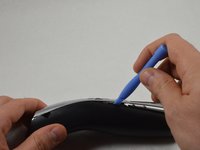
Utiliza la herramienta de apertura de plástico azul para separar las dos mitades del dispositivo.
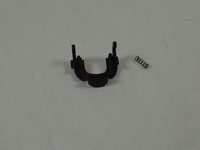
If you happen to lose the two springs, you can cut off 2x10mm of a spring from a pen :P
Merry trimming and a happy new beard !
I bought a set of Draper screwdrivers specifically for this. Can’t shift any of the screws. Ideas?
The screws holding the body together seem to be of poor quality and possible glued in place, I only managed to remove one with quite a high quality screwdriver and had to drill out the others. Taking this apart takes longer than 15 mins on it’s own leave alone doing repairs.
On a MB4045 model, I can confirm that the screws are glued into the plastic and cannot be unscrewed. I had to Dremel out the heads and dremeled a fair bit of plastic in the process. These trimmer model are designed for planned obsolescence. Shameful. The whole disassembly took me 1hr +
-
-
-
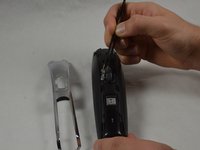
Retira el botón de la hoja negra y los dos resortes de 10,0 mm, que están intercalados entre las mitades del conjunto de la cubierta.
-
-
-
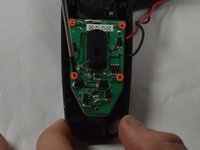
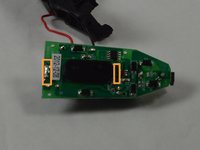
Retira los cuatro tornillos PH00 de 9,0 mm de la placa base.
-
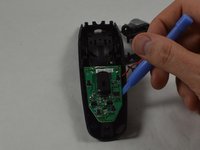
Utiliza la herramienta de apertura de plástico para retirar la placa base de su alojamiento.
-
-
-
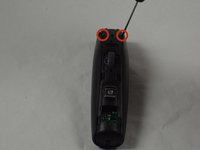
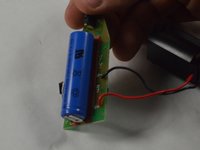
Retira el interruptor térmico de la batería usando el spudger para separarlo del adhesivo.
-
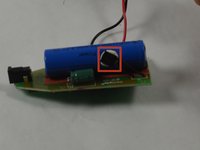
Retira la batería desoldándola de la placa base.
Thx! But how do you get the thermal switch back again? It seems I can’t just put it back by itself. Can you glue it back or something?
Ideally you should use a “thermal conductive glue”. You can search online for it. For me this was a non-critical fix so I just used a small amount of fabric glue which will stay flexible so I can take it off again next time, if there is a next time.
-


Para reensamblar tu dispositivo, sigue estas instrucciones en orden inversa.
Para reensamblar tu dispositivo, sigue estas instrucciones en orden inversa.
Cancelar: No complete esta guía.
23 personas más completaron esta guía.
Un agradecimiento especial a estos traductores:
100%

¡ Francisco Javier Saiz Esteban nos está ayudando a reparar el mundo! ¿Quieres contribuir?
Empezar a traducir ›
Equipo

USF Tampa, Team 1-5, Blackwell Winter 2015 Miembro de USF Tampa, Team 1-5, Blackwell Winter 2015
USFT-BLACKWELL-W15S1G5
Miembros de 3
14 Guías creadas
13 comentarios
Great work - but help on where to source the battery would be good too :)
It's available as a generic - it's a '14500' Li-Ion battery, 3.7V - typically 750-800mAh. Dimensions: 50mm x 14mm (diameter).
I have seen two types of these batteries: protected and unprotected. Which type do we need?
Amaury C -
You did everyrhing except the most important part to me
How did you unsolder the battery, and solder the new battery?
I was going to buy the tools from the local store but realized i don't know how to appropriately unsolder/solder battery tabs.
Non the less you are the only one who made such explanation, thank you.
If you happen to lose the two springs, you can cut off 2 pieces from the spring of a pen :P
Merry Trimming & A Happy New Beard !
The connectors to the battery were in my case spot welded not soldered which created some problems. Soldered both connectors from the circuit board together with the battery. Successfully drilled away the welding points, and then used the now rather demolished connectors again. Soldered the new battery. Not beautiful but it works.
Use 3 times only,but not charged
Didn’t have a soldering iron. I pried the battery tabs off the battery and used conductive tape to secure them as a workaround. Not ideal but seems to be holding so far
Thanks! The guide worked a treat on my MB4045. Having a second person hold the board and battery during the soldering helped immensely. For my MB4045 I used the A14500HD10FT (version A) battery from ecoluxshopdirect.co.uk. Lets hope this lasts for another 5+ years. Thanks again to all who contributed to this guide!
Agreed, guide worked well for 4045. Had to adjust width of tab to fit into the negative hole on the board. I ended up folding it and that worked. The positive tab on the stock battery required some wiggling as it was like it had been folded down onto the PCB