Introducción
La parte superior de la base eléctrica NutriBullet contiene interruptores activadores que se presionan cuando se coloca la jarra de la licuadora sobre la base. Cuando todos los interruptores están presionados, la licuadora se activa. Dependiendo del número de modelo específico, puede haber dos (NB-101B) o tres (NB-301) interruptores activadores.
Esta guía de reemplazo proporcionará instrucciones sobre cómo reemplazar estos activadores en un modelo con 3 interruptores, pero los pasos deben ser razonablemente similares en diferentes modelos.
Qué necesitas
-
-
Desenchufa el dispositivo de la pared y coloca la base de alimentación boca abajo.
-
-
-
-
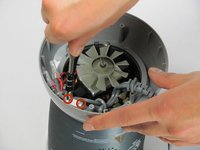
Mueve la carcasa exterior hacia arriba hasta que se separe de la base de alimentación.
I used my Nutribullet no more than 15 times, or maybe 20, and only for making smoothies, with almond milk, chunks of fruit, and some ground flax. I never ran the motor for more than 30-40 seconds at a time (even though the one-minute limit was nowhere to be found among the instructions. It just gave out on me. I realize now that it was made to give out after a couple of dozen uses. Now it goes to landfill. I will never again buy ANYTHING at Bed Bath & Beyond. They are in business to sell overpriced schlock.
-
-
Herramienta utilizada en este paso:Tweezers$4.99
-
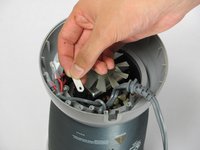
Coloca el NutriBullet powerbase en la mesa donde los activadores blancos sean visibles. Retira las cubiertas con unas pinzas o con los dedos.
And this is where the built in obsolescence can be found! If you have to dismantle the activators, be very careful to use a straight Phillips screwdriver vertically as any angled pressure is likely to break the plastic mouldings that the screws fit into and then you run into the usual problem of finding a glue, that welds plastic. - that will still hold when you tighten the screws against the spring. I’ve posted here as well as on stage 12 so you can be aware of the problem. Wish I’d waited to clean the spill until I got to this stage ….
-
-
-
Remueve los tres tornillos de 3 mm con el desarmador de Phillips Head 2.
Some of these screws are stripped on mine. What can I do to get these screws out?
-
-
-
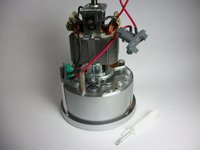
Voltea la base eléctrica NutriBullet y retira la carcasa de plástico levantándola. Es posible que tengas que mover la carcasa para desprender cualquier material endurecido.
In that step on my case, because of leaks it sticked to the base. I had to use a bit more force and I rotated left right until it loosed a bit. I think some kind of alcohol can help as well.
I had trouble separating the plastic and the motor assembly as they were stuck with spilt liquid.
Some alcohol and some persistent gentle persuasion got them apart for me.
-
-
-
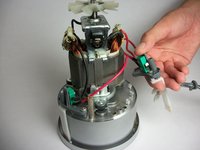
Determina cual activador(er) falla en trabajar haciendo presión en ellos. Luego remueve los dos tornillos de 15 mm que sostienen el activador en su lugar usando el destornillador Phillips Head 2.
-
-
-
Usando un poco de tensión, jala el activador flojo de su slot.
I'm missing one of the 3 activators. How can it be replaced? Called customer care and was told they do not sell the activator caps and I would have to buy the entire motor base for $50. I just need one little plastic activator! Any suggestions?
That does not make me feel confident. One of my activators stopped working, so I can't even push the container on to activate it. not happy with maybe having to buy the whole machine again.
One activator stopped working and I can’t blend. This happened to mine and I didn’t use it that much. I won’t buy another one. Thanks.
You may wish to take note of the way that some of the pieces are aligned during dis-assembly to make re-assembly easier. Two items in particular: the two plastic sleeves have to be replaced in such a way that the air vents are aligned and the base needs to be oriented in a way that allows for the securing of the power cable so that it is out of the fan’s way. Thanks!
A simple cleaning of the activators with hot water may fix the problem of activators blocked !
I was very optimistic when I found these detailed instructions to repair the activators. Very clear and easy to follow, but alas… See the three plastic nubs that the activator attaches to with the two screws? They seem to be very weak spots. One of mine snapped off, and once that happens, I’m not sure there is any solution. Any ideas? A potential waste of a good motor. I wonder if this is a “designed to fail” kind of thing.
I was in this situation. I taped the switch on the activator (green) closed.
One of the attachment posts was still partially there so I screwed the activator back down with that, and pulled out the spring and shortened the white pokey (that would normally hit the switch) so it fits with where I taped.
We'll see how long it holds!
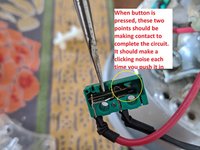
To everyone who is looking a replacement activator (the small green part), I was able to REPAIR the activator itself. Once you take off the green component (after step #13), you can actually open up the green component. The small metal tab will fall out, so don’t lose it, you will put it back in later. The small black button may also fall out, so don’t lose that either. The problem in my case was that the switch was stuck. I used a small screwdriver to wiggle the little metal piece inside until it snapped back into place. When you depress the internal metal piece, it should make a “clicking” noise, and the metal tab should connect the circuit (red wire to black wire). Once that is working again you can reassemble it carefully and make sure you still hear the clicking noise.
Not sure if this link will work or not but I took a photo https://photos.app.goo.gl/kj5Cdz13cE4yQC...
If you read the label on the component you can find replacement, mine said “donghai kw4-3z-3a”. https://www.ebay.com/itm/392605448299
One of my green switches (micro-switch) had frozen stuck and wasn’t clicking (switching). I was about to pry it apart when I thought, why not try to just force it, see if it frees up? It did. I pressed down on the metal tab with my finger, levering down on that little black button. After trying that about 3 or 4 times it freed up and returned to its original state (where it clicks like its supposed to).
Try this before either giving up or committing to prying it open.
And this is where the built in obsolescence can be found! If you have to dismantle the activators, be very careful to use a straight Phillips screwdriver vertically as any angled pressure is likely to break the plastic mouldings that the screws fit into and then you run into the usual problem of finding a glue, that welds plastic. - that will still hold when you tighten the screws against the spring.
-
-
-
Abre el interruptor verde. La pestaña de metal y botón negro caerán. Juegue con el interruptor de metal en el interior para colocarlo de vuelta en su lugar y luego reensamblar con cuidado. Debería hacer un sonido de click.
-


Para reensamblar tu dispositivo, sigue estas instrucciones en orden inverso.
Para reensamblar tu dispositivo, sigue estas instrucciones en orden inverso.
Cancelar: No complete esta guía.
60 personas más completaron esta guía.
Un agradecimiento especial a estos traductores:
100%


Estos traductores nos están ayudando a reparar el mundo! ¿Quieres contribuir?
Empezar a traducir ›
Equipo

Cal Poly, Team 19-8, Maness Winter 2015 Miembro de Cal Poly, Team 19-8, Maness Winter 2015
CPSU-MANESS-W15S19G8
Miembros de 4
13 Guías creadas
46 comentarios
Thank you. I would have went nuts looking for the screw under the rubber pieces. Would have probably destroyed the whole machine.
Thank you for this guide! So happy to have fixed it myself and gave my bullet a nice cleaning in the process :)
Excellent guide - thanks. Our nutribullet was incredibly stiff and hard to operate... taking it apart allowed me to properly clean it and now it works perfectly.
NOTE: be careful when reassembling as there is a specific orientation of the outer casing. Refer back to the position of the plug housing in step 1. I assumed the housing could go on any way and had to take it apart again.
Thank you! I was able to fix the activator, with was stuck on all of the filth inside. They really should improve these blenders, so the smoothies do not drip and collect in the motor and everything else. It works great now, but what a disgusting experience... I plugged the little draining hole up. Eew
Note that in most case actuator replacement is not required, they jam due to liquids dropping into them (a pretty poor design if you ask me). Upside down into shallow hot water, or even a small shot of WD 40 will do the job. Fix the actuators otherwise you will break the tabs on the recipients.
One piece of advice: Take a sharpie pen and match-mark each piece to the one it mates with as you disassemble the unit so you can put the pieces back in the same orientation. Orientation matters for the power cord to end up in the right spot relative to the bracket that secures the wires. Also take a photo of the wires before taking the bracket apart so you can remind yourself of how they went. That is not shown too well in the photos included in the instructions above.
I was nearly in tears after my intense workout then being unable to make my smoothie for breakfast this morning!! The hot water worked perfectly!!
Just for information: My Nutibullet only had two actuators - the third one was a dummy with no switch on it. The problem I had was that the plastic holder for one of the actuators had broken so the whole assembly was moving and therefore not switching. The assembly was reattached securely using a slightly thicker and longer self tapping screw sand washers plus a couple of strategically positioned tie wraps for additional support. Really badly designed actuator holders with a couple of weak points and screws that only just engage so don’t overtighten the screws or they will just pop out of the holes they screw into. Not sure how long the repair will last or how long it will be before the second actuator holder fails. Invaluable advice above to take photos of the inside whilst dismatling and the mark the pieces to help alignment when reassembling.
I took the risk and gently tightened the activator switch housing screw so that it was now flush with the base it connects to and not moving, but I agree, it’s only a matter of time before I will have to be more “creative” to keep the activator switch in place
Thank You, I would like to know where can I get Activators to replace them ?
Were you be able to find activators?
The explanation is very good… However I am unable to find a supplier for the actuator … Thus ultimately not useful to know how it CAN be done …disappointed.
Thank you! I was able to bring our NutriBullet back from the dead with your repair guide! As it turned out, one of the gray plastic clips that hold the actuators and switches had cracked, allowing the white pin that activates the microswitch to drift to the side. I was able to repair the little cracked tube that the white pin rides up and down by cleaning the crack with alcohol and gluing with superglue. The NutriBullet works like new again, with no need to add additional pressure to keep it going. Hopefully it will last a while longer.
To everyone who is looking a replacement activator (the small green part), I was able to REPAIR the activator itself. Once you take off the green component (after step #13), you can actually open up the green component. The small metal tab will fall out, so don’t lose it, you will put it back in later. The small black button may also fall out, so don’t lose that either. The problem in my case was that the switch was stuck. I used a small screwdriver to wiggle the little metal piece inside until it snapped back into place. When you depress the internal metal piece, it should make a “clicking” noise, and the metal tab should connect the circuit (red wire to black wire). Once that is working again you can reassemble it carefully and make sure you still hear the clicking noise.
Not sure if this link will work or not but I took a photo https://photos.app.goo.gl/kj5Cdz13cE4yQC...
If you read the label on the component you can find replacement, mine said “donghai kw4-3z-3a”. https://www.ebay.com/itm/392605448299
Great little guide! My bullet is back to it old self. Thank you for being there for me.
this worked for me thx!
I used this guide to re assemble after I took the nuribullet apart - I'm well pleased. In the past, after disassembling things, I’d normally end up with at least one screw left over and wondering where it was supposed to go. Thank you for the
I have the older Bullet but I followed these disassembly instructions and it was fairly similar. Mine was similarly full of smoothie gunk and once I cleaned it all out, it worked just fine!
I want to thank you for supplying the disassembly pics and instructions. I posted a comment a new section to the trouble shooting guide. In my case my eldest son used our Nutribullet in a non-pulsed way and appeared to have burned out the motor. I used your diagrams to disassemble and then - having had some experience with these issues in the past, assumed that the heat sensor had failed. Was quite frustrated when replacing this component did not fix the unit. Perseverance and some electric motor DIY channel browsing - caused me to investigate the brushes and commutator - this was the problem and a relatively easy fix as the unit was still disassembled.
This is a great tutorial. One word of caution, pay close attention to how the red electric cables route past the fan protector when you are taking the machine apart. There are essentially 3 ways the machine can be reassembled, but only one of these results in the cables routing past this protector properly. But very helpful and worked a treat.
Thank you very much for your post , my beloved Nutri Bullet has a new lease of life. I followed your instructions and now my machine works perfectly. Simple effective solution and considering I was about to get rid off it.
I no longer have to apply all my strength to push down to activate.
Thank you.
I'm looking for the motor mounts, all 3 broke??? They are made of plastic inside???
I'm looking for the 3 motor mounts all 3 broke, they have plastic nipples inside of the rubber brackets.
Thank you so so so so much! This has saved our Nutribullet! Clear instructions , great illustataive photos! 100%
Thank you for these instructions! One of the white plastic activators was totally jammed. I thought a little of my smoothie got down in there when it leaked a few times and gunked it up. Sure enough, I took it apart, washed the white plastic pieces and it works great once again. I could not have done it without your awesome instructions.
On my Nutribullet I had a similar issue (mixing did not start)... root cause was a broken off plastic nose on the cup. So one of the three Switches was not actuated - so the safety mechanism worked and the Motor did not start. Just changed to one of the other cups now until my spare part cup will arrive ;-)
Green switch fix did the job
Dozen people have asked where to get the %#*@ part, the actuator/activator. No replies!!!
Part no available for purchase????
Part number for activator? Lot's of people are asking.
Look for "donghai kw4-3z-3a", watch out for the right lever.
VauWeh -
I had a broken plastic casing that houses one of my actuator springs. Not sure how to go about remedying that on my own. I already know that I can't buy replacement parts, but maybe a dollop of crazy glue to fill the small hole will solve my problem. Any ideas?