Introducción
Esta guía te lleva a través del proceso de instalación del botón lateral derecho.
Qué necesitas
-
-
Usando un destornillador Phillips # 00, retire los cuatro tornillos de 6,4 mm en la carcasa trasera
-
-
-
Suavemente separar las dos carcasas, teniendo en cuenta la batería y los conectores del controlador de pantalla táctil que mantienen las carcasas juntas..
-
-
-
-
Libere el cable de la batería levantando suavemente la conexión con un spudger.
Any idea what type of pcb header is on the board for the battery? I have a motherboard with a broken header but I cant source a replacement
This is where I screwed up so I recommend extra caution for other newbies. Only the black part is supposed to come off. Don't be an idiot like me and pry off too much...
Yea I messed up there too. Is there a way to fix it?
This component was far more stubborn than the screen connector when it came to removal. I opted for a smaller tool than the spudger (small flat-head) and managed to disconnect it after determining the best bit size for the job. Screwdriver is metal, obviously, so being gentle helps to avoid damaging anything.
broke the white part
-
-
-
Utilizando el extremo puntiagudo del spudger, desconecte los tres conectores del cable de la antena en la parte superior de la tarjeta inalámbrica.
-
Deruta los cables de la antena de modo que estén fuera de la carcasa de la tarjeta inalámbrica. Ponga los cables lejos.
Hello, I have the PCH-2001 model of the PS vita and the right analog stick went out. I ordered a replacement and the stick is slightly larger than the original. The original has a black rectangle on the back, the new version has the star version, which is what you have on this website as the replacement part. Any help here would be much appreciated. Thanks.
-
-
-
Retire los dos tornillos Phillips # 00 de 4.4mm de la tarjeta inalámbrica.
-
Saque la tarjeta inalámbrica.
My screwdriver does not want to unscrew those. They won’t turn at all.
Got the same, used PH #0 and grabbed wireless card casing with fingers from the top to release pressure on screen and avoid (possibly) breaking it.
Some PS vita models seem to use a T2 screw instead of a PH#00. I’ve encountered this twice now.
I replaced de wifi card but is still difficult to connect to wifi. Could it be the wifi antenna? which cable model is it?
3G Vita 1000.
I found that the PH00 head wouldn't actually fit in to the screw correctly. A PH000 fit but was still requiring a bit more force than seemed necessary. Also the card did not pop up when the screws were released and that's because Sony used a tacky pad under the card so needed a bit of prying up to get the angle.
-
-
-
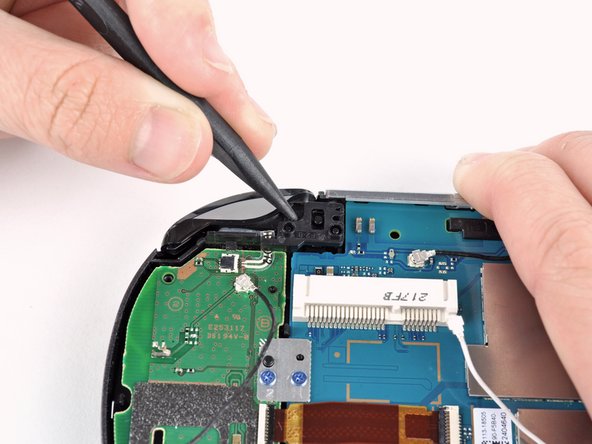
Levanta la carcasa del botón del hombro derecho con un spudger y déjalo a un lado.
-


Para volver a armar tu dispositivo, sigue estas instrucciones en orden inverso.
Para volver a armar tu dispositivo, sigue estas instrucciones en orden inverso.
Cancelar: No complete esta guía.
4 personas más completaron esta guía.
Un agradecimiento especial a estos traductores:
100%


Estos traductores nos están ayudando a reparar el mundo! ¿Quieres contribuir?
Empezar a traducir ›


5 comentarios
Is anyone else experiencing the button getting stuck?
Yes, mine is getting stuck, too. I am hoping a replacement will solve this problem.
aseelau -
i am replacing the whole front part of my vita do to screen cracked and wont turn on, when i put the button back on, how would i do so to make it stick back on? would i need to reglue it or will it stick back on by itself?