Introducción
Si estas teniendo problemas con que el OnePlus 6 no mantiene la carga o no esta prendiendo, usa esta guía para reemplazar la batería del teléfono.
La batería de un teléfono es lo que le da alimentación al teléfono y teniendo una batería buena es clave para una larga vida para el teléfono.
De vez en cuando, la vida útil de batería de un teléfono, incluso en el OnePlus 6, puede ser reducida con el tiempo y te puede causar frustración, Estos problemas vienen de una variedad de cosas como sobrecargar el teléfono con muchas aplicaciones al mismo tiempo o simplemente tener una batería dañada. Asegúrate de revisar OnePlus 6 Troubleshooting page para ver si hay una manera más fácil de reparar antes de tomar acción y reemplazar algo. Si nada funciona, esta guía paso a paso te llevará a través del reemplazo de tu batería vieja con una nueva para que puedas volver a tener tu OnePlus funcionando como nuevo.
El primer paso en esta guía de reemplazo es remover el panel trasero del teléfono, el panel trasero esta hecho de un cristal así que ten cuidado de no romperlo. También este atento a una batería inflada ya que puede ser ameaza de incendio o explosión.
Asegúrate de desconectar cualquier fuente de alimentación y apagar el teléfono antes de empezar el proceso de reemplazo.
Qué necesitas
-
-
Prende la pistola de calor en nivel bajo y aplica calor a los bordes curvos de la parte trasera del teléfono.
-
Inserta las púas de apertura entre el panel frontal y trasero y deslízalas alrededor del perímetro para romper el adhesivo que asegura la cubierta trasera.
-
Repite hasta que el panel trasero este retirado completamente.
-
-
-
-
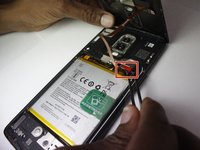
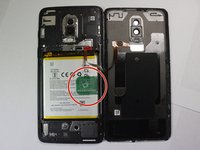
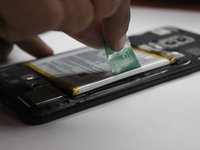
Toma la pestaña verde conectada a la batería y jala la batería directamente y hacia afuera.
-


Para reensamblar tu dispositivo, sigue estas instrucciones en orden inverso.
Para un rendimiento óptimo, después de completar esta guía calibra tu batería instalada nueva.
Lleva tu basura electrónica a un R2 or e-Stewards certified recycler.
Para reensamblar tu dispositivo, sigue estas instrucciones en orden inverso.
Para un rendimiento óptimo, después de completar esta guía calibra tu batería instalada nueva.
Lleva tu basura electrónica a un R2 or e-Stewards certified recycler.
Cancelar: No complete esta guía.
13 personas más completaron esta guía.
Un agradecimiento especial a estos traductores:
100%

¡ Fernando Salazar Garcia nos está ayudando a reparar el mundo! ¿Quieres contribuir?
Empezar a traducir ›
Equipo

Clemson, Team 4-3, Hunter Fall 2021 Miembro de Clemson, Team 4-3, Hunter Fall 2021
CLEM-HUNTER-F21S4G3
5 Miembros
14 Guías creadas
6 comentarios
How do I glue the phone back together when I am done? Do I need to add more glue? Do I just heat it with the heat gun again and squeeze it together?
I agree, this is unclear.
The "Parts" section at the top includes "Precut adhesive card", but when you click on that item, it gives a whole bunch of different size options for rolls of tape (8mm, 5mm, 1mm, etc.) and it's unclear which size to get. Does anyone have details of this?
Greg -
Great tutorial, battery is fixed thank you ! If you prefer videos, this one is a good complement https://www.youtube.com/watch?v=OBN7Tc7J...
Battery good so far, instructions clear enough! I turned the phone on immediately after replacing the battery to make sure everything worked. This was to avoid putting the phone back together only to find it wouldn't turn on, and then having to dismantle it again.
One thing you may want to pay attention to is not to separate the screen (front) layer from the phone, rather than the back side, which is what I did on my first try.
I opted not to get adhesive strips and I simply applied thinly cut electrical tape around the phone's edges, on the outside, to keep it together after fixing. Not terribly aesthetic but does the job well enough, especially if you use a book-style phone case like me.
Pretty doable fix for a first-timer, especially when using the fixit tools (picks, spudgers etc). Happy with the results. Thank you for the guide!
Additional tips (1/2):
1. When buying tools, consider buying a suction handle. This was useful to use on the heated back cover to open up a gap to insert the opening picks into.
2. Consider removing the SIM tray before heating the back cover.
3. When heating the glass back cover, consider wearing some resistant gloves when heating the glass back cover. The glass can get a little got and I was only using a hair dryer on the highest setting, rather than a heat gun.
4. When you have managed to wedge your first opening pick underneath the back cover, take another pick and drag it along the nearest part of the gap to open up the gap further before setting that pick into position. Repeat as you go around the entire edge of the phone. However, BE CAREFUL to not push the opening pick too deep, especially around where the volume buttons are, as the fingerprint sensor cable is located close the edge of the phone.