Introducción
Esta guía muestra cómo extraer y sustituir el conjunto de pantalla y digitalizador para el OnePlus 5.
Utiliza esta guía para las pantallas que vienen premontadas en un marco.
Este procedimiento requiere un desmontaje importante, incluida la sustitución de la batería, y la transferencia de piezas pequeñas de la pantalla antigua a la de sustitución. Las dos partes más difíciles son liberar los clips del marco de la tapa trasera y no dañar el cable del escáner de huellas dactilares.
Algunas imágenes de la guía muestran el módulo de la doble cámara trasera ya retirado del teléfono. No es necesario retirarlo para este procedimiento''.
Si la batería está hinchada, [What to do with a swollen battery|toma las precauciones adecuadas|new_window=true]].
Por tu seguridad, descarga la batería por debajo del 25% antes de desmontar el teléfono. Esto reduce el riesgo de un evento térmico peligroso si la batería se daña accidentalmente durante la reparación.
Qué necesitas
-
-
Inserta una herramienta de expulsión de tarjetas SIM, una broca o un clip enderezado en el pequeño orificio situado debajo de la bandeja de la tarjeta SIM, cerca de las cámaras traseras en el borde del teléfono.
-
Presiona firmemente para expulsar la bandeja.
-
-
-
Retira los dos tornillos T2 de 2,6 mm situados a horcajadas del puerto USB-C en el borde inferior del teléfono.
What are the reference of the screws ? They are missing in the one I bought !
Hi Yôken,
They help hold the back cover on. Most of the time, the clips are enough to hold the phone together.
Just FYI, for whatever reason my brand new OnePlus 5 had 0,8 mm stars screws instead of T2 Torx.
Definitely T2 for me. Do watch out during assembly. I have a feeling that it’s easy to strip these.
T2 for me too. It was missing in my kit and iFixit sent it later when I asked them about it.
-
-
-
Costura del panel de visualización: Esta costura forma parte del conjunto de la pantalla. No hagas palanca en esta costura, o separará y dañará el panel de la pantalla.
-
Costura del marco: Aquí es donde el marco de plástico se une a la tapa trasera. Haz palanca sólo en esta costura.
-
Hay doce clips que sujetan el marco contra la carcasa trasera. Ten en cuenta su ubicación cuando hagas palanca para retirar la cubierta trasera en los pasos siguientes.
-
-
-
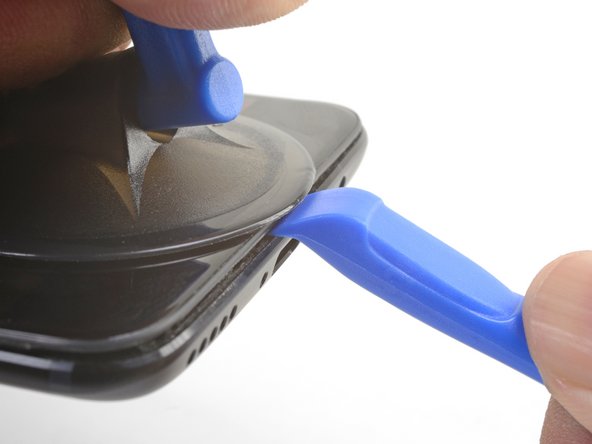
Coloca una ventosa cerca del borde inferior de la pantalla.
-
Tira de la ventosa con fuerza constante.
-
Presiona el borde de una herramienta de apertura directamente en la costura del marco cerca de la ventosa hasta que el borde se encaje entre el marco de plástico y el reborde de la tapa trasera.
I found the suction cup to be more of a hindrance and kept hitting the power button, making it necessary to stop and turn the phone off again. I watched a youtube video where the person didn't use a suction cup at all and decided to try that. I also found that a guitar pick type spudger worked far better than the one shown in the picture. If you're having trouble getting it started, I suggest trying those two things.
-
-
-
Una vez que el borde de la herramienta de apertura esté encajado en su posición, desliza con cuidado la herramienta a lo largo del borde inferior del teléfono.
-
Guía con cuidado la herramienta de apertura alrededor de la esquina izquierda del teléfono manteniendo el borde de la herramienta dentro de la costura.
This was extremely difficult & took a lot of force. I needed a thin flat metal spudger and wrecked a couple of plastic ones in the process. I left a few scratches along the join in the process. It would be easier if I had something to hold the phone, in my hand I kept turning it on by accident.
what was the metal spudger did you use? I am having trouble as well. I cannot seem to pry the back cover and it feels like it is shut tightly, there are no crevices I can pry into. What was your strategy may I ask?
At first, I slightly opened the body with a plastic tool, but it was not enough to actually open the back cover. Then I used a thin metal screwdriver for this. It was difficult but nothing special. Just be sure that you are opening the correct seam between the body and the screen and don’t make sudden moves. I bent nothing, everything came back in place when reassembled.
ivan -
Same as David here: the plastic opening tools/guitar picks were doing nothing (not even creating the first "crack") . In the end I managed to open it using Jimmy (the metal knife/spudger), but not without scratching the whole metal cover.
-
-
-
Continúa deslizando la herramienta de apertura a lo largo del borde largo, liberando los clips por el camino.
-
-
-
Con la parte inferior y el borde izquierdo del teléfono liberados, mueve suavemente el marco para liberar los clips de los bordes superior y derecho.
-
Alinea el borde superior del marco con la tapa trasera y asegúrate de que los clips superiores encajan en su sitio.
-
Aprieta a lo largo de los bordes largos del teléfono para encajar los clips restantes en su sitio.
Reinstalling the back cover stumped me for a second… If you’re struggling with aligning the top edge of the frame, remember that the camera is going to look off/pointed a bit too low until you actually clip the frame back in.
Really stupid but it was the only thing that tripped me up in this guide.
-
-
-
Haz palanca con la punta de un spudger y desconecta el cable flexible de la tapa trasera de su enchufe.
If the flex cable pins are damaged, the flex cable can be replaced.
If the connecter pins (on the motherboard) are damaged, you might need to do microsoldering (or contact a microsoldering company) to replace the damaged connector.
Brendan -
-
-
-
Utiliza la punta de un spudger para hacer palanca y desconectar el conector de la batería de su zócalo.
-
-
-
Retira los seis tornillos Phillips de 2,6 mm que fijan el altavoz al marco.
-
-
-
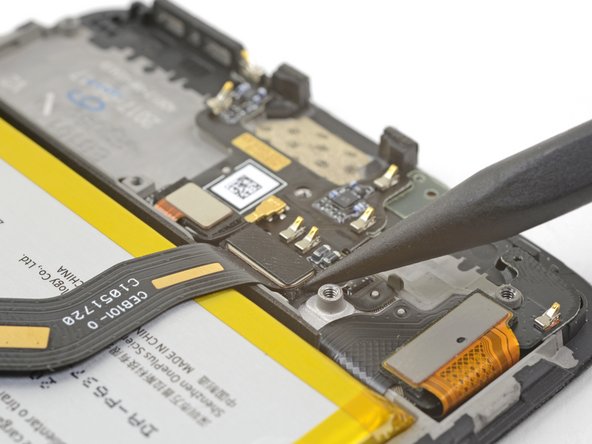
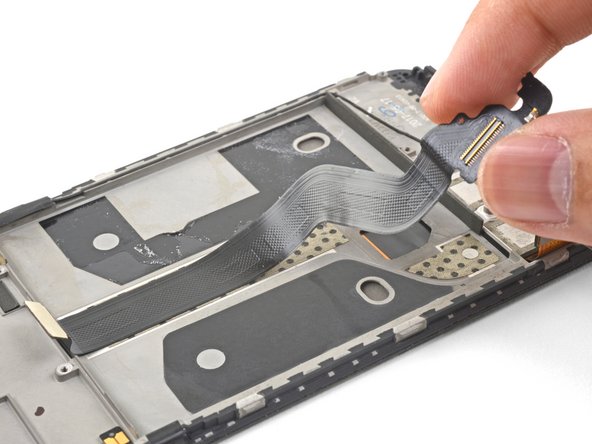
Usa la punta de un spudger para hacer palanca y desconectar el cable flex de interconexión del socket.
This step is used in multiple guides, and not all of them require the cable to be bent away. You can just leave it sitting there, disconnected.
This image seems to show the daughterboard removed but there is no corresponding previous step. I see no way to remove the interconnect flex cable without removing the daughterboard. Possibly the volume switch can be removed with the cable still connected but I'm not confident enough to try this so will remove the daughterboard.
David,
Thanks for bringing this up. That's indeed a procedural error! I've added the missing steps in the affected guides.
-
-
-
-
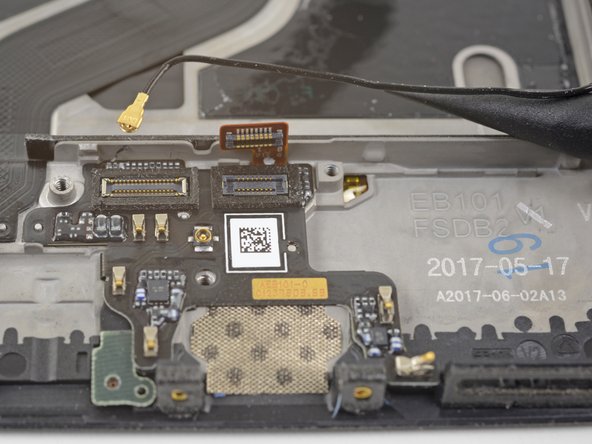
Haz palanca con la punta de un spudger y desconecta el conector del escáner de huellas dactilares de su zócalo en la placa hija.
-
-
-
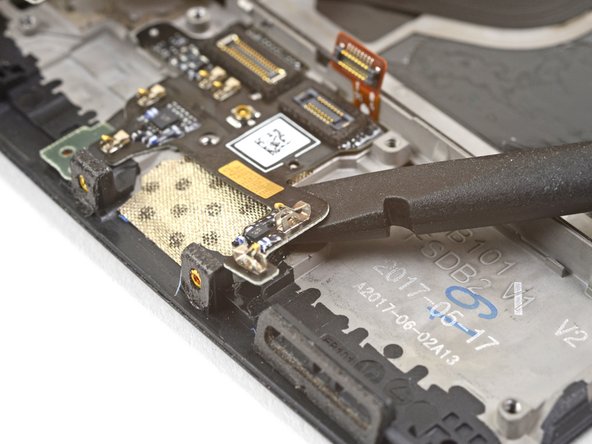
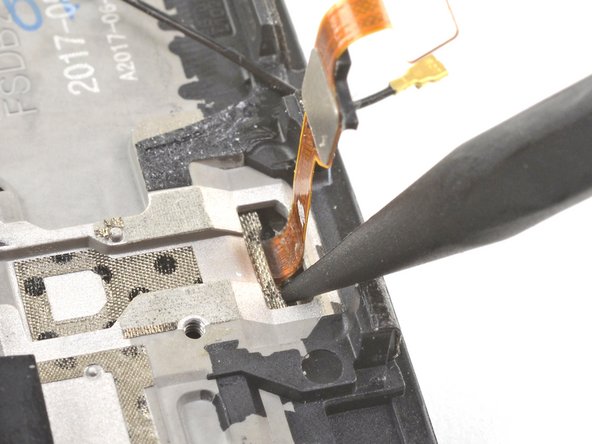
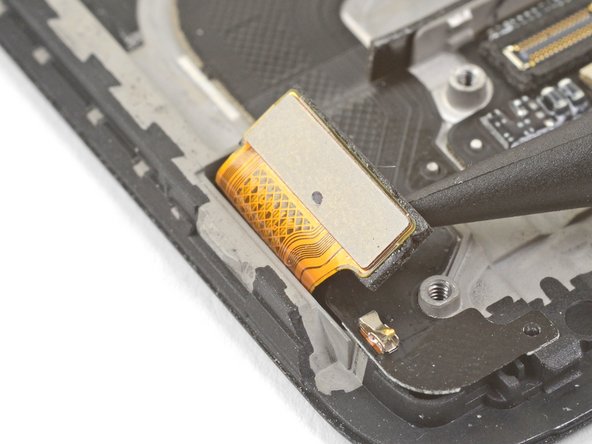
Desliza el extremo plano de un spudger por debajo de la cinta que cubre el escáner de huellas digitales.
-
Levántala para hacer palanca y retirar la cinta.
Hello! Does this silicone tape have the same thickness as the mesh that will be removed during disassembly? Do you have a mesh like that available or do you know a place to purchase it online?? Thanks
-
-
-
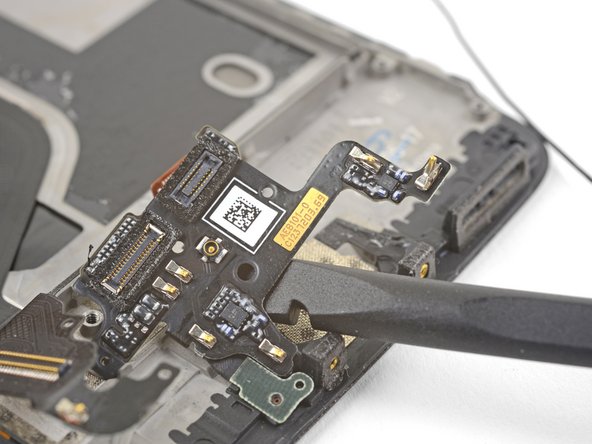
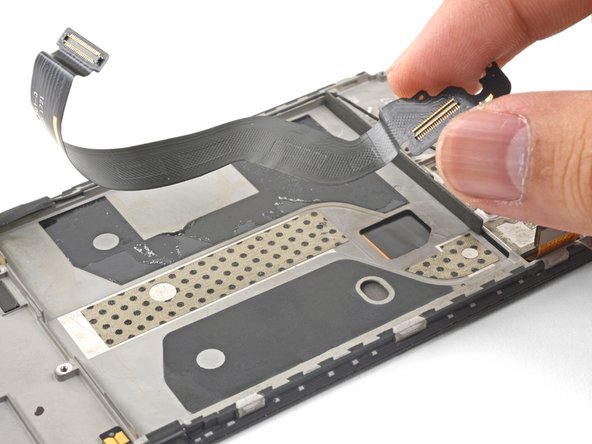
Utiliza el dedo para levantar suavemente el extremo del conector del escáner de huellas digitales. Tira lentamente hacia arriba. No tires directamente del escáner de huellas digitales.
-
Sigue tirando hacia arriba hasta que el cable del escáner de huellas digitales se libere de su hueco.
I couldn’t release this by pulling upwards as shown. Maybe I wasn’t brave enough & could have pulled harder. I used a fine pointed end of a scalpel blade under the left side where the QR code is & that, while pulling gently, did the trick.
-
-
-
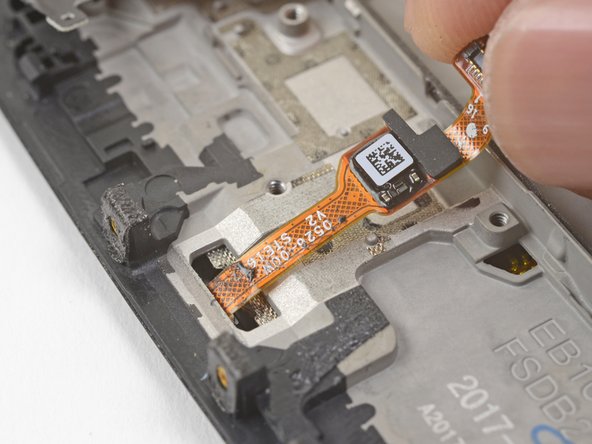
Una vez que el escáner de huellas dactilares esté suelto de su hueco, pasa con cuidado su cable flexible a través del recorte, fuera de la parte frontal de la pantalla.
-
Retira el escáner de huellas digitales.
My replacement fingerprint scanner did not come with any adhesive to hold it in place and it floated above the surface of the phone. I used a tiny amount of very carefully applied Gorilla contact adhesive which worked but will be a pain to remove next time.
-
-
-
Usa la punta de un spudger para hacer palanca y desconectar el cable de interconexión de la pantalla de su zócalo, cerca del borde inferior de la placa madre.
Hallo, hier scheint der Schritt zu fehlen, in dem das Kameramodul entfernt wird.
Hello Norman,
You do not need to remove the camera module for procedure.
Hi Arthur,
You do need to remove the camera module, it’s in the photographs above, but not from step 33 onwards. It needs removing in order to remove the motherboard in steps 34 and 35.
Hi Alex! Thanks for the feedback! Can you relay which replacement guide you found the missing steps in? That would help me very much!
There are no steps 33, 34, 35 in this guide so the above comments must be from some other guide. With this phone I just lifted out the motherboard, carrying the camera with it. It went back the same way - but be careful not to trap the connector cable at the front under it.
-
-
-
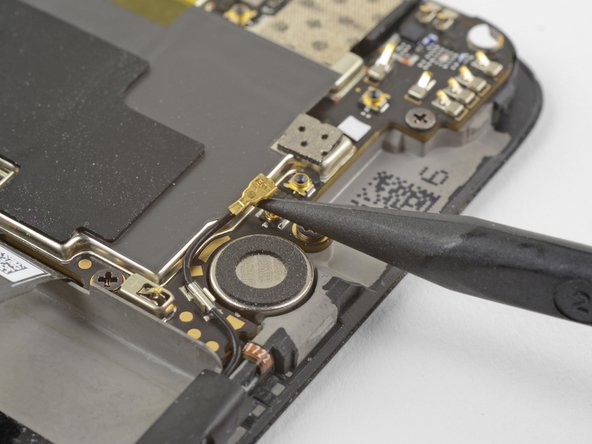
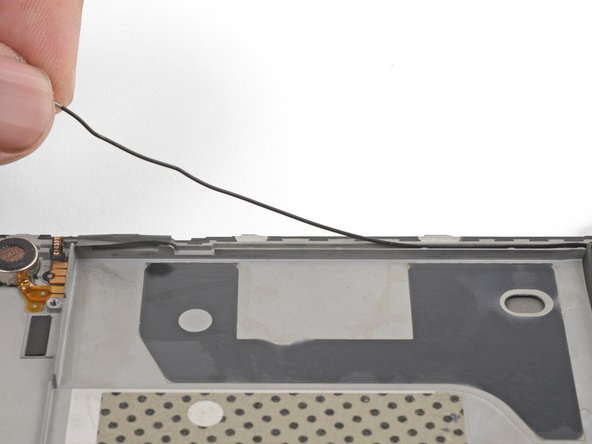
Desliza la punta de un spudger por debajo del cable interconector de la antena que está conectado a la placa madre por encima del motor vibrador.
-
Haz palanca hacia arriba para desconectar el cable de su zócalo.
-
Saca el cable de su clip de conexión a tierra de la placa madre y apártalo.
Be attentive when reassembling if your unit doesn’t have a tape, which keeps antenna interconnect cable in place — I’ve accidentally got it squeezed with back cover.
-
-
-
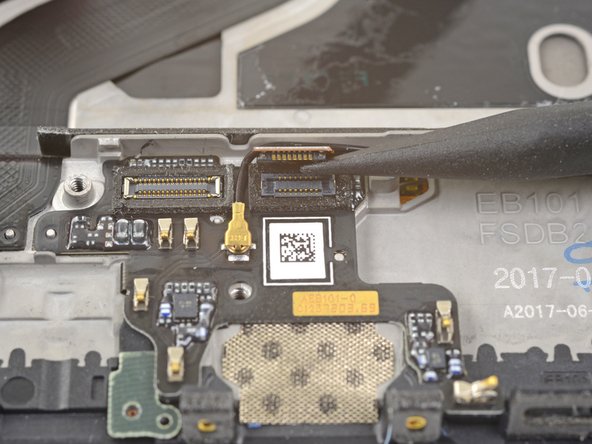
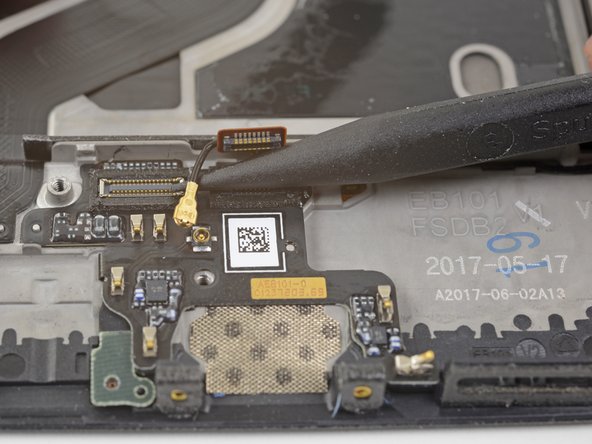
Desliza la punta de un spudger bajo el pequeño conector cuadrado de antena conectado a la placa madre cerca del borde superior.
-
Haz palanca hacia arriba para desconectar el conector de la antena de su zócalo.
camera step seem to be missing
The cameras should be removed in step 14.
-
-
-
Usa los dedos para levantar el borde superior de la placa madre.
-
Saca la placa madre de su hueco y extráela.
The previous steps have not removed the camera although the pictures show it has been removed. I found that I could carefully lift away the motherboard with the camera attached.
When replacing the motherboard take care not to trap the small square antenna connector under the top edge.
-
-
-
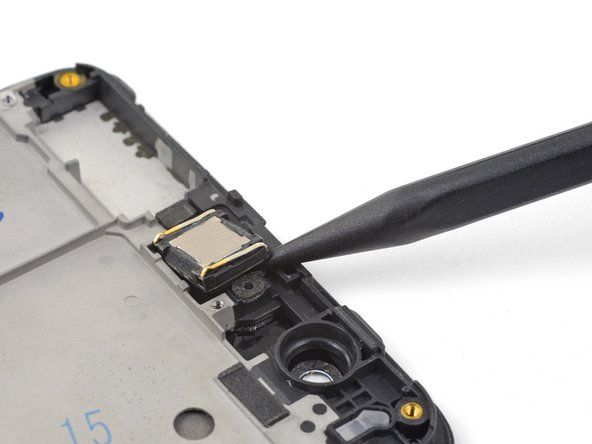
Introduce la punta de un spudger bajo la esquina superior derecha del módulo del auricular y haz palanca hacia arriba, aflojando el módulo de su hueco.
-
-
-
Si vas a transferir el módulo del auricular a un marco de reemplazo, asegúrate de despegar y retirar el revestimiento adhesivo blanco antes de presionar el módulo del auricular en su lugar.
-
-
-
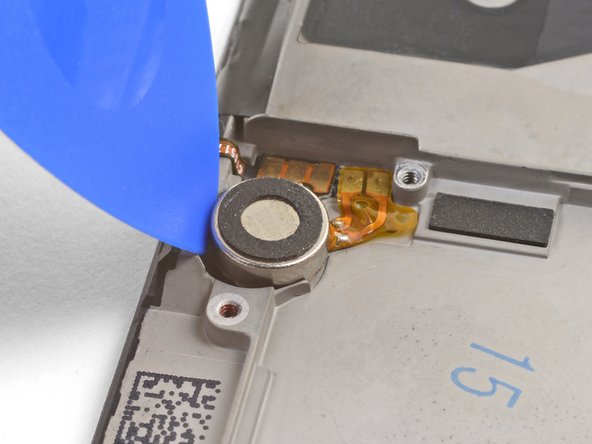
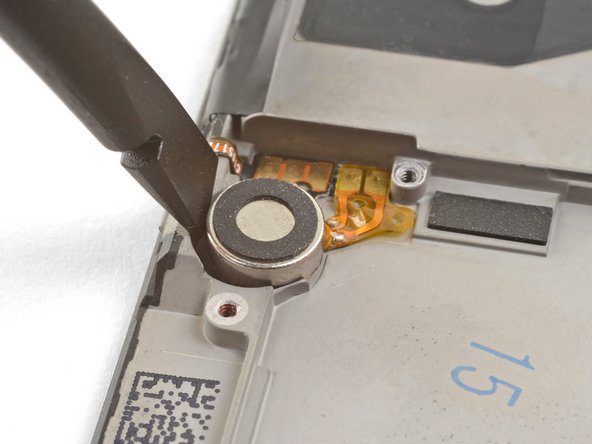
Introduce la punta de una púa de apertura entre el motor vibrador y el marco y empuja hacia abajo para soltar el motor vibrador de su hueco.
-
Una vez que el motor de vibración esté ligeramente suelto, puedes introducir el extremo plano de un spudger entre el motor y el marco para liberarlo de su hueco.
-
-
-
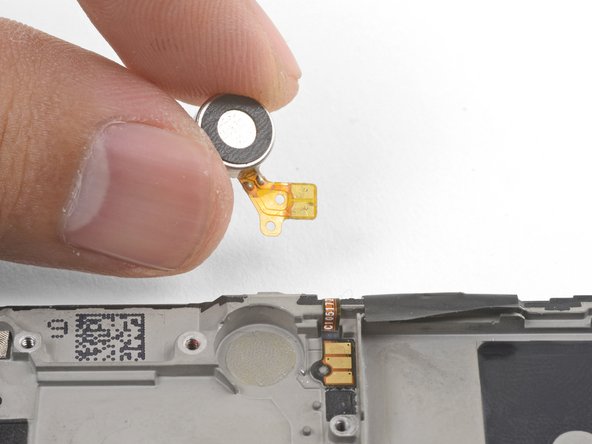
Desliza la punta de una púa de apertura por debajo de la almohadilla flexible del motor de vibración y levántala suavemente del marco.
-
Insertar traducción aquí
-
-
-
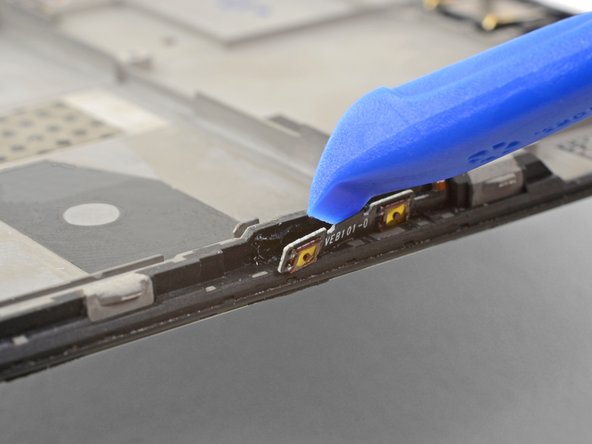
Utiliza unas pinzas o la punta de un spudger para hacer palanca y retirar la cinta negra que cubre los botones de volumen del borde derecho del teléfono.
-
Repite el proceso con la cinta negra que cubre el botón de encendido en el borde izquierdo del teléfono.
-
-
-
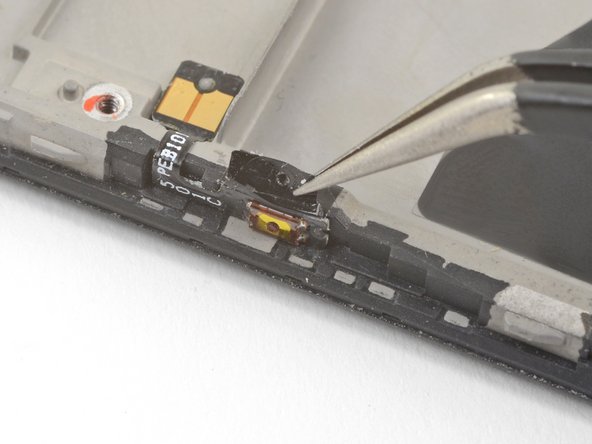
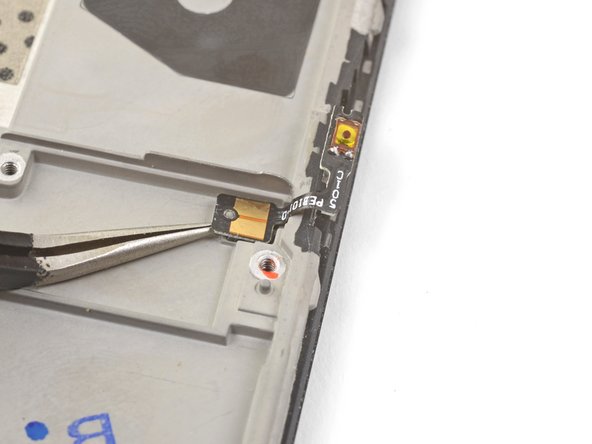
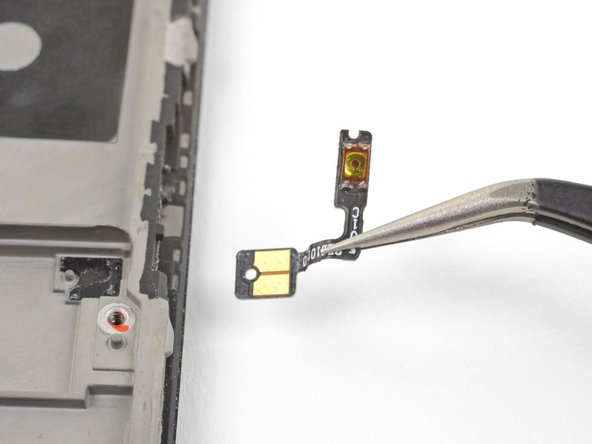
Aprieta las puntas de las pinzas e introduce la punta por debajo de la almohadilla de contacto de la botonera de volumen, cerca del borde superior derecho del marco.
-
Haz palanca hacia arriba para soltar la almohadilla de contacto del marco.
-
Retira los botones de volumen.
Installing a vol button to a used frame I found the existing adhesive (a black sticky rubbery compound) still sticky enough to hold all in place except for the last 2mm of the outer strip with the switches which I fixed with a tiny piece of double sided tape. The tape was not at all adhesive & it's not obvious what it's for. Electric tape doesn't stick to the vol button strip so I used 2 or 3 pin prick size dots of contact adhesive to keep it in place. Fingers crossed!
-
-
-
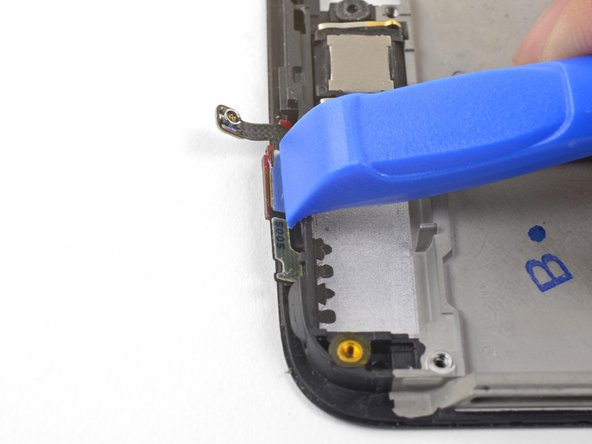
Utiliza el borde de una herramienta de apertura para apartar del marco el conector de la antena de la tapa trasera. Está situado en el borde superior del marco.
-
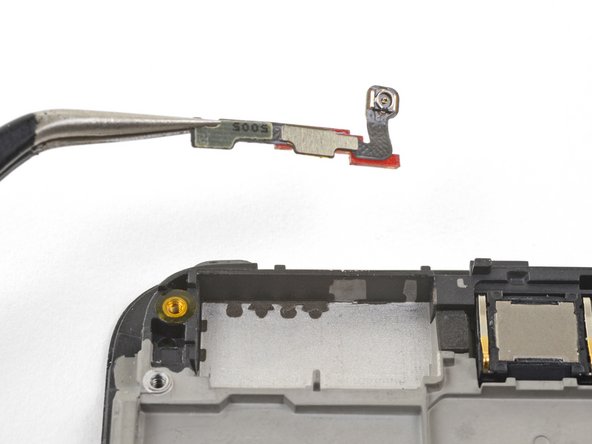
Retira el conector de antena de la tapa trasera.
-
Si vas a transferir el conector a un marco de reemplazo, despega el revestimiento azul del borde superior del marco de reemplazo antes de pegar el conector en el borde.
-


Para volver a montar el dispositivo, sigue estas instrucciones en orden inverso.
Lleva tus residuos electrónicos a un centro de reciclaje certificado.
¿La reparación no ha ido según lo previsto? Visita nuestra Comunidad de respuestas de OnePlus 5 para obtener ayuda sobre la solución de problemas.
Para volver a montar el dispositivo, sigue estas instrucciones en orden inverso.
Lleva tus residuos electrónicos a un centro de reciclaje certificado.
¿La reparación no ha ido según lo previsto? Visita nuestra Comunidad de respuestas de OnePlus 5 para obtener ayuda sobre la solución de problemas.
Cancelar: No complete esta guía.
32 personas más completaron esta guía.
Un agradecimiento especial a estos traductores:
100%

¡ Mariana Roca nos está ayudando a reparar el mundo! ¿Quieres contribuir?
Empezar a traducir ›


17 comentarios
Nice. But where do you get the replacement part from?
Dear Christos, hope it is not too late, you can check Oneplus 5 screen replacement from Witrigs
HI . Do I need to buy an original screen and digitizer for my oneplus 5?
I'm from Argentina and on EBAY I do not see ORIGINAL parts
Can someone help me?
Hi Joselo,
You do not need an original, but that is probably the best quality. The original screen is AMOLED. There are also OLED and LCD replacement screens. These will not be as bright as the original AMOLED panel.
Hi, I need to know if this screen is like the original (Amoled) or not, and approximately how long it takes to send by mail to Miami Florida. Thank you OnePlus 5 Screen
Hi Joselo, that Screen and Digitizer Assembly is indeed an AMOLED screen and digitizer.
As for the shipping question: In order to determine shipping estimates, costs, and methods, you will need to enter your shipping address at checkout as this may vary based on the specific address.
If you ever have any questions, feel free to contact our iFixit Customer Support. We are always here to assist if you need anything. :)
Wow, this repair looks hard. I’d rather buy a new phone than attempt this.
Don’t blame you; the time commitment is hard to justify. However, I had a few hours to spare and took it slow: now I have a backup device from a (my first) phone repair :)
manual is very clear, successfully replaced the screen this weekend. difficulty is not too bad
Thanks for the guide, made me able to change my own screen for real cheap!
U forgot the front camera :)
Otherwise great guide!
The contacts for the vibration motor were hard to get off!
I left the front camera attached to the motherboard when I removed the board, but you can remove it separately.
The vibration contacts are pretty heavily glued in! They have to—otherwise, the motor will shake loose :)
Just used this guide, managed to get all the parts off my old phone but have noticed on the new frame there is not any black sticky for the parts to stick onto, it's just bare metal where they're supposed to adhere. Can anyone enlighten me?? Can I buy this double sided black tape? Is Tesa tape a good replacement? I'm assuming things will short out if I try to stick them into the bare metal frame?
Hi Rich,
Tesa tape is a good option! Depending on what you are sticking, you may only need the Tesa adhesive card. For smaller parts such as the side buttons, double-sided tape will suffice.
Nice tutorial. Everything works now after switching the screen. Took about 3h to someone with experience, but the steps are well documented.
The screen replacement from ifixit is not the same quality as the original (particularly the glass is very fragile); still, it's very nice to have access to spare parts and avoid buying a whole new phone!
Solid guide! Pretty intensive repair; only difficulty was to get a new piece of electrical tape to cover the buttons: ended up neglecting to replace that and just using them as is (with greater sensitivity).