Esta traducción podría no reflejar los cambios más recientes añadidos a la guía de referencia. Ayúdanos a actualizar la traducción o revisa la guía original.
Introducción
Esta guía te mostrará cómo reemplazar la parte más importante de tu Nintendo 3DS XL, la placa base. La placa base es la parte central de su dispositivo, ¡es donde sucede todo!
Qué necesitas
-
-
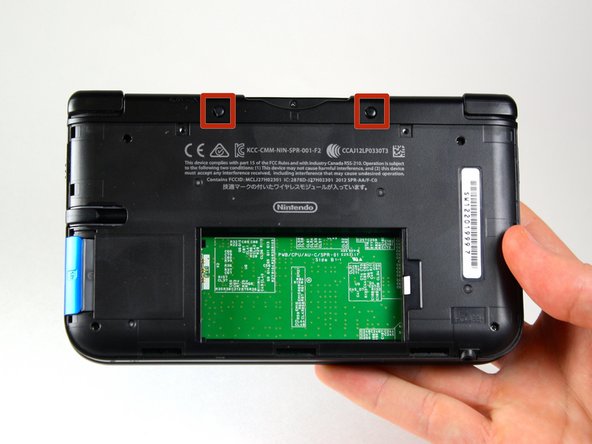
Afloja los dos tornillos Phillips #0 de 4,2 mm de longitud situados en la parte superior de la tapa posterior.
-
Los tornillos tienen arandelas (rondanas) de seguridad que evitan que los tornillos se desprendan de la cubierta . Deja las arandelas en los tornillos; no es necesario removerlas para esta guía de reparación.
-
-
-
Coloca el dispositivo de manera que la cubierta quede hacia arriba.
-
Usa una herramienta para abrir de plástico para desprender la cubierta empezando desde la esquina derecha.
-
Sostén la orilla de la cubierta para asegurarte de que no se cierre de nuevo.
-
Revisa la pequeña sección debajo del compartimiento del stylus. Manipula la cubierta en ese punto si aún no se ha desprendido.
-
Quita la cubierta del dispositivo y deja la batería a un lado.
-
-
-
Usando pinzas remueve las gomas localizadas arriba del dispositivo a cada lado del slot de cartuchos
-
-
-
Asegúrate de que se haya retirado la tarjeta SD. Con una herramienta de apertura de plástico, haz palanca en la carcasa inferior comenzando por el borde inferior y trabajando alrededor del perímetro.
-
Dos cables planos conectan la carcasa a la placa de circuito. Ten cuidado de no tirar demasiado fuerte de la carcasa y rasgar los cables planos.
-
-
-
-
Coloca el dispositivo de modo que la ranura del cartucho de juego quede en la parte superior.
-
Localiza la placa IR ubicada en el lado superior derecho de la placa base.
-
Retira la placa IR con una herramienta de apertura de plástico insertando la herramienta debajo de la placa IR y haciendo palanca suavemente hacia arriba.
-
-
-
Con una herramienta de apertura de plástico, saca la placa Wi-Fi.
-
La placa Wi-Fi aún estará conectada por un cable y no es necesario quitarla por completo para este paso. Simplemente colócala fuera de su lugar en este paso.
-


Para volver a armar tu dispositivo, sigue estas instrucciones en orden inverso.
Para volver a armar tu dispositivo, sigue estas instrucciones en orden inverso.
Cancelar: No complete esta guía.
47 personas más completaron esta guía.
Un agradecimiento especial a estos traductores:
92%


Estos traductores nos están ayudando a reparar el mundo! ¿Quieres contribuir?
Empezar a traducir ›
Equipo

Cal Poly, Team 9-13, Regan Spring 2014 Miembro de Cal Poly, Team 9-13, Regan Spring 2014
CPSU-REGAN-S14S9G13
5 Miembros
44 Guías creadas
13 comentarios
Does anyone know how to fix the flap on the ribbon because I accidentally removed the whole thing
How do you fix it so it will stop shutting down on start up?
my 3DS XL in turn on, speaker making cracking sound, no display, then power off. is this motherboard issue.
I have the same problem, did you were able to fix it ?
soyeliel -