Saltar al contenido principal

Melitta Caffeo Barista T opening

Qué necesitas

  1. Melitta Caffeo Barista T opening, Preparation: paso 1, imagen 1 de 1
    • Never forget: Remove the cable from the powerplug

    • Remove all the parts

  2. Melitta Caffeo Barista T opening, Remove the backside: paso 2, imagen 1 de 2 Melitta Caffeo Barista T opening, Remove the backside: paso 2, imagen 2 de 2
    • The backside is fixed with seven Torx T10 screws. Unscrew them

    • Get the Backside of. It should be a bit stuck.

  3. Melitta Caffeo Barista T opening, Remove the powder compartment lid: paso 3, imagen 1 de 3 Melitta Caffeo Barista T opening, Remove the powder compartment lid: paso 3, imagen 2 de 3 Melitta Caffeo Barista T opening, Remove the powder compartment lid: paso 3, imagen 3 de 3
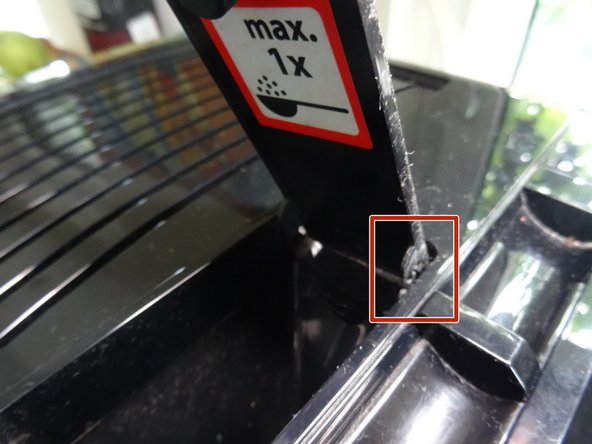
    • Pull the powder compartment up.

    • Pull one of the sides of the Powder compartment out of the hinge and loosen the lid.

    • Remove the powder compartment

  4. Melitta Caffeo Barista T opening, Loosen the upper housing part: paso 4, imagen 1 de 3 Melitta Caffeo Barista T opening, Loosen the upper housing part: paso 4, imagen 2 de 3 Melitta Caffeo Barista T opening, Loosen the upper housing part: paso 4, imagen 3 de 3
    • In the powder compartment, you should see a rubber cover. Loosen the rubber cover with the appropriate tools.

    • There should also be a Torx T10 screw. Unscrew it

  5. Melitta Caffeo Barista T opening, loosening the Upper housing part: paso 5, imagen 1 de 2 Melitta Caffeo Barista T opening, loosening the Upper housing part: paso 5, imagen 2 de 2
    • The upper cover with the brewing unit is held up from three clamps. These can be reached through a slit.

    • Press these clams with a flat scredriver in and pull the upper cover up, until the clamps loosen.

  6. Melitta Caffeo Barista T opening, Removal of the upper case: paso 6, imagen 1 de 3 Melitta Caffeo Barista T opening, Removal of the upper case: paso 6, imagen 2 de 3 Melitta Caffeo Barista T opening, Removal of the upper case: paso 6, imagen 3 de 3
    • On the side that has a a watertank you can find 2 other clamps

    • Press these clamps with a flat scredriver in and pull the cover up until they loosen

    • Lift the upper cover and the backside up, hook it on the front edge and remove them

  7. Melitta Caffeo Barista T opening, Removal of the side panel: paso 7, imagen 1 de 2 Melitta Caffeo Barista T opening, Removal of the side panel: paso 7, imagen 2 de 2
    • Push the right and the left side panel back, then pull the lower edge out and pull the side panel out.

    • This could be a bit stuck

    • On the side panel with the watertank, there should be a supply hose attached to a cable that connects the water-level sensore. loosen them

    • Hint: the side panel doesn't have to be removed completely for each repair.

Conclusión

Work through the steps in reverse order, to rebuild your machine.

Un agradecimiento especial a estos traductores:

de en

100%

Estos traductores nos están ayudando a reparar el mundo! ¿Quieres contribuir?
Empezar a traducir ›

VauWeh

Miembro Desde 10/19/15

210,422 Reputación

255 Guías creadas

Equipo

Repair is War on Entropy Miembro de Repair is War on Entropy

Community

27 Miembros

1,186 Guías creadas

0 comentarios

Agregar Comentario

Ver Estadísticas:

Ultimas 24 horas: 1

Ultimos 7 días: 28

Ultimos 30 días: 143

Todo El Tiempo: 1,274