Esta versión puede contener ediciones incorrectas. Cambie a la última instantánea verificada.
Qué necesitas
-
-
Retira los siguientes 10 tornillos que sujetan la tapa inferior del MacBook Pro 13 "Unibody:
-
Siete tornillos Phillips de 3 mm.
-
Tres tornillos Phillips de 13,5 mm.
-
-
-
Levanta ligeramente la tapa inferior y empuja hacia la parte posterior para liberarlo de las pestañas que lo sujetan
-
-
-
Utilice el extremo plano de un spudger para levantar el conector de la batería hacia arriba fuera de su toma en la placa lógica.
-
-
-
Usa un spudger para sacar el conector del ventilador de su zócalo en la placa lógica.
-
-
-
Toma la lengüeta de plástico asegurada al candado del cable de datos de la pantalla y gírala hacia el lado de entrada de CC de la computadora.
-
Tira con cuidado del conector del cable de datos de la pantalla paralelo a la placa.
-
-
-
Este paso está sin traducir. Ayuda a traducirlo
-
Remove two Phillips screws securing the hard drive bracket to the upper case.
-
Lift the the retaining bracket out from the upper case.
-
-
Este paso está sin traducir. Ayuda a traducirlo
-
Lift the hard drive from its free edge and pull it out of the chassis, minding the cable attaching it to the computer.
-
-
Este paso está sin traducir. Ayuda a traducirlo
-
Disconnect the hard drive by pulling the hard drive cable connector away from the drive.
-
-
Este paso está sin traducir. Ayuda a traducirlo
-
Remove the following four screws securing the hard drive and IR sensor cable to the upper case:
-
Two 1.5 mm Phillips screws.
-
Two 4 mm Phillips screws.
-
Slide the hard drive and IR sensor bracket away from the edge of the upper case.
-
Carefully peel the hard drive and IR sensor cable from the upper case.
-
-
Este paso está sin traducir. Ayuda a traducirlo
-
Remove the following screws securing the subwoofer to the upper case:
-
One 3.8 mm Phillips screw.
-
One 5 mm Phillips screw
-
Lift the subwoofer off the optical drive, and set it above the computer.
-
-
Este paso está sin traducir. Ayuda a traducirlo
-
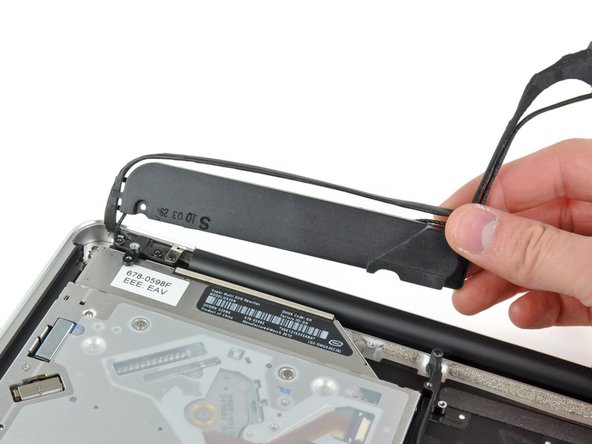
Remove the two 10 mm Phillips screws securing the camera cable bracket to the upper case.
-
Lift the camera cable bracket out of the upper case.
-
-
Este paso está sin traducir. Ayuda a traducirlo
-
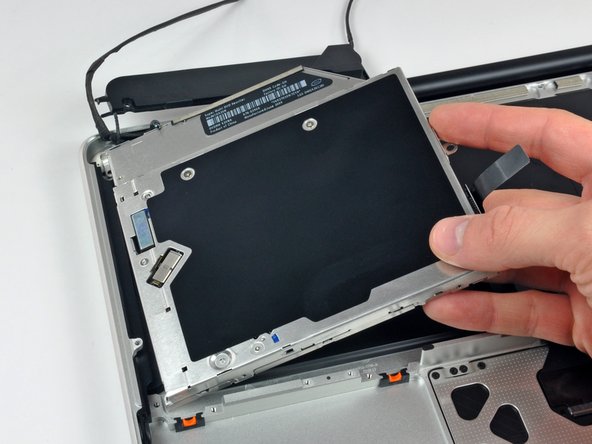
Remove the three 2.5 mm Phillips screws securing the optical drive to the upper case.
-
Lift the optical drive from its right edge and pull it out of the computer.
-
-
Este paso está sin traducir. Ayuda a traducirlo
-
Peel back the small piece of black tape covering the right speaker cable.
-
Be careful, as the power button ribbon cable is directly under this piece of tape.
-
-
Este paso está sin traducir. Ayuda a traducirlo
-
Use the tip of a spudger to pry the right speaker up off the adhesive securing it to the upper case.
-
-
Este paso está sin traducir. Ayuda a traducirlo
-
Lift the subwoofer and right speaker assembly out of the upper case.
-
-
Este paso está sin traducir. Ayuda a traducirlo
-
Remove the two outer T8 Torx screws securing each side of the display bracket to the upper case (4 screws total).
-
-
Este paso está sin traducir. Ayuda a traducirlo
-
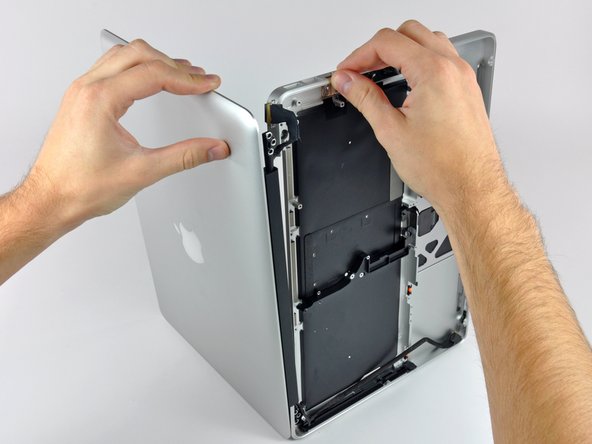
Open your MacBook so the display is perpendicular to the upper case.
-
Place your opened MacBook on a table as pictured.
-
While holding the display and upper case together with your left hand, remove the T8 Torx screw from the lower display bracket.
-
-
Este paso está sin traducir. Ayuda a traducirlo
-
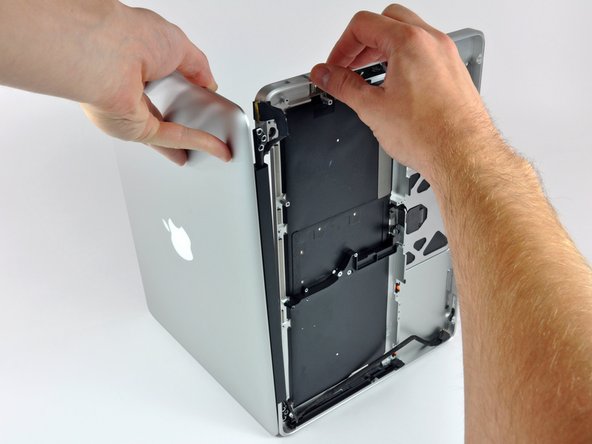
Be sure to hold the display and upper case together with your left hand. Failure to do so may cause the freed display/upper case to fall, potentially damaging each component.
-
Remove the last remaining T8 Torx screw securing the display to the upper case.
-
-
Este paso está sin traducir. Ayuda a traducirlo
-
Grab the upper case with your right hand and rotate it slightly toward the top of the display so the upper display bracket clears the edge of the upper case.
-
Rotate the display slightly away from the upper case.
-
Lift the display up and away from the upper case, minding any brackets or cables that may get caught.
-
-
-
Retira los cuatro tornillos Phillips de 1,2 mm resaltados en rojo.
-
-
-
Inserta con cuidado el cable de tu antiguo panel táctil a través de la ranura cortada en tu nueva carcasa superior.
-
Usa una mano para sostener el cable del panel táctil en su lugar mientras inserta las dos lengüetas de retención en el borde exterior del panel táctil debajo del borde de la carcasa superior.
-
Tira del cable del panel táctil mientras colocas el panel táctil en su espacio vacío en tu nueva carcasa superior.
-
-
-
Aprieta los dos tornillos exteriores a lo largo del borde interior del trackpad y verifica su alineación en el lado exterior de la carcasa superior.
-
Si su alineación se ve bien, instala el resto de los tornillos Phillips a lo largo del borde interior del panel táctil.
-
Antes de volver a armar stu máquina, verifica que el tornillo de fijación aún esté instalado en una posición en la que el mouse haga clic correctamente.
-


Cancelar: No complete esta guía.
65 personas más completaron esta guía.
