Introducción
If scrolling the scroll wheel starts becoming imprecise or seemingly "slow", it may be because there's filth accumulation affecting the movement sensor. Because of the rolling movement of the wheel, dust accumulates in the form of a ball and will block the photo-sensor intermittently. There's some discussion on the internet that may lead us to think that this behavior is an app configuration problem (if you're using Logitech Options), but after opening the device I confirmed that, in my case, it was just dirty. Please note that you just have to disassemble the device using the instructions you will find right here on iFixit up until step #2 of the Disassembly Guide to reach the scroll wheel, so you may skip steps #3-#11 of the guide below.
Qué necesitas
-
-
-
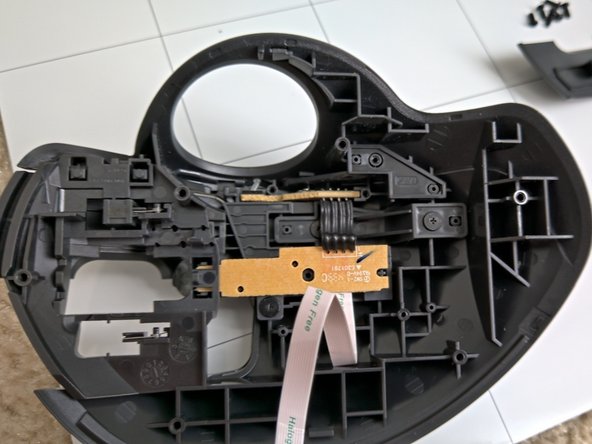
The right click lever comes out after the bracket covering the ribbon cable
-
The Right click lever comes out through the front/top of the mouse
-
Then the circuit boards can be removed
-
-
-
Under the circuit boards there is three piece that need to come out next
-
The first has one screw and two clear pieces that transmit the light from the circuit board to the outside of the mouse and hole to allow another to pass through it
-
Then the computer selector switch lever can come out the front/top of the mouse
-
After that the connecting light indicator transmitter will fall out and the left click lever can be removed
-
-
-
With the cover open, look at the scroll wheel on the side that has a hollow central area and roll the wheel. You should look for any dirt/filth that may have accumulated on this inner side of the wheel in the form of a little ball that interferes with the sensors (see image on next step).
-


To reassemble your device, follow these instructions in reverse order.
To reassemble your device, follow these instructions in reverse order.
Cancelar: No complete esta guía.
Una persona más ha completado esta guía.
2 comentarios
Before going to all that work, I tried using a can of air to forcefully blow into the gap on each side of the scroll wheel. I don't know if it got any lint out, but it started working perfectly again without having to disassemble it.
This is much more complex than it needs to be. Do step 1, then step 2, and then instead of step 3 you put the top half of the mouse to the right side of the mouse with the top on the table, like opening a clamshell to the right. The ribbon to the top half is plenty long, and you have full access to the scroll wheel for cleaning and you can skip to steps 11 and 12.
Vacuum and forced air didn't work for me, as my 6+ year old mouse had a bunch of hair and lint trapped in the mechanism, but with tweezers I was able to extract enough that the mouse works great again.
Further note that step 1 will not work with a normal T6 bit driver, as two of the screws are recessed pretty far, screw holes are too narrow for a 4mm bit to fit. Luckily, I had a dedicated T6 driver with a narrow shaft that fit in.