Introducción
Añadir una segunda unidad de disco duro a tu portátil tiene muchas ventajas, como la mejora de la velocidad, el aumento del espacio de almacenamiento y la reducción de los problemas a la hora de instalar nuevos programas. Utiliza esta guía para instalar uno utilizando nuestra carcasa de bahía óptica para disco duro.
Qué necesitas
-
-
Remueve los siguientes diez tornillos que aseguran la cubierta trasera a la cubierta superior.
-
Tres tornillos tipo Philips (punta cruz) de 13.5 mm (14.1 mm)
-
Cuando remuevas estos tornillos, ten en cuenta cómo salen en un ángulo ligero. Deben volverse a instalar de igual forma.
-
-
-
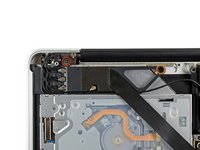
Usa el borde del spudger para apalancar el conector de la batería hacia arriba del enchufe en la tarjeta lógica.
-
-
-
Desconecta el conector del cable de la cámara de su zócalo en la placa lógica.
-
-
-
-
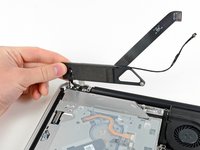
Tira del cable de la unidad óptica para sacarlo de la misma.
-
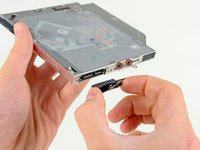
Retira los dos tornillos Phillips #0 negros que sujetan el pequeño soporte metálico de montaje. Transfiere este soporte a tu nueva unidad óptica o caja de disco duro.
-
-
-
Retira el separador de plástico de la bahía del disco óptico presionando los cierres a cada lado, levántalo y sácalo de la bahía.
-
-
-
Asegúrate de que los conectores del disco duro miran hacia abajo antes de colocarlo en el hueco de la bahía.
-
Coloca con cuidado el disco duro en el hueco insertándolo en la ranura.
-
Mientras sujetas la bahía con una mano, presiona el disco duro con la otra mano para insertarlo en los conectores.
-


Para volver a ensamblar tu dispositivo, sigue estas instrucciones en orden inverso.
Cancelar: No complete esta guía.
123 personas más completaron esta guía.
Un agradecimiento especial a estos traductores:
100%

¡ Mariana Roca nos está ayudando a reparar el mundo! ¿Quieres contribuir?
Empezar a traducir ›

13Guía Comentarios
great guide!
I had problems initialising the SDD drive in the optical bay. But have placed it in HD bay and it works fine.
My old Hard drive is a really snug fit in the caddy (its a 9.5mm drive) - when installed in the HD bay it sits on rubber shock absorbers and has air around it.
With a HD in the optical bay, I expect there to be some overheating or shock problems in the future.
!! Hard drive !! The Harddrive with the OS X on it for booting, has to be to be in the Harddisk bay and not the optical bay!
The System does only startup regularly on the SATA connector meant for the Harddrive, not the SATA connector of the former optical drive! (Even for MID 2012)
So, cause the most of us will add a SSD and want to run the System from it, we have to change the old Harddisk to the Optical bay where it is mounted without the anti shock rubbers.
In my case it did´t die there for over a year yet, so, not the big deal it seems at the first look ;-) lucky
I have a mid-2012 MBP. I just replaced the superdrive with a Samsung Evo 840 1TB SSD. My mac will boot from this drive when it is in the primary bay, and also if it is connected externally with a USB3/SATA cable. However it will not boot from the optical drive bay.
Also, if I install my original drive (Seagate Momentus XT 750GB hybrid) in the optical drive bay it will not boot.
If however I install an old 5400 HDD in to the optical drive bay, it WILL boot.
All three of the above mentioned drives have the same cloned OS on them. When the hybrid or the SSD are installed in the optical drive bay I can see them in the system profiler; both read a negotiated link speed of 6g.
Am I missing something...?
Crumbs :
Yes you are missing something… MPB MI2012 have just ONE Sata3 to read SSD… The sata for optical drive bay is on sata2.. So it can’t read SSD drive. Put your DD5400 on the optical drive bay, and boot with your SSD (install on the primary bay) and everything will be okay ;)!
Micke -