Introducción
Añadir un segundo disco duro a su portátil tiene muchas ventajas, como una mayor velocidad, más espacio de almacenamiento y menos dolores de cabeza a la hora de instalar nuevo software. Utiliza esta guía para instalar uno utilizando nuestra carcasa para disco duro de bahía óptica.
Qué necesitas
-
-
Remueve los siguientes diez tornillos que sujetan la caja inferior de la caja a la caja superior:
-
Siete tornillos Phillips de 3 mm.
-
Tres tornillos Phillips de 13.5 mm.
-
-
ComprarHerramienta utilizada en este paso:P6 Pentalobe Screwdriver 2009 15" MacBook Pro Battery$5.49
-
Retira los dos tornillos de Pentalobe de 5 puntos a lo largo del borde superior de la batería.
-
-
-
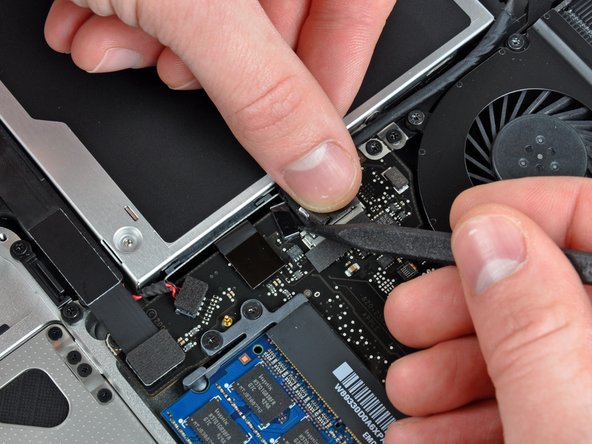
Sujeta el extremo del retenedor del cable hacia abajo con un dedo mientras utilizas la punta de un spudger para levantar ligeramente el otro extremo y girarlo alejándolo del conector del cable de la cámara.
-
-
-
-
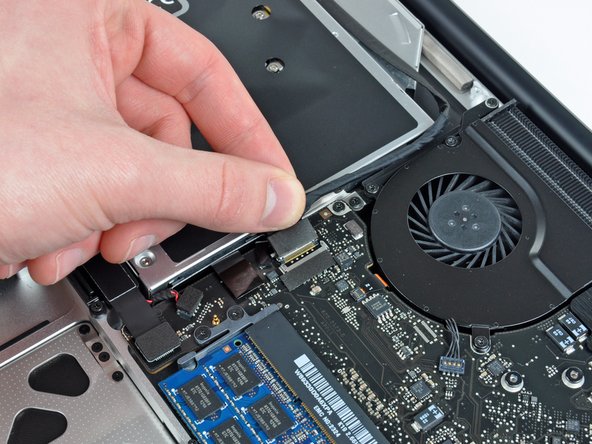
Retira el cable de la unidad óptica tirando de él hacia fuera de la unidad óptica.
-
-
-
Retira los dos tornillos Phillips nº 0 negros que sujetan el pequeño soporte de montaje metálico. Transfiere este soporte a tu nueva caja para disco óptico o disco duro.
-
-
-
Retira el separador de plástico de la bahía del disco óptico presionando los cierres a cada lado, levántalo y sácalo de la bahía.
-
-
-
Asegúrate de que los conectores del disco duro miran hacia abajo antes de colocarlo en el hueco de la bahía.
-
Coloca con cuidado el disco duro en el hueco insertándolo en la ranura.
-
Mientras sujetas la bahía con una mano, presiona el disco duro con la otra mano para insertarlo en los conectores.
-


Para volver a montar el dispositivo, sigue estas instrucciones en orden inverso.
Para volver a montar el dispositivo, sigue estas instrucciones en orden inverso.
Cancelar: No complete esta guía.
85 personas más completaron esta guía.
Un agradecimiento especial a estos traductores:
100%

¡ Mariana Roca nos está ayudando a reparar el mundo! ¿Quieres contribuir?
Empezar a traducir ›


6 comentarios
I have just gotten my second hard drive up and running after a few false starts. The main piece of advice I'd give you if you are going to do the same is, format the new hard drive via USB BEFORE you install it!
Physically installing the second hard drive was no trouble at all. The problem I had was formatting it inside the computer. This gave me multiple failed attempts using Disk Utility. When I tried to erase or partition the drive, after a long hang, I always got the error: "File system formatter failed."
I thought something might be wrong with the hard drive, and was about to return it. But then I thought I'd take it out of the computer and plug it in using the Silicone 2.5" Hard Drive Enclosure with USB 2.0 Cable. I ran erase in Disk Utility again and it worked! Now it's showing up in finder and I can start storing files on it.
Also, I must say the customer support from ifixit is great. I messaged them about this and some other issues I was having and I got a detailed response from them within a couple of days. Thanks guys!
After doing this for the first time and starting my computer it worked like a charm but after taking the drive back out to swap primary and secondary drives (so i could have my os installed on the bigger drive) it quit working. Now my secondary drive won't work at all. It won't show up in finder or DU. I'm fairly confident that i didn't break anything on the logic board. Any ideas?
I am struggling with this on a 15 in. Have done this same thing on three 13 in MacBook pros and one iMac.
Fan running, camera gone and bluetooth and wifi not installed. Have done SMC reset and checked cables numerous times. Please provide guidance -