Saltar al contenido principal

Huawei P10 Lite Display Replacement

Qué necesitas

  1. Huawei P10 Lite Display Replacement, Back cover: paso 1, imagen 1 de 3 Huawei P10 Lite Display Replacement, Back cover: paso 1, imagen 2 de 3 Huawei P10 Lite Display Replacement, Back cover: paso 1, imagen 3 de 3
    • Insert the tip of an opening pick between the back cover and the mid frame and slide it around the phone, to cut the adhesive.

    • Using a suction handle to lift the back cover may help to get an initial gap for the opening pick to put in.

    • If the adhesive is hard to cut, use an iOpener to loosen it.

  2. Huawei P10 Lite Display Replacement: paso 2, imagen 1 de 3 Huawei P10 Lite Display Replacement: paso 2, imagen 2 de 3 Huawei P10 Lite Display Replacement: paso 2, imagen 3 de 3
    • After you cut the adhesive on every edge, twist your opening pick, to separate the rear cover from the phone.

    • Flip the rear cover over to the right side of the phone.

  3. Huawei P10 Lite Display Replacement: paso 3, imagen 1 de 2 Huawei P10 Lite Display Replacement: paso 3, imagen 2 de 2
    • Use a pair of tweezers to remove the sticker.

    • Remove the two Phillips #00 screws.

    • Remove the four 2.5 mm Phillips #00 screws.

  4. Huawei P10 Lite Display Replacement: paso 4, imagen 1 de 2 Huawei P10 Lite Display Replacement: paso 4, imagen 2 de 2
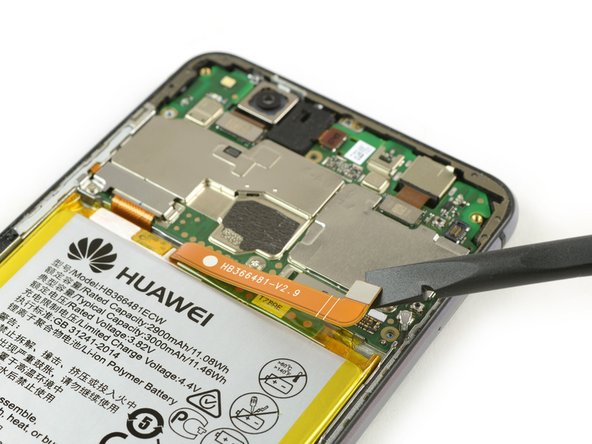
    • Use tweezers to remove the mainboard shield.

    • Use the flat end of a spudger to disconnect the finger print sensor flex cable.

    • When reassembling apply new adhesive where it is necessary.

  5. Huawei P10 Lite Display Replacement, Battery Disconnection: paso 5, imagen 1 de 3 Huawei P10 Lite Display Replacement, Battery Disconnection: paso 5, imagen 2 de 3 Huawei P10 Lite Display Replacement, Battery Disconnection: paso 5, imagen 3 de 3
    • Remove the Phillips screw holding the battery connector plate in place.

    • Remove the battery connector plate.

    • Use the flat end of a spudger to disconnect the battery flex cable.

  6. Huawei P10 Lite Display Replacement, Battery: paso 6, imagen 1 de 2 Huawei P10 Lite Display Replacement, Battery: paso 6, imagen 2 de 2
    • Use an iOpener to loosen the adhesive beneath the battery.

    • Insert a spudger between the battery and the mid frame to create a gap.

    • Be careful not to puncture or crease the battery.

    • Insert an opening pick or use the spuder in the gap to cut the adhesive beneath the battery.

    • There are flex cables running under the battery. Don't damage them with your tools.

  7. Huawei P10 Lite Display Replacement: paso 7, imagen 1 de 2 Huawei P10 Lite Display Replacement: paso 7, imagen 2 de 2
    Herramienta utilizada en este paso:
    Tesa 61395 Tape
    $5.99
    Comprar
    • Use a spudger to cut the rest of the adhesive and lever the battery out of the phone.

    • Remove the battery.

    • When reassembling your phone replace old adhesive with double-sided tape or pre-cut adhesive strips.

    • Never reinstall a battery that has been bent or damaged during removal.

  8. Huawei P10 Lite Display Replacement, Display: paso 8, imagen 1 de 3 Huawei P10 Lite Display Replacement, Display: paso 8, imagen 2 de 3 Huawei P10 Lite Display Replacement, Display: paso 8, imagen 3 de 3
    • Remove the Philipps screw holding the display connection bracket in place.

    • Remove the display connection bracket.

    • Use the flat end of a spudger, to disconnect the display flex cable.

  9. Huawei P10 Lite Display Replacement: paso 9, imagen 1 de 3 Huawei P10 Lite Display Replacement: paso 9, imagen 2 de 3 Huawei P10 Lite Display Replacement: paso 9, imagen 3 de 3
    • Use an iOpener to loosen the adhesive under the display.

    • Insert the tip of an opening pick between the display and the midframe.

    • Insert a second opening pick next to the other one.

  10. Huawei P10 Lite Display Replacement: paso 10, imagen 1 de 3 Huawei P10 Lite Display Replacement: paso 10, imagen 2 de 3 Huawei P10 Lite Display Replacement: paso 10, imagen 3 de 3
    • Slide one of the opening picks round the phone, to cut the adhesive.

  11. Huawei P10 Lite Display Replacement: paso 11, imagen 1 de 3 Huawei P10 Lite Display Replacement: paso 11, imagen 2 de 3 Huawei P10 Lite Display Replacement: paso 11, imagen 3 de 3
    Herramienta utilizada en este paso:
    Tesa 61395 Tape
    $5.99
    Comprar
    • After you slid the opening pick completly around the phone, twist it at the top of the phone, to seperate the display from the midframe.

    • Grab the phone at the upper part and seperate the display from the frame while working the flex cable through the gap.

    • When reassembling your phone replace old adhesive with double-sided tape or pre-cut adhesive strips.

Conclusión

To reassemble your device, follow these instructions in reverse order.

37 personas más completaron esta guía.

Dominik Schnabelrauch

Miembro Desde 11/23/16

203,353 Reputación

682 Guías creadas

Equipo

iFixit Miembro de iFixit

Staff

135 Miembros

16,817 Guías creadas

2 comentarios

hey bam ich habe ein glück wegend euch ifixit danke dafür die anleitung hat mich zu glück gebracht dank ifixit ist mein

huawei p10 lite heile danke für alles lg der besitzer des huawei p10 lite

David Wendler - Contestar

Hallo,

soweit ich sehe, ist die Klebefolie nicht im Ersatzteil enthalten, und die vorgestanzte Klebefolie ist nicht (mehr) erhältlich. Statt dessen verweist ihr auf das doppelseitige Klebeband von tesa, das als Rolle erhältlich ist - aber in verschiedenen Breiten.

Welche Breite ist für diese Reparatur hier denn die passendste?

Und wird das phone damit wieder genauso staubdicht wie zuvor (man wird ja puzzlen müssen, und an den Übergangsstellen hat man Stöße statt durchgehende Verklebung…)?

TeeLittle - Contestar

Agregar Comentario

Ver Estadísticas:

Ultimas 24 horas: 3

Ultimos 7 días: 31

Ultimos 30 días: 149

Todo El Tiempo: 62,836