Saltar al contenido principal

How to Attach Googly Eyes to the Anti-Clamp

Qué necesitas

  1. How to Attach Googly Eyes to the Anti-Clamp, Clean Clampy: paso 1, imagen 1 de 2 How to Attach Googly Eyes to the Anti-Clamp, Clean Clampy: paso 1, imagen 2 de 2
    • Before you begin, wipe down Clampy to ensure a clean surface for the googly eyes to adhere to.

  2. How to Attach Googly Eyes to the Anti-Clamp, Peel off the liner: paso 2, imagen 1 de 2 How to Attach Googly Eyes to the Anti-Clamp, Peel off the liner: paso 2, imagen 2 de 2
    • Use tweezers, or your fingers, to peel off the paper liner and expose the googly eye's adhesive.

    • Repeat the previous two steps for Clampy's second eye (unless you want a Cyclops Clampy).

  3. How to Attach Googly Eyes to the Anti-Clamp, Peel off the adhesive: paso 3, imagen 1 de 3 How to Attach Googly Eyes to the Anti-Clamp, Peel off the adhesive: paso 3, imagen 2 de 3 How to Attach Googly Eyes to the Anti-Clamp, Peel off the adhesive: paso 3, imagen 3 de 3
    • If you want to use alternate adhesive, follow the next three steps. Otherwise, skip to this step.

    • Use tweezers to peel off a portion of pre-cut adhesive.

    • It doesn't have to be a lot of adhesive—just enough to allow the googly eye to stick securely.

    • You can also use double-sided tape instead of pre-cut adhesive. Clampy isn't picky.

  4. How to Attach Googly Eyes to the Anti-Clamp, Apply the adhesive to the eye: paso 4, imagen 1 de 3 How to Attach Googly Eyes to the Anti-Clamp, Apply the adhesive to the eye: paso 4, imagen 2 de 3 How to Attach Googly Eyes to the Anti-Clamp, Apply the adhesive to the eye: paso 4, imagen 3 de 3
    • Place the sticky side of the adhesive on the back of a googly eye.

    • Press down on the adhesive to ensure it's fully adhered to the eye.

  5. How to Attach Googly Eyes to the Anti-Clamp, Peel off the liner: paso 5, imagen 1 de 3 How to Attach Googly Eyes to the Anti-Clamp, Peel off the liner: paso 5, imagen 2 de 3 How to Attach Googly Eyes to the Anti-Clamp, Peel off the liner: paso 5, imagen 3 de 3
    • Peel off the remaining liner to expose the adhesive.

    • Repeat the previous three steps for Clampy's second eye.

    • The only thing limiting the amount of eyes Clampy can have is your imagination.

  6. How to Attach Googly Eyes to the Anti-Clamp, Apply the eyes: paso 6, imagen 1 de 3 How to Attach Googly Eyes to the Anti-Clamp, Apply the eyes: paso 6, imagen 2 de 3 How to Attach Googly Eyes to the Anti-Clamp, Apply the eyes: paso 6, imagen 3 de 3
    • You are about to perform the repair equivalent of ocular surgery! Proceed with caution and care for Clampy.

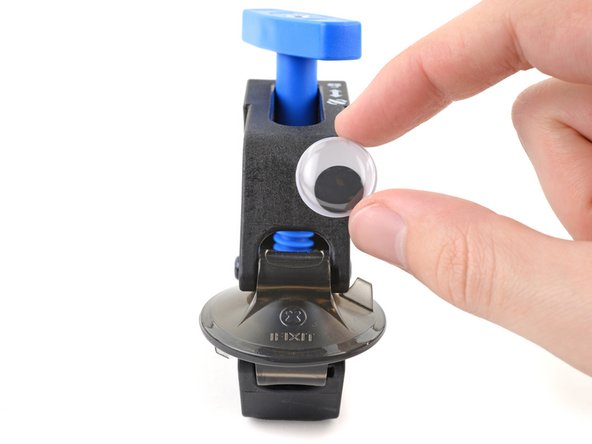
    • Place the googly eyes on the top arm of Clampy, just above the suction cups.

    • Press down on each eye to ensure they fully adhere to Clampy.

  7. How to Attach Googly Eyes to the Anti-Clamp, Alternative eye positions: paso 7, imagen 1 de 3 How to Attach Googly Eyes to the Anti-Clamp, Alternative eye positions: paso 7, imagen 2 de 3 How to Attach Googly Eyes to the Anti-Clamp, Alternative eye positions: paso 7, imagen 3 de 3
    • Depending on your Clampy's personality, you can position its eyes in various ways.

    • The following images are some examples of alternative Clampy styles:

    • Prey Clampy

    • Suction-Cup-For-Feet Clampy

    • Snail Clampy

  8. How to Attach Googly Eyes to the Anti-Clamp, Feed Clampy: paso 8, imagen 1 de 3 How to Attach Googly Eyes to the Anti-Clamp, Feed Clampy: paso 8, imagen 2 de 3 How to Attach Googly Eyes to the Anti-Clamp, Feed Clampy: paso 8, imagen 3 de 3
    • Congratulations, you have given Clampy the gift of sight! However, it will now hunger for devices to open.

    • Give your Clampy something modest to open, like an iPhone 13 mini.

    • Make sure to remove the two P2 Pentalobe screws from the iPhone before giving it to Clampy.

  9. How to Attach Googly Eyes to the Anti-Clamp: paso 9, imagen 1 de 1
    • Watch Clampy open the device like a pro.

    • If your Clampy isn't sated, follow the next step.

  10. How to Attach Googly Eyes to the Anti-Clamp: paso 10, imagen 1 de 1
    • Give your Clampy something larger, like an iPhone 13 Pro.

    • Watch Clampy open this device with ease.

    • If your Clampy seems to open this device even faster...almost like its appetite is growing, follow the next step.

  11. How to Attach Googly Eyes to the Anti-Clamp: paso 11, imagen 1 de 1
    • Give your Clampy something monstrous, like an iPhone 13 Pro Max.

    • Watch Clampy lose control of itself and tear open the phone with unnecessary violence.

    • If you've run out of options, follow the next step.

  12. How to Attach Googly Eyes to the Anti-Clamp, Witness Clampy: paso 12, imagen 1 de 3 How to Attach Googly Eyes to the Anti-Clamp, Witness Clampy: paso 12, imagen 2 de 3 How to Attach Googly Eyes to the Anti-Clamp, Witness Clampy: paso 12, imagen 3 de 3
    Herramienta utilizada en este paso:
    Anti-Clamp
    $24.95
    Comprar
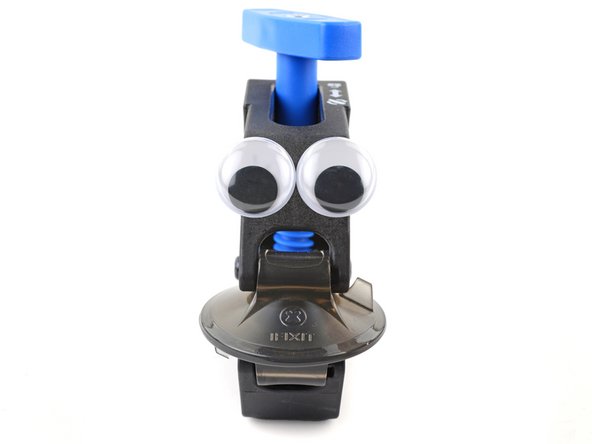
    • Witness Clampy sit atop his pile of victims, each a testimony to his power of suction.

    • Legends tell of a clamp so powerful that even iPads shiver when they hear its name. Mothers all over the world tell their children that if they use too much adhesive on their electronics, a certain clamp will visit you in the night—and that clamp will show no mercy. These are only tales, however.

    • But, perhaps you've invoked this clamp-like being by attaching googly eyes to the Anti-Clamp. And that being's name is...

    • Clampy

Conclusión

To send Clampy back to the realm of repair gods, follow the instructions in reverse order.

32 personas más completaron esta guía.

Alex Diaz-Kokaisl

Miembro Desde 01/16/22

118,976 Reputación

549 Guías creadas

Equipo

iFixit Miembro de iFixit

Staff

135 Miembros

16,732 Guías creadas

3 comentarios

I love this♥️💙💜💛🖤💚🧡🤍🤎

This is AMAZING!!!!!!

HelloMacOS - Contestar

I love this website so much XD

MeowMix64 - Contestar

Agregar Comentario

Ver Estadísticas:

Ultimas 24 horas: 11

Ultimos 7 días: 28

Ultimos 30 días: 119

Todo El Tiempo: 3,261