Saltar al contenido principal

Google Pixel 2 XL Earpiece Speaker Replacement

  1. Google Pixel 2 XL Earpiece Speaker Replacement, SIM Card: paso 1, imagen 1 de 2 Google Pixel 2 XL Earpiece Speaker Replacement, SIM Card: paso 1, imagen 2 de 2
    • Insert a SIM card eject tool or a paperclip into the small hole in the SIM card tray, located on the left edge of the phone, opposite of the power and volume buttons.

    • Press firmly to eject the tray.

  2. Google Pixel 2 XL Earpiece Speaker Replacement: paso 2, imagen 1 de 1
    • Remove the SIM card tray from the phone.

    • The SIM card will fall out of the tray easily.

    • When reinserting the SIM card, ensure that it is in the proper orientation relative to the tray.

  3. Aviso: los pasos 3-14 provienen de una guía que está marcada como "En progreso".

    Google Pixel 2 XL Earpiece Speaker Replacement, Opening Procedure: paso 3, imagen 1 de 2 Google Pixel 2 XL Earpiece Speaker Replacement, Opening Procedure: paso 3, imagen 2 de 2
    • If your display glass is cracked, tape over the glass to prevent bodily harm and further breakage. This also makes a smooth surface allowing the suction cup to bond.

    • Apply a suction cup as close to the SIM slot edge of the phone as you can while avoiding the curved edge.

    • The suction cup will not make a good seal on the curved portion of the glass.

  4. Google Pixel 2 XL Earpiece Speaker Replacement: paso 4, imagen 1 de 3 Google Pixel 2 XL Earpiece Speaker Replacement: paso 4, imagen 2 de 3 Google Pixel 2 XL Earpiece Speaker Replacement: paso 4, imagen 3 de 3
    • Pull up on the suction cup with firm, constant pressure and insert an opening pick between the front panel and rear case.

    • This requires a significant amount of force and patience. If you have trouble, rock the suction cup and screen to weaken the adhesive, or apply heat with an iOpener, heat gun, or hair dryer.

  5. Google Pixel 2 XL Earpiece Speaker Replacement: paso 5, imagen 1 de 2 Google Pixel 2 XL Earpiece Speaker Replacement: paso 5, imagen 2 de 2
    • In the following steps, extra caution is required in certain areas to avoid damage to the phone:

    • Do not insert the pick more than 0.25 inches (6 mm) into the bottom edge of the phone. If the pick contacts the folded portion of the OLED panel, it can damage the display.

    • Do not cut along the left edge; there are delicate display cables that can be damaged.

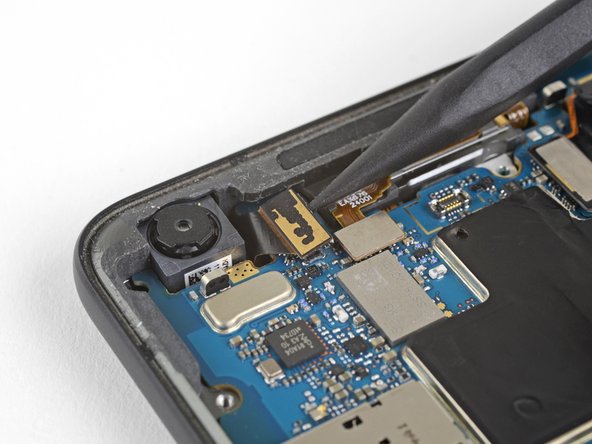
    • Only make very shallow cuts in the upper left corner; prying deeply can damage the front-facing camera.

  6. Google Pixel 2 XL Earpiece Speaker Replacement: paso 6, imagen 1 de 2 Google Pixel 2 XL Earpiece Speaker Replacement: paso 6, imagen 2 de 2
    • Slide the opening pick down the right side of the phone to separate the display adhesive.

  7. Google Pixel 2 XL Earpiece Speaker Replacement: paso 7, imagen 1 de 3 Google Pixel 2 XL Earpiece Speaker Replacement: paso 7, imagen 2 de 3 Google Pixel 2 XL Earpiece Speaker Replacement: paso 7, imagen 3 de 3
    • In the following steps, use the flat edge of the opening pick, rather than a corner, to cut. This will help prevent inserting the pick too deeply.

    • Slide the opening pick around the lower-right corner and along the bottom edge of the phone.

  8. Google Pixel 2 XL Earpiece Speaker Replacement: paso 8, imagen 1 de 3 Google Pixel 2 XL Earpiece Speaker Replacement: paso 8, imagen 2 de 3 Google Pixel 2 XL Earpiece Speaker Replacement: paso 8, imagen 3 de 3
    • Reinsert the flat edge of the pick at the top-right corner of the phone, and slide it around the corner and the top edge of the phone.

  9. Google Pixel 2 XL Earpiece Speaker Replacement: paso 9, imagen 1 de 2 Google Pixel 2 XL Earpiece Speaker Replacement: paso 9, imagen 2 de 2
    • Gently lift the display from the right side of the phone, opening it like a book.

    • If the display doesn't readily lift, do some extra prying to separate the last of the adhesive.

    • Don't try to fully separate the display yet, as fragile ribbon cables still connect it to the phone's motherboard.

    • Carefully lay the display flat on the table next to the rest of the phone, keeping it close to the phone to avoid straining the display and digitizer cables.

  10. Google Pixel 2 XL Earpiece Speaker Replacement: paso 10, imagen 1 de 2 Google Pixel 2 XL Earpiece Speaker Replacement: paso 10, imagen 2 de 2
    • Use the corner of an opening tool to pry up and unclip on the lower edge of the digitizer cable connector cover.

    • The clip securing this cover is along the bottom edge.

    • Pry carefully to avoid damaging the cable underneath, or losing the cover itself.

    • Remove the connector cover.

    • Make sure to keep this component so you can reinstall it during reassembly.

  11. Google Pixel 2 XL Earpiece Speaker Replacement: paso 11, imagen 1 de 2 Google Pixel 2 XL Earpiece Speaker Replacement: paso 11, imagen 2 de 2
    • Use the point of a spudger to lift the digitizer cable connector up and out of its socket on the motherboard.

    • To re-attach press connectors like this one, carefully align and press down on one side until it clicks into place, then repeat on the other side. Do not press down on the middle. If the connector is misaligned, the pins can bend, causing permanent damage.

    • If any part of your screen doesn't respond to touch after your repair, re-seat this connector, making sure it clicks fully into place and that there's no dust or other obstruction in the socket.

  12. Google Pixel 2 XL Earpiece Speaker Replacement: paso 12, imagen 1 de 1
    • Use tweezers to remove any tape from the display connector cover.

  13. Google Pixel 2 XL Earpiece Speaker Replacement: paso 13, imagen 1 de 2 Google Pixel 2 XL Earpiece Speaker Replacement: paso 13, imagen 2 de 2
    • Insert the point of a spudger into the small hole on the edge of the display connector cover.

    • Use the spudger to pry the cover out of its recess.

    • Remove the connector cover.

    • Make sure to keep this component so you can reinstall it during reassembly.

  14. Google Pixel 2 XL Earpiece Speaker Replacement: paso 14, imagen 1 de 2 Google Pixel 2 XL Earpiece Speaker Replacement: paso 14, imagen 2 de 2
  15. Google Pixel 2 XL Earpiece Speaker Replacement, Midframe: paso 15, imagen 1 de 1
    Herramienta utilizada en este paso:
    Magnetic Project Mat
    $19.95
    Comprar
    • Remove eleven 3.8 mm Phillips screws securing the midframe.

    • Throughout this repair, keep track of each screw and make sure it goes back exactly where it came from.

  16. Google Pixel 2 XL Earpiece Speaker Replacement: paso 16, imagen 1 de 3 Google Pixel 2 XL Earpiece Speaker Replacement: paso 16, imagen 2 de 3 Google Pixel 2 XL Earpiece Speaker Replacement: paso 16, imagen 3 de 3
    • Insert an opening tool into the notch in the midframe near the volume buttons and pry the midframe up and away from the rest of the phone.

    • Remove the midframe.

  17. Google Pixel 2 XL Earpiece Speaker Replacement, Battery Connector: paso 17, imagen 1 de 2 Google Pixel 2 XL Earpiece Speaker Replacement, Battery Connector: paso 17, imagen 2 de 2
    • Use the flat end of a spudger to disconnect the battery connector.

  18. Google Pixel 2 XL Earpiece Speaker Replacement, Motherboard: paso 18, imagen 1 de 2 Google Pixel 2 XL Earpiece Speaker Replacement, Motherboard: paso 18, imagen 2 de 2
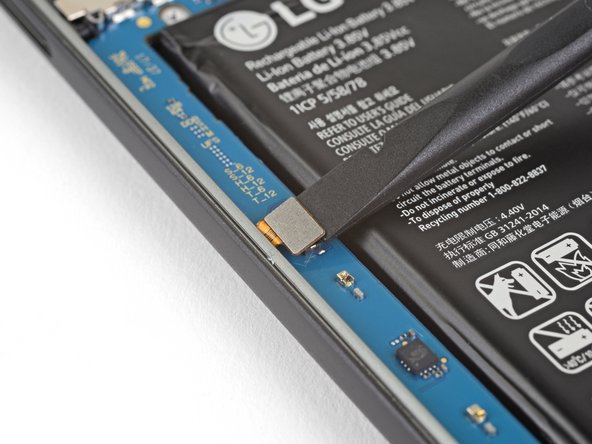
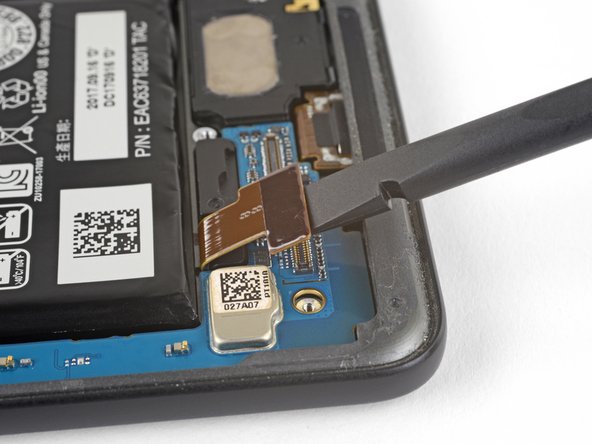
    • Use the point of a spudger to disconnect the front-facing camera connector.

    • During reassembly, it's easiest to attach the front camera to the motherboard, then insert the motherboard.

  19. Google Pixel 2 XL Earpiece Speaker Replacement: paso 19, imagen 1 de 3 Google Pixel 2 XL Earpiece Speaker Replacement: paso 19, imagen 2 de 3 Google Pixel 2 XL Earpiece Speaker Replacement: paso 19, imagen 3 de 3
    • Use the flat end of a spudger to disconnect the right Active Edge sensor connector.

    • Disconnect the antenna cable.

  20. Google Pixel 2 XL Earpiece Speaker Replacement: paso 20, imagen 1 de 2 Google Pixel 2 XL Earpiece Speaker Replacement: paso 20, imagen 2 de 2
    • Use the point of a spudger to disconnect the fingerprint sensor connector.

  21. Google Pixel 2 XL Earpiece Speaker Replacement: paso 21, imagen 1 de 2 Google Pixel 2 XL Earpiece Speaker Replacement: paso 21, imagen 2 de 2
    • Use the flat end of a spudger to disconnect the left Active Edge sensor connector.

  22. Google Pixel 2 XL Earpiece Speaker Replacement: paso 22, imagen 1 de 2 Google Pixel 2 XL Earpiece Speaker Replacement: paso 22, imagen 2 de 2
    • Use the flat end of a spudger to disconnect the charging assembly connector.

  23. Google Pixel 2 XL Earpiece Speaker Replacement: paso 23, imagen 1 de 2 Google Pixel 2 XL Earpiece Speaker Replacement: paso 23, imagen 2 de 2
    • Use the point of a spudger to disconnect the front-facing sensor assembly connector.

  24. Google Pixel 2 XL Earpiece Speaker Replacement: paso 24, imagen 1 de 3 Google Pixel 2 XL Earpiece Speaker Replacement: paso 24, imagen 2 de 3 Google Pixel 2 XL Earpiece Speaker Replacement: paso 24, imagen 3 de 3
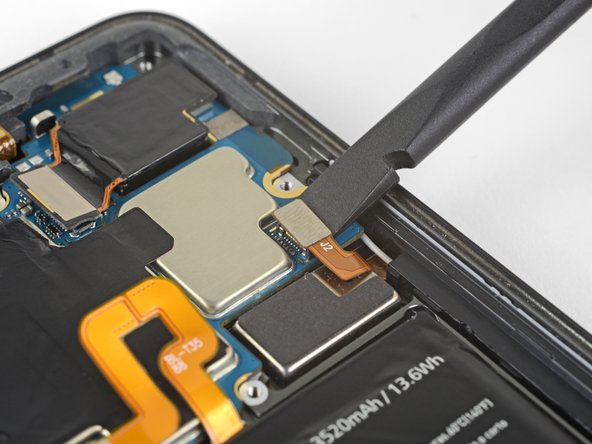
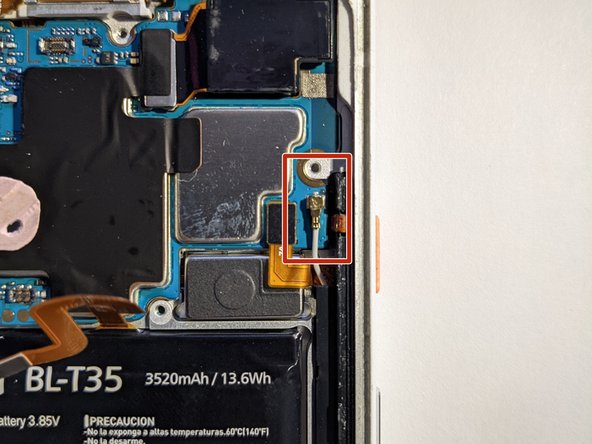
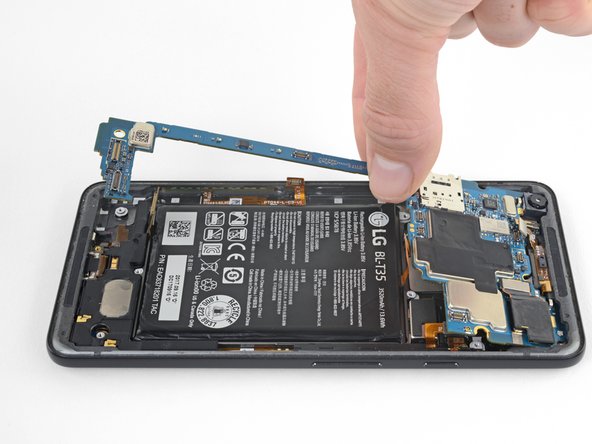
    • Make sure all the cables and connectors are clear of the board, and use the flat edge of a spudger to gently lift the bottom of the motherboard.

    • The narrow part of the motherboard is very fragile. If it starts to bend when you lift, stop and make sure there isn't anything holding the board down. The board should lift up without any resistance.

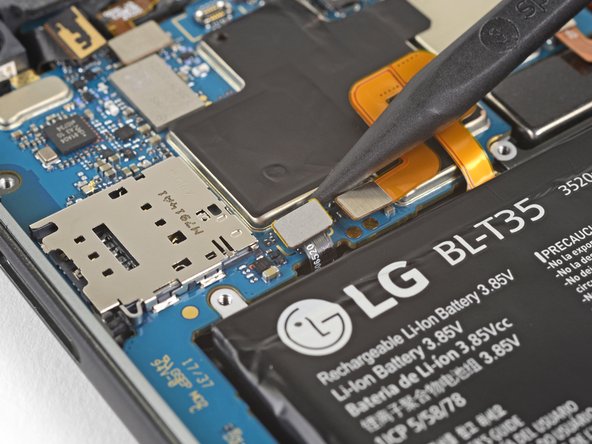
    • Holding the wide part of the motherboard near the SIM card slot, carefully slide the board toward the bottom of the phone while lifting it out of the phone.

    • Remove the motherboard.

    • Try to keep the phone flat with the battery facing up after you remove the motherboard, as the front-facing camera can fall out of the phone case very easily.

    • When reinstalling the motherboard, move all the cables and connectors out of the way of the board and make sure all connectors are aligned with their respective sockets.

  25. Aviso: el paso 25 proviene de una guía que está marcada como "En progreso".

    • Apply plenty of heat to the right side of the back glass.

    • Use a small suction cup and pull the glass up to put an opening pick under it.

    • The suction cup included in the iFixit kit is too big.

    • If you do not have a suction cup, you can try to fit a jimmy underneath the glass. You will likely damage the enamel using this method.

    • Keep applying heat and slowly moving the opening picks around the top of the phone.

  26. Google Pixel 2 XL Earpiece Speaker Replacement, Earpiece Speaker: paso 26, imagen 1 de 1
    • Flip the phone over

    • Apply gentle heat to the earpiece speaker contacts and separate them from the frame.

  27. Google Pixel 2 XL Earpiece Speaker Replacement: paso 27, imagen 1 de 1
    • Using a spudger, pry the plastic cover off in these areas.

  28. Google Pixel 2 XL Earpiece Speaker Replacement: paso 28, imagen 1 de 1
    • Gently apply heat to the front of the phone frame to loosen the glue holding the speaker in.

    • Insert a spudger into these points and gently pry the speaker out of the frame of the phone.

Conclusión

To reassemble your device, follow these instructions in reverse order.

Una persona más ha completado esta guía.

Patrick

Miembro Desde 05/14/14

6,574 Reputación

21 Guías creadas

0 comentarios

Agregar Comentario

Ver Estadísticas:

Ultimas 24 horas: 0

Ultimos 7 días: 0

Ultimos 30 días: 11

Todo El Tiempo: 503