Esta versión puede contener ediciones incorrectas. Cambie a la última instantánea verificada.
Introducción
En esta guía, le mostraremos cómo reemplazar latarjeta principal de la GoPro Hero4 Silver. Esta tarjeta es el cerebro de la cámara, que controla todas sus funciones. Antes de comenzar, asegúrese de que retire la batería del equipo y que tenga las herramientas necesarias para realizar esta reparación.
Qué necesitas
-
-
Comienza quitando la tapa de plástico plateado de la cámara con una herramienta de apertura de plástico. Inserta la herramienta de apertura de plástico en el medio de cada borde y levanta las pestañas que mantienen la tapa de la cámara.
-
Las siete pestañas de plástico están marcadas en rojo.
-
-
-
Remueva los tres tornillos de 8 mm tipo philips #000 en las esquinas de la cámara.
-
Remueva el único tornillo de 4 mm tipo philips #000 de la esquina inferior izquierda de la cámara.
-
-
-
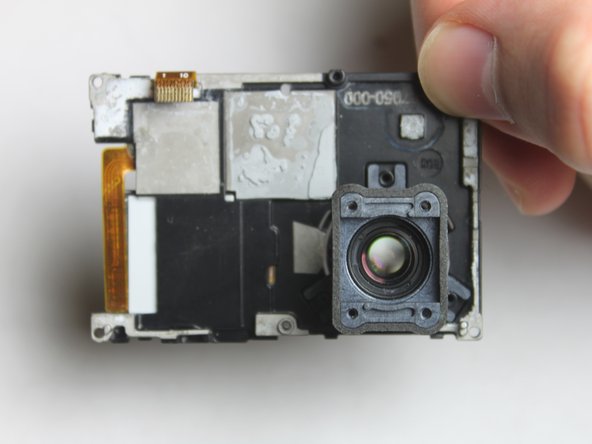
Para quitar el sensor, simplemente despegue la lente hacia el cable plano conectado.
-
El sensor tiene cables de tipo cinta que se extienden a la placa base a través de un conector rectangular negro.
-
Para quitar el sensor, use el spudger para levantar cada lado. Luego, levante el conector directamente de su conector.
-
Una vez removido el sensor, ahora puede reemplazarlo por uno nuevo.
-
-
-
Retire los tres tornillos tipo phillips de 8 mm #000 que sujetan la tarjeta de la placa principal
-
-
-
-
Para quitar el puerto libre, simplemente deslice hacia afuera desde el lado izquierdo de la cámara. Debería salir con solo un poco de fuerza.
-
Esta pieza puede ser reemplazada, reparada o guardada para un posterior desmontaje de la GoPro.
-
En la foto de la izquierda está el puerto cuando se separa de la tarjeta principal.
-
-
Este paso está sin traducir. Ayuda a traducirlo
-
Use a pair of tweezers to disconnect the ribbon cable from the ZIF connector by flipping up the black retaining flap. You should then be able to pull the cable free.
-
Once the ribbon cable is disconnected, you can remove the black plastic bracket which holds the camera lens.
-
-
Este paso está sin traducir. Ayuda a traducirlo
-
Once the camera assembly has been removed, you can begin separating the motherboard assembly from the camera housing.
-
-
Este paso está sin traducir. Ayuda a traducirlo
-
Flip the motherboard assembly and camera housing over so you can access the back of the motherboard.
-
Look for the white connector that has two wires that lead from the mother board to the battery compartment in the camera housing.
-
Using the metal tweezers, pull upward on the connector to disconnect the clip.
-
-
Este paso está sin traducir. Ayuda a traducirlo
-
With the connector removed you can now set the camera housing aside and work on the motherboard.
-
-
Este paso está sin traducir. Ayuda a traducirlo
-
Flip the motherboard over.
-
Remove the single 8 mm Phillips #000 screw.
-
-
Este paso está sin traducir. Ayuda a traducirlo
-
Flip the motherboard over. The speaker assembly should be loose and only connected by two wires leading to a white connector.
-
Using the metal tweezers, pull upwards to disconnect the connector from its port.
-
-
Este paso está sin traducir. Ayuda a traducirlo
-
Once disconnected from the motherboard, the speaker assembly can be removed.
-
-
-
Una vez se remueve el altavoz, ahora puede reemplazar la placa base.
-


Para armar su dispositivo nuevamente, siga estas instrucciones en orden inverso.
Para armar su dispositivo nuevamente, siga estas instrucciones en orden inverso.
Cancelar: No complete esta guía.
28 personas más completaron esta guía.
Un agradecimiento especial a estos traductores:
100%

¡ Eneider Colina nos está ayudando a reparar el mundo! ¿Quieres contribuir?
Empezar a traducir ›
Equipo

USF Tampa, Team 2-1, Blackwell Fall 2015 Miembro de USF Tampa, Team 2-1, Blackwell Fall 2015
USFT-BLACKWELL-F15S2G1
4 Miembros
20 Guías creadas
11 comentarios
Do step 9 before step 6. It's near impossible to get the middle screw out in the order the guide presents. There's also a screw that isn't mentioned that needs to be removed in order to complete step 9. You can see the screw in step 6's picture right above the QR bar code.
Hi team,
How would you secure the flex cables, next to the power connector, back to the motherboard?
Did you ever get an answer as i have the same problem
Same problem
gelmi -
Anything on this yet?