Introducción
This guide walks through the replacement of the keyboard in a Dell XPS laptop. It also includes instructions to remove of all the components necessary to access the keyboard.
Make sure to have a safe location to store all of the small screws while completing this guide, as the screws are very small and easy to lose.
Qué necesitas
-
-
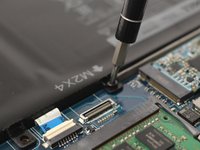
Turn the laptop upside down.
-
Use a T5 Torx Screwdriver to remove the ten 3 mm long screws from the perimeter of the back of the laptop.
-
-
-
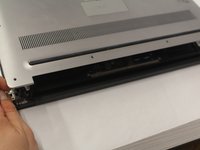
Open up the information panel door (on the middle of the back side).
-
While holding the door open, use a Phillips #00 Screwdriver to remove the two 10 mm long screws.
use a J1, fits a lot better. no risk of rounding
Size is Philips #0 not #00
-
-
-
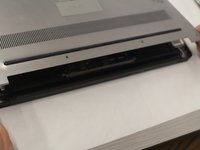
Carefully lift the 2 corners of the back panel close to the hinge upwards, to release the whole panel.
Dégouté d'avoir suivi cette étape à la lettre ?
N'ouvrez SURTOUT PAS le panneau par les deux coins arrières du côté de la charnière !!!
Et N'utiliser SURTOUT PAS une spatule en plastique pour l'ouvrir si le panneau ne se détache pas facilement !!!
Le panneau est fait pour s'ouvrir par les coins avant!!! A l'arrière des picots servent justement à l'empêcher de s'ouvrir !!!
Le résultat si vous utiliser uns spatule à l'arrière… c'est que ces picots cassent… ?
IL FAUT DONC OUVRIR LE PANNEAU PAR L'AVANT !! Et il est juste posé donc inutile d'utiliser une spatule…
Voilà voilà je suis dégoûté d'avoir fait cette connerie alors qu'en cliquant sur un autre tuto (lien juste en dessous sur Google) ils le disent…
J'espère qu'après mon commentaire l'auteur de ce tuto fera la modif…
Sur ce… merci pour le tuto…
Bonjour Tanguy ! Désolée de votre mésaventure :( Et merci de ce retour fort précieux à qui voudra effectuer la réparation ! Votre commentaire est visible par tous, donc les utilisateurs seront avertis. iFixit est un wiki ; si vous le souhaitez, vous pouvez également adapter le tutoriel d’origine pour inclure votre retour d’expérience.
-
-
-
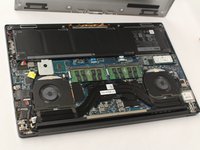
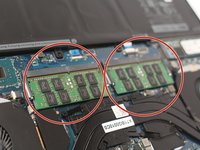
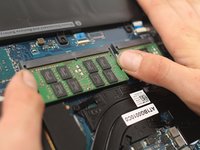
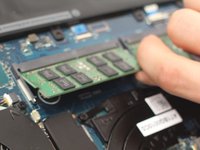
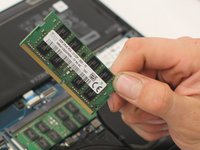
There are 2 separate RAM sticks.
-
Gently push down on the 2 outside tabs of the RAM stick you want to replace.
-
While still pushing down, gently push the tabs outwards, causing the RAM stick to flip up.
Removing the RAM to replace the keyboard isn't entirely necessary. It's such an easy step though that protecting your RAM might be worth doing.
-
-
-
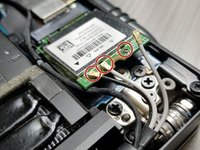
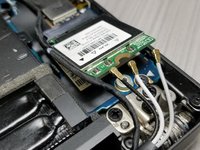
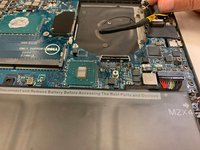
With a Philips #00 Screwdriver bit, remove one 4 mm long black screw located by the antenna connections on the wireless card.
-
Set the screw and metal holder aside.
-
-
-
Gently lift up each of the antennas (3) to disconnect them from the wireless card.
This step requires an extremely delicate touch. Those "buttons" will take the "snaps" right off the WIFI card and the hair-thin wiring on the card will break at the slightest pressure. If possible, remove the card and leave it attached to the wires rather than trying to pop off the connectors.
-
-
-
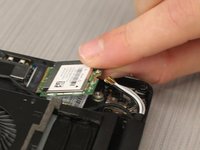
With the antennas disconnected, gently pull the wireless card out at the angle it sits at.
-
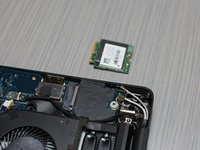
The wireless card has been successfully removed!
How do you know what are compatible wifi cards?
Removing the WLAN card was easy. However, I have problems reconnecting the antenna cables to the card. Is a lot of force necessary?
Do you recommend pliers, a pinch tool or something similar?
I don't want to break anything (and that's why I've had a WLAN stick for a few weeks now :( ).
-
-
-
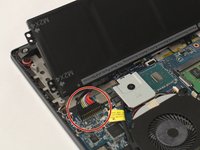
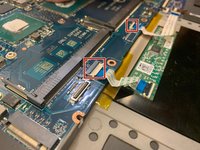
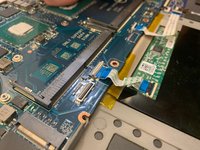
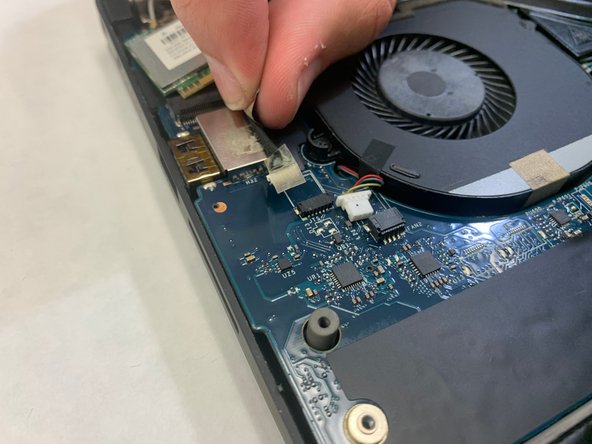
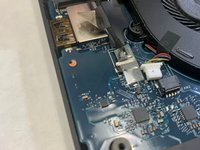
Use the Small Plastic Spudger to carefully disconnect the white connector from the black port.
-
-
-
-
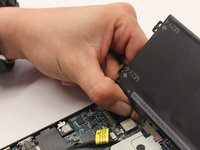
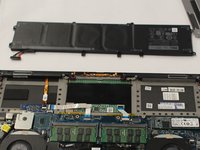
Use a Philips #00 Screwdriver to remove the seven 3 mm long screws from the perimeter of the battery.
Everything went great to this point … but the #00 Philips screws securing the battery will not move! The seven screws holding the battery are torqued down so crazy tight the #00 Phillips screwdriver is stripping the heads of the screws. I stopped trying before damaging the screw heads any further. A quick Google search indicates this is not an uncommon problem, but there are no clear solutions (other than sending the computer to Dell). Does anyone know how to get these screws to move without heavily damaging them?
iFixit has a guide with several tips on removing stripped screws here. Just make sure to take care as you work through the guide and stop and move on to the next method immediately once you notice the current one isn’t working so you don’t further strip the screws. One last tip: instead of using a rotary tool with a cutting wheel like in the last few steps of the guide, you can use a flat head that is oversized for the stripped screw as a small chisel to slowly and carefully carve out a notch in the screw head. This works just like the cutting wheel (albeit slowly) to create a notch you can use to remove the screws. Damaging the screws isn’t ideal, but replacement screws are fairly inexpensive and widely available. Good Luck!
-
-
-
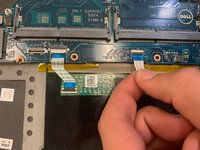
The touchpad has two ZIF connectors at the bottom of the motherboard. Use a flat plastic tool to lift the tabs (see picture 2) and gently pull the ribbon cables free.
-
-
-
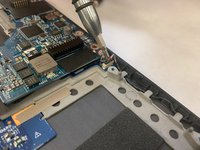
Remove the single Phillips screw to take off this plate and reveal the connector underneath.
-
Pull up the black strap with the plastic spudger, and use your fingers to gently but firmly pull straight up.
This step is optional if you are willing to just gently lift the motherboard and flip it over toward the hinge of the laptop. I had to do this when the head of my screw was stripped due to someone previously using the wrong screwdriver bit on it. Again, you can leave the cable connected since you're not replacing the motherboard in this fixit guide.
-
-
-
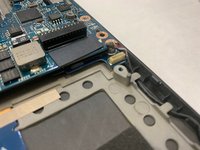
This connector in the top left might be taped in two places. Simply pull up to loosen the tape, and use the plastic edges of the connector to pull it out. Have some tape on hand for reassembly, as the tape might have lost its adhesive backing.
This may only be for touch screen displays?
Yup, ours has no connector here to remove.
-
-
-
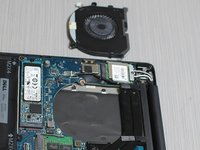
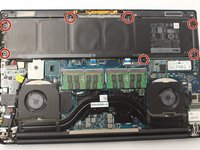
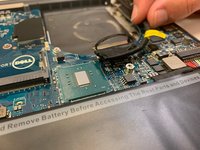
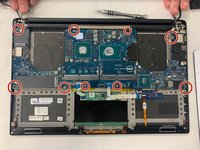
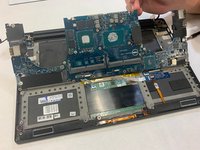
With all mounted components removed, unscrew the motherboard Phillips-head screws.
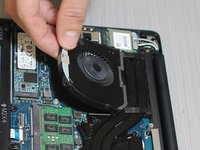
There is an additional step to remove the cooling apparatus that sits on top of the board PCI and GPU (black tunnels from fans that run over board)
There are three motherboard screws in the lower right circle
-
-
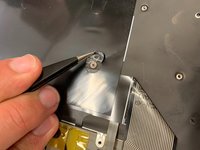
Herramienta utilizada en este paso:Tweezers$4.99
-
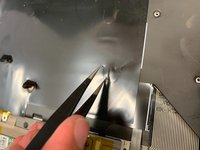
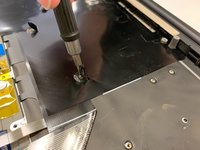
Use small tweezers to peel back the covers for the remaining 9 #00 Phillips screws.
-
Remove the remaining screws.
Check your new keyboard. It might not have this protective film on it - which is ok. Since the film is part of the keyboard you are replacing, don't sweat it if you scratch or tear this protective film.
-


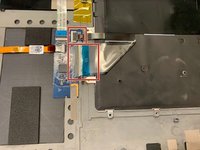


Now you have successfully removed your keyboard. To reassemble your device, follow these instructions in reverse order.
Now you have successfully removed your keyboard. To reassemble your device, follow these instructions in reverse order.
Cancelar: No complete esta guía.
7 personas más completaron esta guía.
Equipo

IUPUI, Team 2-4, Harley Spring 2022 Miembro de IUPUI, Team 2-4, Harley Spring 2022
IUPUI-HARLEY-S22S2G4
Miembros de 3
3 Guías creadas
4 comentarios
Will this work with a Dell Precision 5520? I have noticed that these two laptops use many of the same components.
This was an excellent guide! The entire process took me a full two hours. Most of the time was spent trying to figure out how to fix a broken antenna filament on the wifi card. See my note regarding that step. My daughter's laptop keyboard is now brand new and I was able to remove all the dog hair and dust at the same time!
This was super-helpful. I have an XPS 7590, and a few things were slightly different, but this guide matched my machine closely enough. I now have a fully working machine with a new keyboard. Thanks!
wonderfully written & diagrammed guide, thank you internet friend!