Saltar al contenido principal

AlphaSmart Pro Display Screen Replacement

Qué necesitas

  1. AlphaSmart Pro Display Screen Replacement, Separating Panels: paso 1, imagen 1 de 3 AlphaSmart Pro Display Screen Replacement, Separating Panels: paso 1, imagen 2 de 3 AlphaSmart Pro Display Screen Replacement, Separating Panels: paso 1, imagen 3 de 3
    • Power off your AlphaSmart Pro device and remove the batteries before beginning disassembly.

    • Remove all eight 1 cm Phillips head screws from the back panel of the AlphaSmart Pro with the Phillips #00 Screwdriver.

    • Carefully separate the front panel from the back panel.

    • Notice that the front and back panels are still connected by a ribbon cable.

  2. AlphaSmart Pro Display Screen Replacement, Detaching Ribbon Cable: paso 2, imagen 1 de 2 AlphaSmart Pro Display Screen Replacement, Detaching Ribbon Cable: paso 2, imagen 2 de 2
    • To remove the ribbon cable, use the spudger to lift each side of the connector from the socket.

    • Gently pull up on the connector to completely remove the connector from the socket.

    • You are now able to separate the front panel from the back panel.

  3. AlphaSmart Pro Display Screen Replacement, Removing Display Screen: paso 3, imagen 1 de 3 AlphaSmart Pro Display Screen Replacement, Removing Display Screen: paso 3, imagen 2 de 3 AlphaSmart Pro Display Screen Replacement, Removing Display Screen: paso 3, imagen 3 de 3
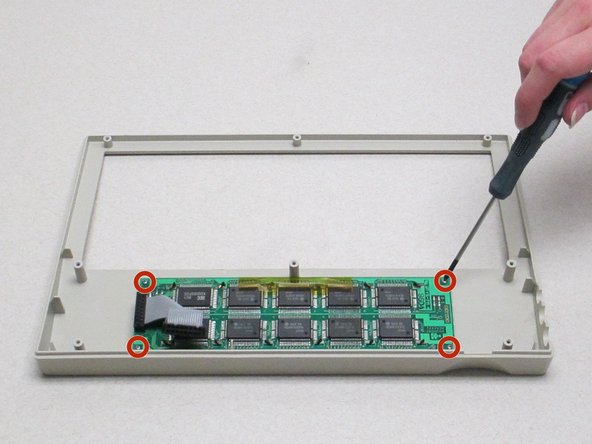
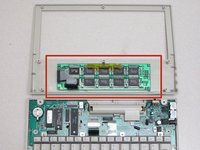
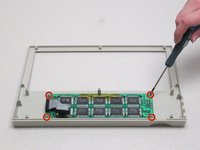
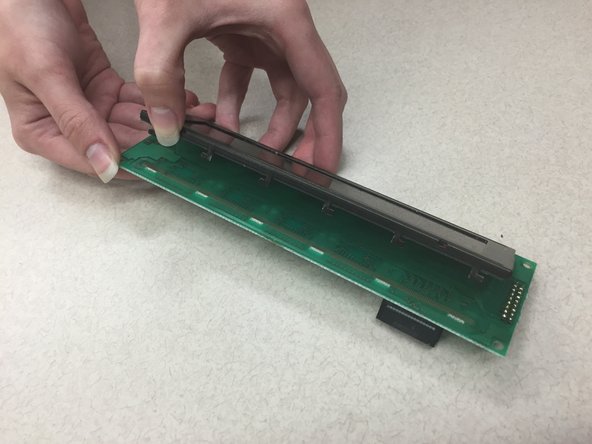
    • Looking at the front panel, use the Phillips #00 screwdriver to remove the four Phillips head 0.8 cm screws from each corner of the display motherboard.

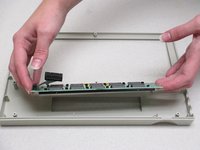
    • Lift the display screen and motherboard from the plastic front panel to separate the two pieces.

  4. AlphaSmart Pro Display Screen Replacement, Removing Small Motherboard: paso 4, imagen 1 de 3 AlphaSmart Pro Display Screen Replacement, Removing Small Motherboard: paso 4, imagen 2 de 3 AlphaSmart Pro Display Screen Replacement, Removing Small Motherboard: paso 4, imagen 3 de 3
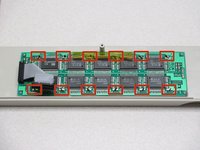
    • To remove the small motherboard from the display screen, use the flat needle nose pliers or the angled tweezers to carefully bend the 12 metal tabs so that they can be pushed through the small slots.

    • You must also lift up the transparent tape that covers two of these tabs.

    • Separate the display screen and small motherboard.

Conclusión

To reassemble your device, follow these instructions in reverse order.

Nathan Smith

Miembro Desde 10/13/14

22 Reputación

2 Guías creadas

Equipo

Clemson, Team 1-1, Benson Fall 2014 Miembro de Clemson, Team 1-1, Benson Fall 2014

CLEM-BENSON-F14S1G1

4 Miembros

16 Guías creadas

0 comentarios

Agregar Comentario

Ver Estadísticas:

Ultimas 24 horas: 0

Ultimos 7 días: 0

Ultimos 30 días: 1

Todo El Tiempo: 535