Saltar al contenido principal

ASUS TUF Gaming F15 FX506HEB-DB74 Left SSD Replacement

Qué necesitas

  1. ASUS TUF Gaming F15 FX506HEB-DB74 Left SSD Replacement, Unfasten the lower case: paso 1, imagen 1 de 2 ASUS TUF Gaming F15 FX506HEB-DB74 Left SSD Replacement, Unfasten the lower case: paso 1, imagen 2 de 2
    • Remove the 11 Phillips screws securing the lower case:

    • Seven 11.6 mm screws

    • Two 14.6 mm screws

    • Two 6.1 mm screws

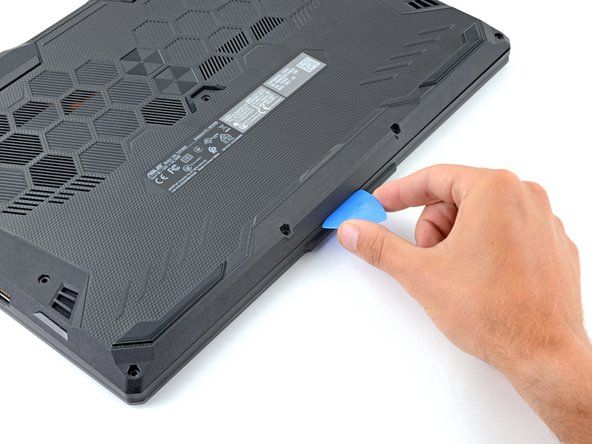
  2. ASUS TUF Gaming F15 FX506HEB-DB74 Left SSD Replacement, Insert an opening pick: paso 2, imagen 1 de 2 ASUS TUF Gaming F15 FX506HEB-DB74 Left SSD Replacement, Insert an opening pick: paso 2, imagen 2 de 2
    • Insert an opening pick between the lower case and the chassis on the front right edge.

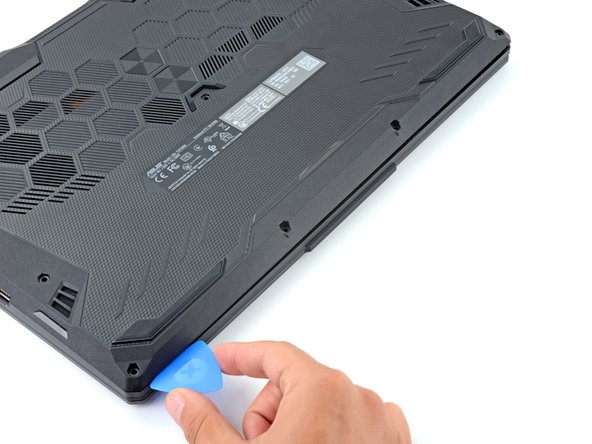
  3. ASUS TUF Gaming F15 FX506HEB-DB74 Left SSD Replacement, Release the right edge clips: paso 3, imagen 1 de 2 ASUS TUF Gaming F15 FX506HEB-DB74 Left SSD Replacement, Release the right edge clips: paso 3, imagen 2 de 2
    • Slide the pick along the right edge to release the clips securing the lower case.

  4. ASUS TUF Gaming F15 FX506HEB-DB74 Left SSD Replacement, Release the remaining clips: paso 4, imagen 1 de 3 ASUS TUF Gaming F15 FX506HEB-DB74 Left SSD Replacement, Release the remaining clips: paso 4, imagen 2 de 3 ASUS TUF Gaming F15 FX506HEB-DB74 Left SSD Replacement, Release the remaining clips: paso 4, imagen 3 de 3
    • Continue sliding the opening pick along the perimeter of the lower case to release the remaining clips.

  5. ASUS TUF Gaming F15 FX506HEB-DB74 Left SSD Replacement: paso 5, imagen 1 de 3 ASUS TUF Gaming F15 FX506HEB-DB74 Left SSD Replacement: paso 5, imagen 2 de 3 ASUS TUF Gaming F15 FX506HEB-DB74 Left SSD Replacement: paso 5, imagen 3 de 3
    • Lift the lower case from the chassis and remove it.

    • During reassembly, this is a good point to power on your laptop and test all functions before sealing it up. Be sure to power your laptop back down before you continue working.

  6. ASUS TUF Gaming F15 FX506HEB-DB74 Left SSD Replacement, Reposition the plastic: paso 6, imagen 1 de 2 ASUS TUF Gaming F15 FX506HEB-DB74 Left SSD Replacement, Reposition the plastic: paso 6, imagen 2 de 2
    • Use your fingers to move the plastic that covers the battery connector out of the way.

    • If the plastic is not staying out of the way use a piece of tape to secure it.

  7. ASUS TUF Gaming F15 FX506HEB-DB74 Left SSD Replacement, Disconnect the battery: paso 7, imagen 1 de 3 ASUS TUF Gaming F15 FX506HEB-DB74 Left SSD Replacement, Disconnect the battery: paso 7, imagen 2 de 3 ASUS TUF Gaming F15 FX506HEB-DB74 Left SSD Replacement, Disconnect the battery: paso 7, imagen 3 de 3
    • Use the flat end of a spudger to push each side of the battery connector until it comes out of the socket.

  8. ASUS TUF Gaming F15 FX506HEB-DB74 Left SSD Replacement, Unfasten the left SSD: paso 8, imagen 1 de 2 ASUS TUF Gaming F15 FX506HEB-DB74 Left SSD Replacement, Unfasten the left SSD: paso 8, imagen 2 de 2
    • Use a Phillips screwdriver to remove the 3.6 mm screw securing the left SSD and its cover.

  9. ASUS TUF Gaming F15 FX506HEB-DB74 Left SSD Replacement, Remove the SSD cover: paso 9, imagen 1 de 3 ASUS TUF Gaming F15 FX506HEB-DB74 Left SSD Replacement, Remove the SSD cover: paso 9, imagen 2 de 3 ASUS TUF Gaming F15 FX506HEB-DB74 Left SSD Replacement, Remove the SSD cover: paso 9, imagen 3 de 3
    • Slide the SSD cover off of the SSD by grabbing the edges near the screw indent and pulling away from the SSD.

  10. ASUS TUF Gaming F15 FX506HEB-DB74 Left SSD Replacement, Remove the SSD: paso 10, imagen 1 de 3 ASUS TUF Gaming F15 FX506HEB-DB74 Left SSD Replacement, Remove the SSD: paso 10, imagen 2 de 3 ASUS TUF Gaming F15 FX506HEB-DB74 Left SSD Replacement, Remove the SSD: paso 10, imagen 3 de 3
    • Pull the SSD out of its socket and remove it. Keep the SSD as parallel to the motherboard as possible when pulling on it.

    • Do not pull up at a sharp angle, as this could damage the SSD and the socket.

Conclusión

To reassemble your device, follow these instructions in reverse order.

Take your e-waste to an R2 or e-stewards certified recycler.

Repair didn't go as planned? Try some basic troubleshooting, or ask our ASUS TUF answers community for help.

Spencer Day

Miembro Desde 09/14/22

53,715 Reputación

394 Guías creadas

Equipo

iFixit Miembro de iFixit

Staff

135 Miembros

17,198 Guías creadas

0 comentarios

Agregar Comentario

Ver Estadísticas:

Ultimas 24 horas: 3

Ultimos 7 días: 6

Ultimos 30 días: 25

Todo El Tiempo: 600