Introducción
Bienvenido al día 3 de nuestro semana de los juegos de desarmado. Hasta ahora hemos desarmado el Magnavox Odyssey 100 y el RCA Studio II; El siguiente es la Atari 2600! Nosotros asociado con PC World para que este desmontaje te de una pequeña vista de otro elemento de la historia de las consolas.
Originalmente llamada como el Sistema computarizado de video (VCS), la Atari 2600 fue lanzada en 1977. Para ese entonces, el hardware basado en microprocesadores estaba siendo popularizado con la Farichild Channel F, y la VCS era el primer intento de Atari con esa tecnología.
El sistema, originalmente diseñado con todos los 6 botones en el panel frontal de la consola, fue rediseñado en 1980 con únicamente 4 de esos botones en el panel frontal, y los otros 2 en la parte trasera de la consola. La consola que se muestra aquí es el modelo de 1980.
Qué necesitas
-
-
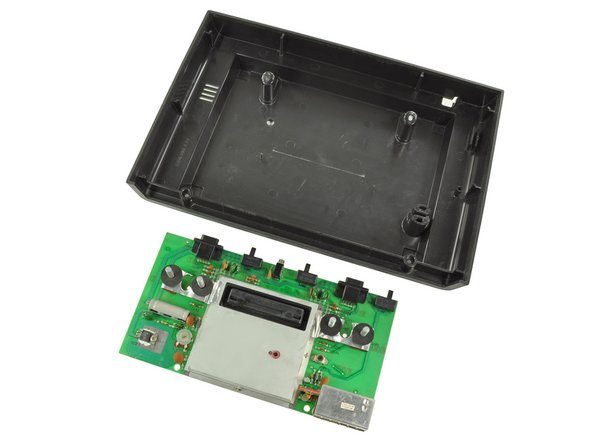
Atari 2600 con su adaptador AC y el icónico control.
-
¿Tiene la Atari 2600 terminación de madera? ¡Está en lo correcto!
-
Las consolas hoy en día no tienen un sentido para decorar la casa, pero aún algunas empresas de computadoras creen en la estética del panel de madera.
-
En su lanzamiento, la Atari 2600 se vendía por $199 USD. En la moneda de hoy en día, eso sería unos $696 USD. En comparación, el modelo de lanzamiento de la Playstation 3 solo costaba $599 USD. ¡Los precios están bajando!
-
En cuanto los usuarios se dieron cuenta de que la Atari 2600 que únicamente el Pong, la 2600 se volvió masivamente exitosa. Fue de vender 250.000 consolas en 1977 a vender 1 millón de unidades en 1979.
-
-
-
Desde su lanzamiento en 1977 hasta 1983, la Atari 2600 fue oficialmente llamada el Sistema Computarizado de Video, en respuesta al Semiconductor de Entretenimiento de Video de Fairchild. La consola fue luego renombrada tras su número de modelo, CX2600
-
En vez de seguir la tendencia de hacer un número limitado de juegos en el sistema como la Magnavox Odyssey 100, la Atari 2600 utilizaba cartuchos extraíbles para guardar juegos tales como, Space Invaders, Pac-Man y Pitfall!
-
Cada jugador podía seleccionar la dificultad del juego, cambiando un interruptor de "A" a "B". Uno de ellos era más difícil de lo que uno se esperaba
In regards to the difficulty switches, switching to "B" was the easier setting and switching to "A" was the harder setting. Some examples:
Missile Command:
A: Make the missiles you launch slower
B: Make the missiles you launch faster
Space Invaders:
A: Makes your base bigger (and most likely to be hit)
B: Makes your base smaller
Asteroids:
A: UFOs appear
B: UFOs does not appear
Hopefully the information I provided here will help those confused with the difficulty switches.
The "anyone's guess" comment was inappropriate. The system owner's manual mentions in section 5 that position "A" is generally more difficult than position "B". Every game instruction manual described exactly what the functions of the difficulty switches were for that game, if they did anything at all. There are a few games which were inadvertently made with difficulty settings reversed from the standard.
Dude. No one cares.
I totally care!
I care deeply. But where is the switch? Is it underneath the console?
On the console shown in this article, difficulty switches are on the back upper edge (visible above the cartridge port in the photo above at Step 2 of this guide). This puts each player’s difficulty switch just inboard of his or her controller port.
On consoles with 6 silver-colored front panel switches, the switch nearest the cartridge port on each side is the difficulty switch.
-
-
-
...O no. ¿En serio? ¿Eso es todo? El equipo diseñador de la carcasa quiso dar mucho espacio para respirar al equipo de la placa base, por las dudas. (En realidad esta es la 3era revisión del hardware interno, el primero tomaba mucho más espacio).
-
Jay Miner logró integrar el chip de la pantalla y el de sonido en un único circuito integrado, reduciendo así, el tamaño de la placa base, pero la carcasa aún parece relativamente hiperbólica
-
Con un diseño que es imposible de ver en cualquier otro dispositivo electrónico, la placa base está apoyada y se sienta a 30 grados dentro del Atari. ¡Ahora esos tornillos tienen sentido!
The case design seems unusual even when you consider the original, 6-switch model. See here: http://www.longhornengineer.com/Videomod...
The reason for the case being so large was that originally it included two speakers for stereo audio output. These were deleted at the last minute in favor of mono audio through the TV as a cost-saving measure, but the very earliest 6-switch consoles have circular-layout speaker slots in the top and support posts cast into the case bottom. In fact, it took Atari quite a long time to completely close off the speaker slots, as even some of the 4-switch models (like the one used here) still have them. I've even seen case tops with speaker slots on only one side!
Here's a much better picture of the insides of a 6-switcher: http://oldcomputers.net/atari-vcs.html
I guess that the round tripods near the front of the case were for holding the speakers.
cityzen -
This photo should be replaced, as it shows incorrect routing of the RF cable (apparently someone has opened this console before). From the RCA socket on the motherboard, the cable should be placed thus: first, it should go toward the *front* of the console (from a player's perspective; i.e. "southwest" as the console is positioned in the present photo) alongside the main EMI shield, and between that shield and the RF modulator unit. Then it should turn 90 degrees toward the player's right and be pressed into the slot in the top of the fat round post. Then it should make another gentle 90 degree turn to head toward the rear of the console and be pressed in place between the small hollow post and the fin beside it, which supports the case top. Proceeding rearward, the cable may either be pressed between the pair of fins, or between the rightmost fin and the case side (as the pair of fins are actually a bit too close to one another) before winding around the remaining plastic bits to finally make its exit from the rear of the case.
-
-
-
-
¡Finalmente, cables que no están soldados a la placa base! (Tomen nota, Studio II). El cable RCA es fácil de quitar.
-
La placa base sale fácilmente, porque no hay ningún tornillo o clips que la sostengan en su lugar. Lo único asegurándola ahí eran los tornillos en ángulo que fueron removidos de la carcasa exterior.
-
La placa base mide 9,75" x 5,25" y la parte de abajo de la carcasa 13,75" x 9,75".
-
¡La carcasa de la 2600 es 2,6 veces más grande que la placa base!
-
-
-
La placa base de la 2600 es dominada por una caja metálica, como el escudo EMI que protege los circuitos integrados.
-
Nuestros esfuerzos de acceder al cerebro de la Atari están temporalmente frenados por 4 pestañas metálicas.
-
Pequeños giros con una pinza y el escudo EMI saldrá.
-
Atari recibe +1 en la habilidad para reparar por no soldar el escudo en la placa base, como algunas empresas recientes han hecho.
-
-
-
¡Cerebro!
-
La Atari 2600 tiene:
-
Procesador de 1,19 MHz 8-bit
-
128 bytes de RAM
-
Resolución 192 x 160 pixeles
-
128 colores, máximo 4 colores por línea
-
Sonido mono por 2 canales
-
A diferencia de muchas consolas anteriores, los juegos se encontraban guardados en chips internos, la Atari 2600 los guardaba en chips de Memoria de Solo Lectura (ROM), guardados en cartuchos externos. Esto permitía un número infinito de juegos para la consola.
The three main chips are socketed (!) for easy replacement.
Yes, socketing the chips DID make replacement easy. However, because they are of the DIP (Dual Inline Package) design, they have one annoying flaw: They tend to "walk" out of the sockets over time. Here's how it happens: When you turn the system on and off, the internal circuitry heats up and cools down. This causes expansion when heated, and contraction when cooled. Over a period of time, this causes the chips to "walk" out of the sockets, causing bad contact and the system will fail to power up. The solution is to open it up and reseat the chips back into the socket. This is one annoying thing about that design. The original IBM PC had a lot of sockets for its memory, and when the event I described happens, the computer would refuse to power up. That's the reason why SIMMs and DIMMs were introduced.
It's interesting to note that the 6507 was a 6502 with some data lines deleted. This meant that the 2600 can only access up to 4K. However, some companies used a bank switching technique, so some cartridges had as much as 16K! That was quite a bit in those days, as memory was pretty expensive.
-
-
-
Los 2 chips son el chip temporizador 6532 Ram-I/O- y el 6507 CPU (una pequeña versión del más popular 6502) de MOS Technology's. Para la actual revisión, fueron hechos por Synertek y Rockwell, respectivamente.
-
El chip propio de Atari, el Adaptador para la Interfaz de la Televisión (TIA) es lo que generaba ingresos de la 2600, porque permitía múltiples colores, capacidades gráficas incrementadas y sonido.
-
Porque la memoria era tan costosa durante el diseño de la 2600, el procesador de video no tiene memoria externa. Como resultado el CPU debe enviar información de video al TIA, una línea a la vez.
-
Existen 6 componentes que el TIA puede crear: Un campo para jugar, 2 sprites (8 líneas de pixeles), una pelota (un píxel) y 2 misiles (2 líneas de pixeles). Combinaciones de estos elementos permitían la complejidad de los video juegos presenciados en la 2600
Pretty sure that the 6507 in that picture has a MOS Tech mark on it, not Motorola. The chip on the bottom (which I think is the TIA, not 100% sure) appears to have a Motorola mark on it, though.
Indeed, Motorola did not make the 6502/6507, although they could have. The history is interesting: http://en.wikipedia.org/wiki/6502
cityzen -
Oh, and the 6507 has a Rockwell logo on it. Rockwell licensed the 6502/6507 and eventually came out with their own versions. Synertek was another licensee.
cityzen -
-
-
-
Con el escudo EMI removido, todos los componentes de la placa base se hacen visibles
-
Perilla para ajustar el tinte de color
-
Tuneador de sonido
-
Modulador RF
-
Chip TIA propio Cyan Engineering (producido por Motorola)
-
6532 RIOT MOS Technology (producido por Synertek)
-
6507 CPU MOS Technology (producido por Rockwell)
-
Regulador de voltaje (producido por Texas Instruments)
-
-
-
La parte trasera de la placa base de la Atari 2600 no tiene nada precisamente interesante, a excepción de las soldaduras y los circuitos dibujados a mano.
-
Este modelo es la revisión 13. ¡Que afortunado!
I think that the giant solder blob underneath the voltage regulator is kind of interesting. I'll have to keep that technique in mind when I need a DIY heatsink in my own projects.
Also kind of interesting are the wrinkly traces. This is due to "hot air solder levelling" (HASL) where the traces were coated with solder before the solder mask was applied, which helped reduce corrosion and with wetting at nearby joints. During the later wave soldering process, the HASL solder would melt again under the mask, and wrinkle as it cooled down. You can see this on a lot of 1970s and 1980s PCBs.
-
-
-
¡Aprecie la Atari y todas sus 5 partes!
-
Le damos a la Atari 2600 un gran agradecimiento por su habilidad de ser reparada. Cada componente está agarrado por soldadura, así que reemplazar una resistencia quemada o un circuito integrado es bastante factible.
-
Tenemos la mala noticia de que no tenemos las partes para la Atari 2600, pero tenemos una nueva tienda de consolas de partes para mantener tus (más modernas) consolas funcionando.
-
Manten un ojo en nuestra página de desarmados o nuestro blog para un detallada vista a otra consola retro mañana!
-


Un agradecimiento especial a estos traductores:
100%
¡ Matias nos está ayudando a reparar el mundo! ¿Quieres contribuir?
Empezar a traducir ›
17 comentarios
Your IC ID on this teardown is incorrect.
The Rockwell chip in the middle CO10745 is the 6507 CPU
The Motorola CO10444 is the TIA and the Synertek is the 6532 RIOT IC
-John
Curator
The CPU Shack Museum
www.cpushack.com
Agreed, and I don't get how you guys came to the conclusion of "a great appreciation for [...] hand drawn circuits".
I see nothing but straight lines, which very well could be neatly hand drawn, but just as easily could be CAD'ed.
But otherwise I love your teardowns of classic hardware. Keep them coming!
Michael -
Perhaps they meant to suggest that the traces were laid out manually using a CAD program, as opposed to auto-routed?
cityzen -
Perhaps by "hand drawn" they meant "hand taped," the more usual method for circuit layout. While I have done small boards with a photo-resist pen on the copper or a marker on a mylar mask, it was more usual and easier to use a strong black tape on the copper or the mask. It came in varying widths, and you could also buy stick-on or transfer pads for through-holes and sets of pads for ICs. When taping out stuff it was definitely easier to do straight lines than curves!
Note that some of the 2600 consoles had (very slightly) different lengths of screws, and putting them in wrong would tear up the traces on the board. http://www.atarimuseum.com/videogames/co...
The article you linked mentions "two sizes of self-tapping screw". Self-tapping screws were only used in the consoles with six switches on the front, from the first two production runs. The issue was resolved by the time those with four front switches were made, like the one used for illustration of this article.
Esa FUE mi primer consola y con esa aprendi ELECTRONICA yo la limpiaba y la reparaba …… Que buena epoca esa
Que?
12345678
I had a 2600 when I was a kid I loved it
Awesome! This console was the reason for my entrance into Electronics as a Technician.
Belle jouex classic
The Playstation 3 comparison should include the fact that the 2600 came with controllers for two players (two joystick and two paddles) and a bundled game. Adding an extra controller and game would make the inflation-adjusted Playstation price nearly the same as the Atari.
Jonathan Kagle - Contestar