Saltar al contenido principal

Google Pixelディスプレイの交換

Aviso: Estás editando una guía de requisitos previos. Cualquier cambio que realices afectará a todas las 6 guías que incluyen este paso.

Inglés
Japonés
Paso 4
Google Pixel Display Replacement: paso 0, imagen 1 de 3 Google Pixel Display Replacement: paso 0, imagen 2 de 3 Google Pixel Display Replacement: paso 0, imagen 3 de 3
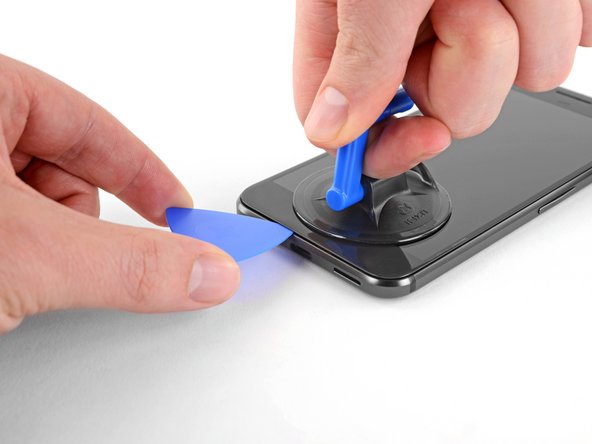
  • Insert an opening pick or a playing card into the gap between the chassis and the display assembly.

  • Begin to slide the opening pick around the edge of the display, cutting through the adhesive that secures it.

  • Do not try to lift or pry the screen off with the pick. Simply slide it around to detach the adhesive.

  • The display panel is extremely fragile. If you plan to re-use your display, take care to insert your tool only as far as necessary to separate the adhesive. Inserting the tool any further can damage the OLED panel under the glass.

開口ピックもしくはプラスチックカードをカシスとディスプレイアセンブリの間の隙間に差し込みます。

開口ピックをディスプレイ端周辺にスライドして、留められた接着剤を切り込んでいきます。

ピックでスクリーンを持ち上げたり、こじ開けたりしないでください。スライドさせて接着剤をはがすだけです。

ディスプレイパネルは脆いです。ディスプレイを再利用する場合は、ツールは必要以上に奥まで差し込まないようご注意ください。ツールを深く差し込むと、ガラス下のOLEDパネルにダメージを与えてしまいます。

Tus contribuciones son autorizadas bajo la licencia de código abierto de Creative Commons.