Saltar al contenido principal

iPad mini 4 LTE Akku austauschen

Aviso: Estás editando una guía de requisitos previos. Cualquier cambio que realices afectará la guía que incluye este paso.

Inglés
Alemán
Paso 2
iPad mini 4 LTE Battery Replacement: paso 0, imagen 1 de 1
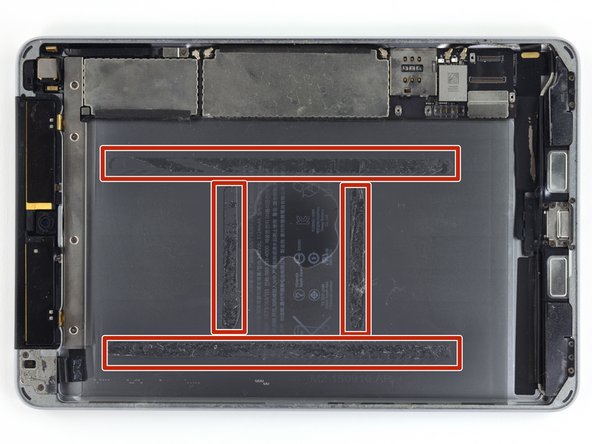
  • In the following steps you will be cutting the adhesive under the battery, and prying it off of the rear case.

  • The adhesive is laid out as shown in this image: two strips along the long edges, and two shorter strips perpendicular in the center.

  • To avoid damaging the battery, use plastic tools, heat, and patience. Do not puncture, bend, or overheat the battery.

  • Do not pry near the logic board, you could damage your iPad.

  • If you are performing this procedure on the Wi-Fi version, it is safe to insert pry tools from the upper, lower, and left edges of the battery. For the LTE version, only pry from the lower and left edges to avoid damaging other components.

In den folgenden Schritten wirst du die Klebeverbindung unter dem Akku auftrennen und ihn vom Rückgehäuse abhebeln.

Der Kleber ist an den im Bild markierten Stellen angebracht: zwei Streifen an den langen Kanten, zwei kürzere Streifen rechtwinklig dazu in der Mitte.

Damit der Akku nicht beschädigt wird, benötigst du Kunststoffwerkzeug, Wärme und Gedult. Perforiere, verbiege oder überhitze in den Akku nicht.

Heble nicht in der Nähe des Logic Boards, du könnte dein iPad beschädigen.

Wenn du dieses Verfahren an der Wi-Fi Version durchführst, kannst du die Hebelwerkzeuge an der Oberkante, der Unterkante und den linken Kante ansetzten. Bei der LTE Version darfst du nur an der Unterkante und linken Kante hebeln, damit keine anderen Bauteile beschädigt werden.

Tus contribuciones son autorizadas bajo la licencia de código abierto de Creative Commons.