Saltar al contenido principal

Sostituzione pannello anteriore iPod Touch 4a generazione

Aviso: Estás editando una guía de requisitos previos. Cualquier cambio que realices afectará a todas las 8 guías que incluyen este paso.

Inglés
Italiano
Paso 7
iPod Touch 4th Generation Front Panel Replacement: paso 0, imagen 1 de 3 iPod Touch 4th Generation Front Panel Replacement: paso 0, imagen 2 de 3 iPod Touch 4th Generation Front Panel Replacement: paso 0, imagen 3 de 3
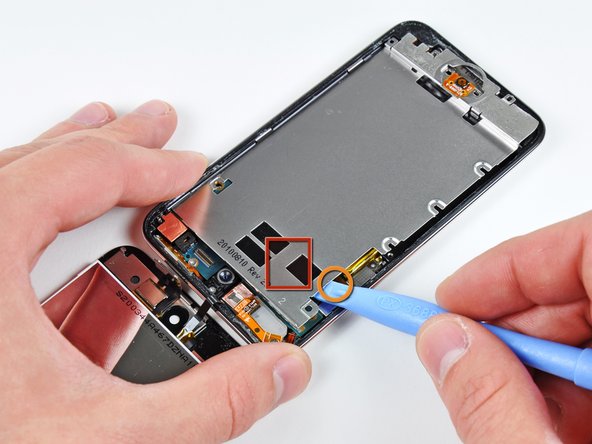
  • Insert the edge of an opening tool under the steel mid plate near the bottom left corner of the Touch.

  • Slowly pry upward to separate the plate from the adhesive securing it to the plastic inner case.

  • If the plate is still attached to the logic board, re-warm the area to loosen the adhesive, then slowly separate the plate from the logic board using the opening tool.

  • There is a thin, fragile ribbon cable underneath the plate. As you pry the plate up, be very careful not to rip the cable.

  • This cable may stick to the plate and will tear very easily if you're not careful. Work slowly and be careful not to strain the cable.

Infila l'estremità di uno strumento di apertura sotto la piastra intermedia in acciaio vicino all'angolo in basso a sinistra dell'iPod Touch.

Fai leva lentamente per separare la piastra dall'adesivo che la fissa alla copertura interna in plastica.

Se la piastra è ancora attaccata alla scheda madre, riscalda la zona per ammorbidire l'adesivo, quindi separala lentamente dalla scheda usando uno strumento di apertura.

C'è un cavo a nastro sottile e delicato sotto la piastra. Mentre la separi, stai molto attento a non strapparlo.

Questo cavo potrebbe restare incollato alla piastra e lo potresti strappare molto facilmente se non stai attento. Lavora lentamente e stai attento a non tirare il cavo.

Tus contribuciones son autorizadas bajo la licencia de código abierto de Creative Commons.