Saltar al contenido principal

Reemplazo de pantalla Samsung Galaxy S20

Inglés
Español
Paso 4
Samsung Galaxy S20 Screen Replacement: paso 0, imagen 1 de 3 Samsung Galaxy S20 Screen Replacement: paso 0, imagen 2 de 3 Samsung Galaxy S20 Screen Replacement: paso 0, imagen 3 de 3
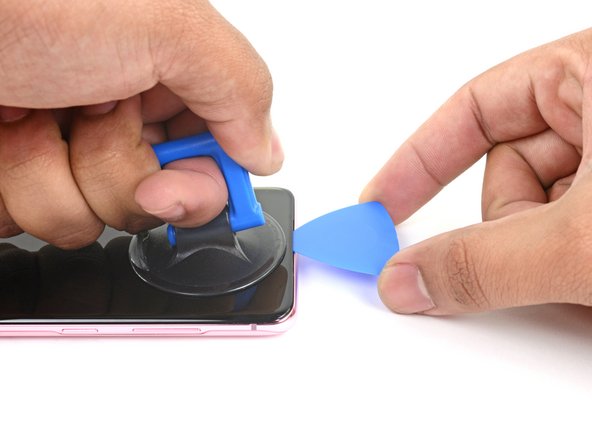
  • Apply a suction cup to the display glass, as close to the center of the top edge as possible.

  • If your display is badly cracked, covering it with a layer of clear packing tape may allow the suction cup to adhere. Alternatively, very strong tape may be used instead of the suction cup. If all else fails, you can superglue the suction cup to the broken screen.

  • Pull on the suction cup with strong, steady force to create a gap between the display glass and the frame.

  • Insert the point of an opening pick into the gap in the center of the earpiece speaker notch, working it downwards underneath the display.

  • Ensure the pick slides over the front-facing camera and is not pushing against it.

  • Due to the stubborn adhesive, this may take multiple attempts of reheating with the iOpener and separating with the suction cup before you get it right.

  • If you are having trouble creating a gap, apply more heat to the edge and try again.

  • Leave your pick in the seam to prevent the adhesive from reasealing.

Aplica una ventosa en el vidrio del display , tan cerca del centro del borde superior como sea posible

Si la pantalla está muy rota, cúbrela con una capa de cinta de embalaje transparente puede permitir que la ventosa se adhiera. Alternativamente, se puede usar una cinta muy fuerte en lugar de la ventosa. Si todo lo demás falla, puedes pegar la ventosa a la pantalla rota.

Jala la ventosa con fuerza, constante para crear una separacion entre el display y el marco del telefono.

Inserta la punta de una púa de apertura en el espacio en el centro de la muesca del altavoz del auricular, moviéndola hacia abajo debajo de la pantalla.

Asegúrate de que la púa se deslice sobre la cámara frontal y no la empuje

Debido al adhesivo resistente, esto puede requerir varios intentos de recalentar con el iOpener y separar con la ventosa antes de hacerlo bien.

Si estás teniendo problemas creando un espacio, aplica mas calor a el borde y prueba de nuevo.

Deja la púa entre el display y el marco para prevenir que el adhesivo vuelva a sellar.

Tus contribuciones son autorizadas bajo la licencia de código abierto de Creative Commons.