Introducción
Sigue esta guía para reemplazar el Taptic Engine en tu iPhone 6s. El Taptic Engine es el motor de retroalimentación háptica y vibratoria del iPhone. Si tu teléfono no vibra o produce un sonido de traqueteo cuando lo hace, reemplazar el Taptic Engine puede solucionar tus problemas.
Qué necesitas
-
-
Remueve los dos tornillos Pentalobe P2 de 3.4 mm que se encuentran cerca del conector Lightning en el borde inferior de tu iPhone.
-
-
Herramienta utilizada en este paso:Clampy - Anti-Clamp$24.95
-
Tira de la manija azul hacia atrás para desbloquear los brazos del Anti-Clamp.
-
Desliza los brazos sobre el borde izquierdo o derecho de tu iPhone.
-
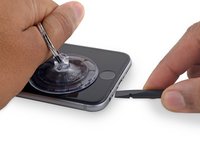
Coloca las ventosas justo encima del botón de inicio en la pantalla, una en el frente y otra en la parte posterior.
-
Empuja hacia abajo las copas para aplicar succión en el área deseada.
-
-
-
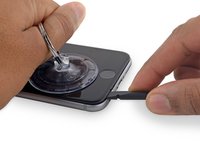
Tira del mango azul hacia delante para bloquear los brazos.
-
Gira el mango en el sentido de las agujas del reloj 360 grados o hasta que las ventosas empiecen a estirarse.
-
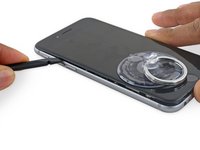
Inserta una púa de apertura bajo la pantalla cuando el Anti-Clamp cree un hueco lo suficientemente grande.
-
Omite los siguientes tres pasos.
-
-
Herramienta utilizada en este paso:Clampy - Anti-Clamp$24.95
-
Si no tienes un Anti-Clamp, sigue los siguientes tres pasos para usar un mango de succión.
-
Aplica calor suave en el borde inferior del iPhone con un iOpenero un secador de pelo durante aproximadamente un minuto.
-
-
-
-
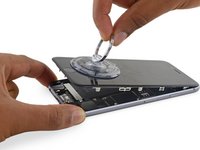
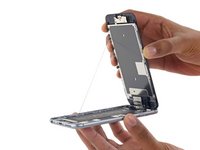
Agarra suavemente el ensamblaje de la pantalla y tira de él hacia arriba para abrir el teléfono , utilizando los clips en la parte superior del panel frontal como una bisagra.
-
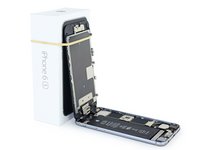
Abre la pantalla en un ángulo de 90º , e inclínala contra algo para mantenerla apoyada mientras se está trabajando en el teléfono.
-
Añadir una banda de goma para mantener la pantalla en su lugar mientras se trabaja . Esto evita la tensión indebida en los cables de la pantalla .
-
-
-
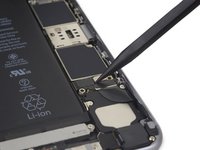
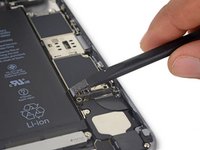
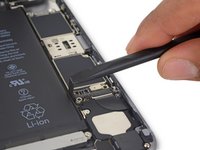
Retira los dos tornillos Phillips 000 que fijan el soporte de conector de la batería:
-
Un tornillo de 2.9 mm
-
Un tornillo de 2.2 mm
-
-
-
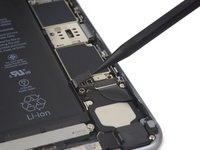
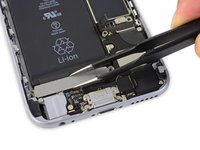
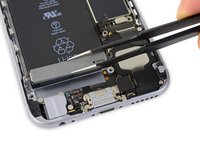
Retira los dos tornillos Phillips de 1,5 mm que sujetan el Taptic Engine en su lugar.
-


Para volver a armar tu dispositivo, sigue estas instrucciones en orden inverso.
Para volver a armar tu dispositivo, sigue estas instrucciones en orden inverso.
Cancelar: No complete esta guía.
112 personas más completaron esta guía.
Un agradecimiento especial a estos traductores:
100%


Estos traductores nos están ayudando a reparar el mundo! ¿Quieres contribuir?
Empezar a traducir ›

5 comentarios
Guide very clear and toolset and replacement battery worked just fine. I replaced battery without disconnecting front panel. Both glued strips got broken (I didn’t remove Taptic Engine) but I managed to rescue strips by carefully leveling up battery with the spudger and picking the strips with twezzer. Then it was easy to pull the glued strips thanks to the gap gained between battery and rear panel
Iphone 6s is back to life. Sorry for my poor English writing skills (creo que escribo mejor en Spanish)
Thank you all
A very good clear guide, and my iphone 6s works fine, restored with the new replacement battery. The replacement battery came with a full set of tools, including sucker, screwdrivers, spudgers and even a packet of screws.
I must admit, although the guide was excellent and well illustrated, I found it a bit of a challenge. I don’t know if my age (nearly 80) didn’t help , with a slightly shaky hand! Those tiny, tiny screws that can ping all over the place, and replacing the weenie terminals that could so easily be damaged if you press in the wrong place, I found the worst to cope with. However the guide was very helpful with its warnings, such as when you are getting the old battery out and the danger of damaging the volume button connector if you work too near the top end.
To conclude I think the guide is very good, and thank you.
Excellent source. I was able to repurpose an old iPhone for reuse as a quasi iPod and keep it out of the trash cycle. HINT: when disassembling devices such as this with many tiny screws I use an enlarged screen shot from the directions, tape it to a steel sheet. I lay out tiny magnets on the picture in the exact pattern as the place from which they came before I remove them. For reassembly, I remove them from the magnets one-by-one as used. This way each screw goes back in the place from which it came.
I am not a tech person, and this is the second time I have replaced the battery in my iPhone 6s using your kit and replacement battery. The first time was a year and a half ago, and all was good until that first replacement battery simply stopped charging. It lasted a year and a half, so I think that's pretty good!
The hardest part of the repair for me is getting all those tiny screws back in. Otherwise, easy to follow instructions, photos and tools. You guys do great work -- thank you!