Esta versión puede contener ediciones incorrectas. Cambie a la última instantánea verificada.
Qué necesitas
-
-
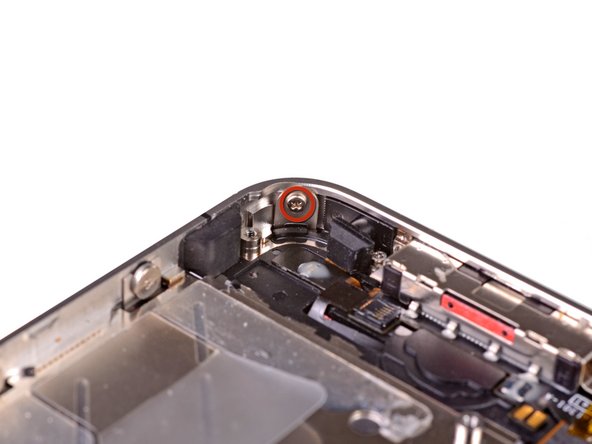
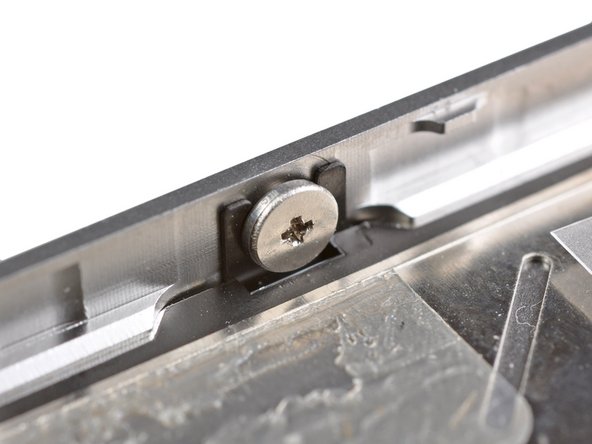
Remueve los dos tornillos Pentalobe P2 de 3.6 mm localizados en las esquinas del conector dock.
-
El Destornillador de 5-Puntas solo debe ser utilizado una vez porque tiene la posibilidad de barrer el tornillo.
-
-
-
Remueve los siguientes tornillos asegurando el conector de la batería a la tarjeta lógica
-
Un tornillo Phillips de 1.7 mm
-
Un tornillo Phillips de 1.5 mm
-
-
-
Inserta el borde de una herramienta de apertura de plástico entre la batería y la carcasa exterior cerca del borde inferior del iPhone.
-
Corre la herramienta de apertura de plástico junto el borde derecho de la batería y has palanca en varios puntos para separar completamente del adhesivo asegurándola a la carcasa exterior.
-
Espera por alrededor de un minuto para que el alcohol debilite el adhesivo.
-
Usa el lado plano de una herramienta de apertura de plástico para levantar gentilmente la batería.
-
-
-
Retira los siguientes tornillos sosteniendo la cubierta del cable del conector dock a la placa lógica
-
Un tornillo Phillips de 1.5 mm
-
Un tornillo Phillips de 1.2 mm
-
Retira la cubierta metálica del cable del conector dock
-
-
-
Este paso está sin traducir. Ayuda a traducirlo
-
Use a SIM eject tool or a paperclip to eject the SIM and its tray.
-
Remove the SIM and its tray.
-
-
Este paso está sin traducir. Ayuda a traducirlo
-
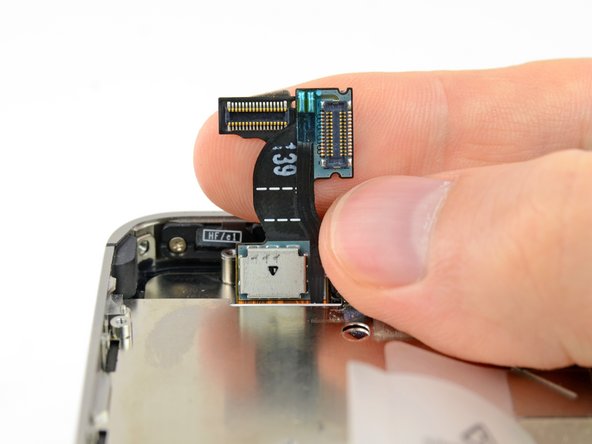
Remove the five cables near the top of the logic board in the following order:
-
Headphone jack/volume button cable
-
Front facing camera cable
-
Digitizer cable
-
Display data cable
-
Power button cable (located underneath the headphone jack/volume button cable as shown in the second picture.)
-
-
Este paso está sin traducir. Ayuda a traducirlo
-
Remove the 1.5 mm Phillips screw securing the grounding clip to the logic board near the headphone jack.
-
-
Este paso está sin traducir. Ayuda a traducirlo
-
Use the tip of a spudger to pry the small grounding clip up off the logic board.
-
Carefully grasp the grounding clip and remove it from the iPhone.
-
-
Este paso está sin traducir. Ayuda a traducirlo
-
Remove the 4.8 mm standoff screw near the headphone jack.
-
-
Este paso está sin traducir. Ayuda a traducirlo
-
Use the edge of a plastic opening tool to disconnect the Wi-Fi antenna from the logic board.
-
-
Este paso está sin traducir. Ayuda a traducirlo
-
If present, peel the piece of black tape covering the hidden screw near the power button.
-
Remove the 2.6 mm Phillips screw securing the logic board near the power button.
-
-
Este paso está sin traducir. Ayuda a traducirlo
-
Remove the following screws securing the logic board to the case:
-
One 2.5 mm Phillips screw near the vibrator motor
-
One 2.4 mm Phillips screw
-
One 3.6 mm standoff along the side of the logic board nearest the battery opening.
-
-
Este paso está sin traducir. Ayuda a traducirlo
-
Carefully lift the logic board from the end closest to the speaker enclosure and slide it away from the top edge of the iPhone.
-
Remove the logic board.
-
-
Este paso está sin traducir. Ayuda a traducirlo
-
Wedge the plastic opening tool between the vibrator and the side of the iPhone.
-
Pry the vibrator up to release it from the adhesive securing it to the iPhone.
-
Remove the vibrator.
-
-
Este paso está sin traducir. Ayuda a traducirlo
-
Remove the two 2.4 mm Phillips screws from the sides of the speaker enclosure assembly.
-
-
Este paso está sin traducir. Ayuda a traducirlo
-
Remove the small plastic bracket that was installed under the screw closest to the dock connector cable.
-
-
Este paso está sin traducir. Ayuda a traducirlo
-
Remove the speaker enclosure assembly from the iPhone.
-
-
-
Retira los pequeños trozos de cinta negra que cubren las pestañas de montaje de la pantalla.
-
-
-
Recuerde cambiar el botón de inicio de su pantalla anterior a la nueva (en la mayoría de los casos, no está incluido). La junta del botón de inicio es de goma fina, por lo que se debe tener cuidado de no romperla. Además, verifique que la malla para el orificio del altavoz esté presente en el reemplazo; si no, utilice la de la pantalla anterior.
-
Asegúrese de quitar la capa protectora (generalmente azul o rosa) del nuevo panel antes de instalarlo.
-
Si su pantalla de reemplazo no viene con un anillo de plástico transparente de 7 mm que rodea la cámara frontal, asegúrese de transferirlo entre la pantalla antigua y la nueva.
-
-
-
Enderece con cuidado los cables de datos del digitalizador y del LCD y páselos por la ranura cortada en la carcasa exterior.
-
Esta foto muestra la pantalla instalada incorrectamente, con demasiada holgura en el cable del digitalizador, lo que luego forma una curvatura que queda atrapada en la ranura. La tercera foto también muestra este bucle.
-
-
-
Durante el reensamblaje, no toque el área metálica en la base del cable de datos del LCD, ya que esto puede causar problemas con el LCD. Si lo tocas accidentalmente, límpialo suavemente con una toallita con alcohol antes de continuar.
-
Después del reensamblaje, proteja su nueva pantalla contra rasguños instalando un nuevo protector de pantalla.
-
-
Este paso está sin traducir. Ayuda a traducirlo
-
Use the edge of a plastic opening tool to gently peel the bottom right corner of the home button assembly from the display assembly.
-
-
Este paso está sin traducir. Ayuda a traducirlo
-
Use a pair of tweezers to peel the home button assembly off the adhesive securing it to the display assembly.
-
Remove the home button assembly from the display assembly.
-


Cancelar: No complete esta guía.
215 personas más completaron esta guía.

3 comentarios
I found the tear down somewhat easier than it's predecessor (IPhone 4) though for those attempting this kind of thing for the first time, extreme care should be taken to ensure the right tool is used for each job (ie. Phillips driver for Phillips screw etc.). I inherited this job from a friend that didn't know the difference between Phillips and pentalobe screws and hence destroyed the head of the first screw (and the pentalobe driver) once inside the unit.
Take care and you will enjoy a new found love for the device that YOU repaired.
I completed the teardown, but the metal fingers on the new display don't match the old one, hence the 6 screws that you loosen before removing the display no longer line up. VERY annoying... my phone is in pieces now until I can get a replacement display. Anyone else had this problem? BEWARE.. attempt to check yours before getting too far, line up the new display with the side screws and make sure it fits, it wasn't off by much so check they line up exactly. Did I get a iphone 4 display instead of a 4s? I dunno.. i've emailed ifixit to find out.
Did you put the screen + digitizer in upside down or backwards?