Esta versión puede contener ediciones incorrectas. Cambie a la última instantánea verificada.
Qué necesitas
-
-
Apaga el iPhone antes de empezar el desmontaje.
-
La tapa trasera de tu teléfono puede tener dos tornillos Phillips del nº 1000 o tornillos "Pentalobe" de 5 puntas de Apple. Comprueba qué tornillos tienes y asegúrate de que también tienes el destornillador correcto para poder extraerlos.
-
Retira los dos tornillos Pentalobe o Phillips #000 de 3,6 mm situados junto al conector del dock.
-
-
-
Retira el único tornillo Phillips de 1,5 mm que sujeta el conector de la batería a la placa lógica (si existe).
-
-
-
Tira hacia arriba de la pestaña de plástico transparente expuesta para despegar la batería del adhesivo que la sujeta al iPhone.
-
Si queda algo de solución alcohólica en el teléfono, límpiala con cuidado o deja que se seque al aire antes de instalar la nueva batería.
-
Extrae la batería.
-
Antes de reensamblarla, limpia los puntos de contacto entre metales con un desengrasante como el Windex. La grasa de tus dedos puede causar problemas de interferencias inalámbricas.
-
Realiza un reinicio completo después del reensamblaje. Esto puede evitar varios problemas y simplificar la resolución de problemas.
-
-
Este paso está sin traducir. Ayuda a traducirlo
-
Remove the two 1.8 mm Phillips screws securing the dock connector cable cover to the logic board.
-
Remove the metal dock connector cable cover.
-
-
Este paso está sin traducir. Ayuda a traducirlo
-
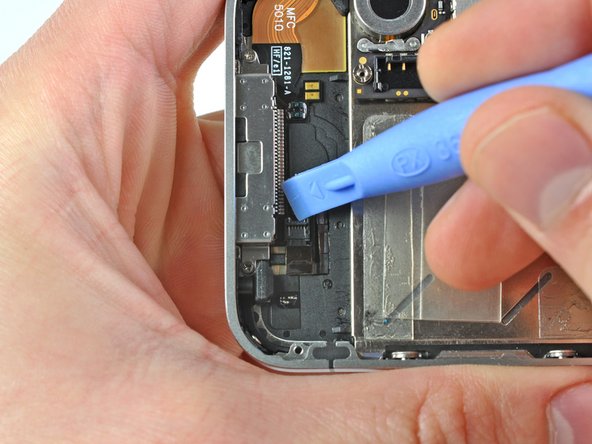
Use the edge of a plastic opening tool to pry the dock cable up from its socket on the logic board.
-
-
-
Este paso está sin traducir. Ayuda a traducirlo
-
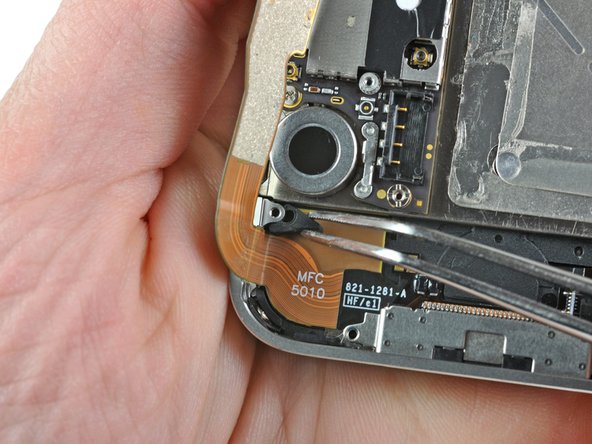
Peel the dock connector cable off the adhesive securing it to the logic board and the side of the speaker enclosure.
-
-
Este paso está sin traducir. Ayuda a traducirlo
-
Remove the 1.6 mm Phillips screw securing the pressure contact to the logic board near the vibrator.
-
Remove the pressure contact.
-
-
Este paso está sin traducir. Ayuda a traducirlo
-
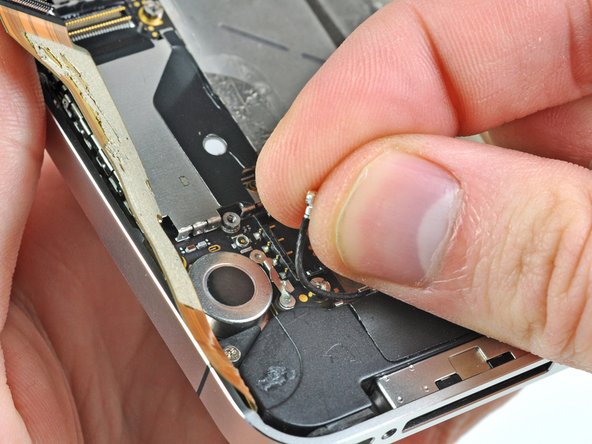
Use the edge of a plastic opening tool to pry the Wi-Fi antenna cable up from its socket on the logic board.
-
De-route the Wi-Fi antenna cable out from under the metal fingers attached to the logic board.
-
-
Este paso está sin traducir. Ayuda a traducirlo
-
Remove the two 2.4 mm Phillips screws securing the speaker enclosure assembly to the outer case.
-
-
Este paso está sin traducir. Ayuda a traducirlo
-
Remove the small black spacer that was under the Phillips screw near the vibrator.
-
-
Este paso está sin traducir. Ayuda a traducirlo
-
Use a plastic opening tool to lift the speaker enclosure assembly out of the case, being sure not to damage the EMI fingers on the attached Wi-Fi antenna.
-
Remove the speaker enclosure assembly.
-
-
Este paso está sin traducir. Ayuda a traducirlo
-
If present, remove the small strip of tape covering one of the dock connector screws.
-
-
Este paso está sin traducir. Ayuda a traducirlo
-
Use a plastic opening tool to flip up the retaining flap on the home button ribbon cable ZIF socket.
-
-
Este paso está sin traducir. Ayuda a traducirlo
-
Use a pair of tweezers to pull the home button ribbon cable out of its socket.
-
-
Este paso está sin traducir. Ayuda a traducirlo
-
Carefully pull, but do not remove, the rubber microphone holder out of its tube in the bottom edge of the iPhone.
-
-
Este paso está sin traducir. Ayuda a traducirlo
-
Remove the two 1.3 mm Phillips screws securing the dock connector to the case of the iPhone.
-
-
Este paso está sin traducir. Ayuda a traducirlo
-
Use a pair of tweezers to remove the small rubber spacer beneath the speaker enclosure mounting ear near the vibrator.
-
-
Este paso está sin traducir. Ayuda a traducirlo
-
Remove the tiny rubber spacer near the dock connector.
-
-
Este paso está sin traducir. Ayuda a traducirlo
-
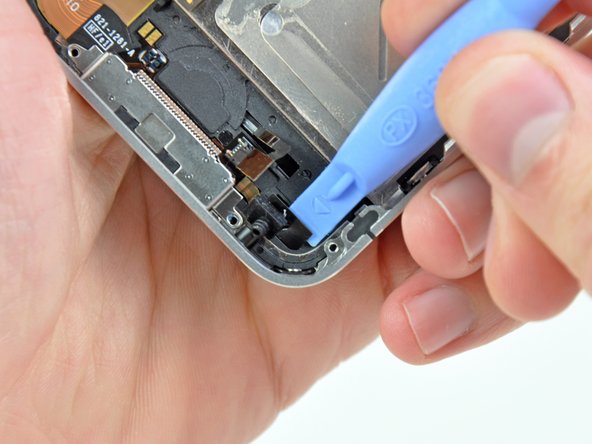
Use the edge of a plastic opening tool to peel the dock connector and its cable off the black plastic case of the iPhone.
-
-
Este paso está sin traducir. Ayuda a traducirlo
-
Pry the dock connector away from its opening at the bottom of the iPhone.
-
Remove the dock connector.
-


Cancelar: No complete esta guía.
117 personas más completaron esta guía.

5 comentarios
So I attempted once to fix the dock connector and failed. A month later I took the phone apart again. The first thing I noticed when taking off the dock connector from the logic board is that it wasn't seated properly. I attached it properly and now the iPhone charges and home button works perfectly!
What about it was not seated properly? any specific contact point? was it not screwed in well if it wasn't seated properly? I just replaced on a friends 4, but it has not turned on yet, and I can't figure it out. It just stopped charging one day so I figured it was a bad port from corrosion or something and replaced it. The swap was easy enough so I'm confused as to why it isn't turning on yet.
Matthew -
New part from IFixit works great. Some tips from my installation:
- PH000 screwdriver works well, but takes some finesse. A little pressure to get the screw going, and don't try to over tighten on the way back in. If you happen to round one out, a 00 or 0 PH screwdriver might get enough bite to get it going.
- Plastic pieces are covering the adhesive on numerous parts of the new dock connector. These are to be removed prior to installation.
- Battery does not have to be removed, so I avoided the risk of breaking something else.
I completed this guide, but unfortunately my phone is in no better shape than it was before the dock replacement. Apparently, this was not the problem. The device won't restore in iTunes. It just sits with the Apple logo and an empty status bar on the screen. Now when I unplug it from the computer, I get a black screen, with just a touch of backlight, but no display otherwise. Before the dock replacement, it always said "Connect to iTunes" but would not restore either. Any thoughts on what else I could try now?